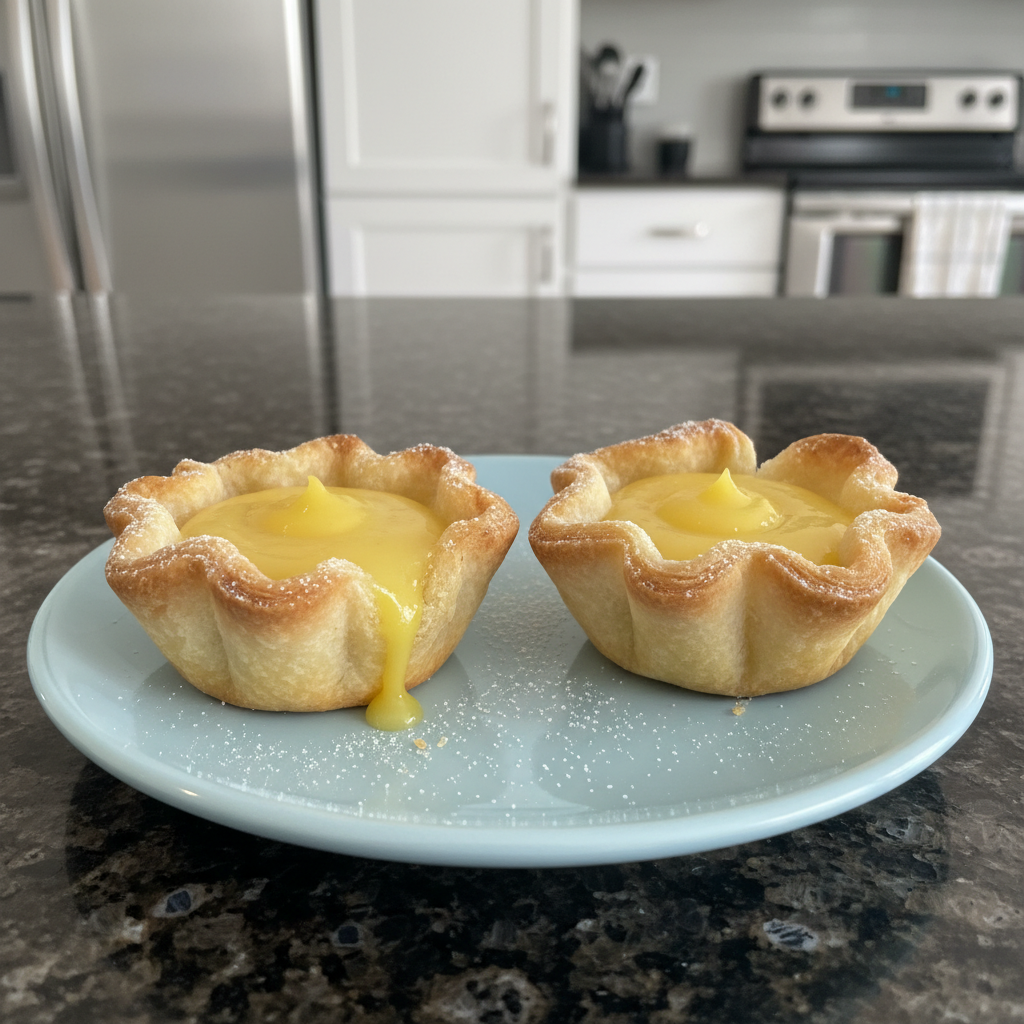
The scent of fresh lemon and sweet pastry always signals spring in my kitchen. As Easter approaches, I find myself drawn to bright, refreshing flavors and visually delightful treats. These mini lemon flower tarts are truly a ray of sunshine on any dessert table. They are the perfect mini lemon flower tarts easter treat, combining tangy lemon with a delicate crust in a charming floral shape. Whether you are a seasoned baker or just starting, this recipe is designed to be easy and enjoyable. I will guide you through preparing the beautiful crusts, creating a luscious lemon filling with a special secret, and assembling these irresistible little desserts.
Why You’ll Love This Recipe
This recipe has a unique twist that sets it apart. I add a thin layer of homemade lemon curd under the main lemon filling. This extra step intensifies the lemon flavor and creates a smoother, more luxurious texture that you will adore. The combination of the bright, tangy filling and the richer, silky curd offers a perfect balance of flavors and mouthfeel. These little pastry desserts are perfect for Easter gatherings, Mother’s Day, or any spring celebration. They are also incredibly visually appealing and festive, making them a centerpiece on your dessert spread. Despite their elegant appearance, they are relatively easy to make with my clear, step-by-step instructions.
Ingredients Needed
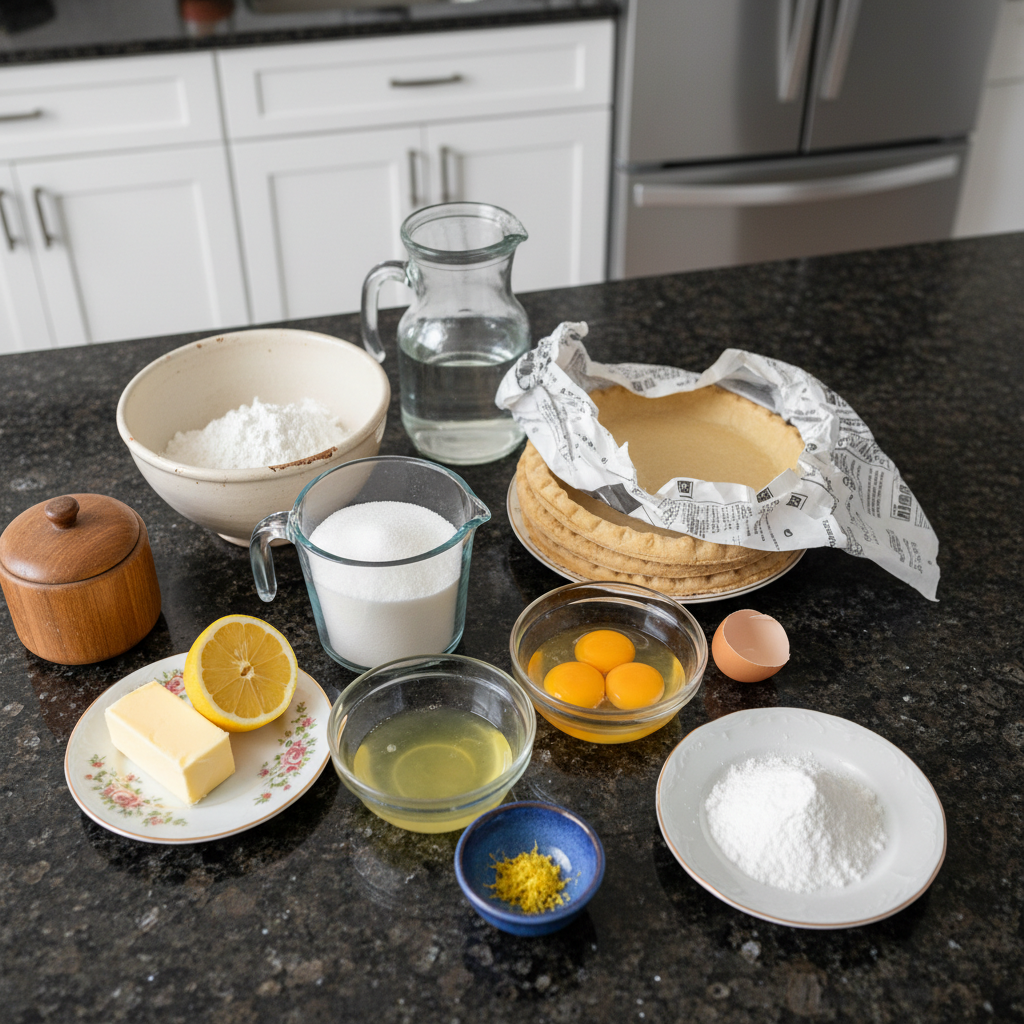
Here are the ingredients you will need to create these wonderful mini lemon flower tarts.
Homemade All Butter Pie Crust or 2 pre-made (ready to roll pie crusts)
4 egg yolks + 1 egg for egg wash
1/3 cup cornstarch
1 1/2 cups water
1 1/3 cups sugar
1/4 teaspoon salt
3 tablespoons butter
1/2 cup lemon juice
1 tablespoon finely grated lemon zest
1 tablespoon powdered sugar
Ingredient Notes & Substitutions
For the pie crust, you have options. My homemade all butter pie crust yields a wonderfully flaky texture, but two pre-made, ready-to-roll pie crusts work beautifully for convenience. If you are looking for a gluten-free pie crust recipe or a store-bought alternative, keeping in mind that the texture might be slightly different. For a dairy-free dessert, substitute a dairy-free butter alternative in both the crust and the lemon filling, and always check labels carefully for hidden dairy.
For the lemon juice, I always recommend using fresh lemon juice for the best, brightest flavor in your lemon filling. Bottled juice can be used in a pinch, but the taste will be subtly different.
Regarding sugar, you can explore alternative sweeteners like agave or stevia for a low sugar version. Be aware that this may require slight adjustments to the texture and overall taste balance of the lemon filling.
When it comes to butter, using unsalted butter for the filling is important. This allows you to control the exact amount of salt in the recipe, ensuring the flavors are perfectly balanced.
How to Make Mini Lemon Flower Tarts Easter
Crafting these delightful mini lemon flower tarts is a joyous process. Follow these steps carefully for the best results.
Step 1: Preparing the Crust
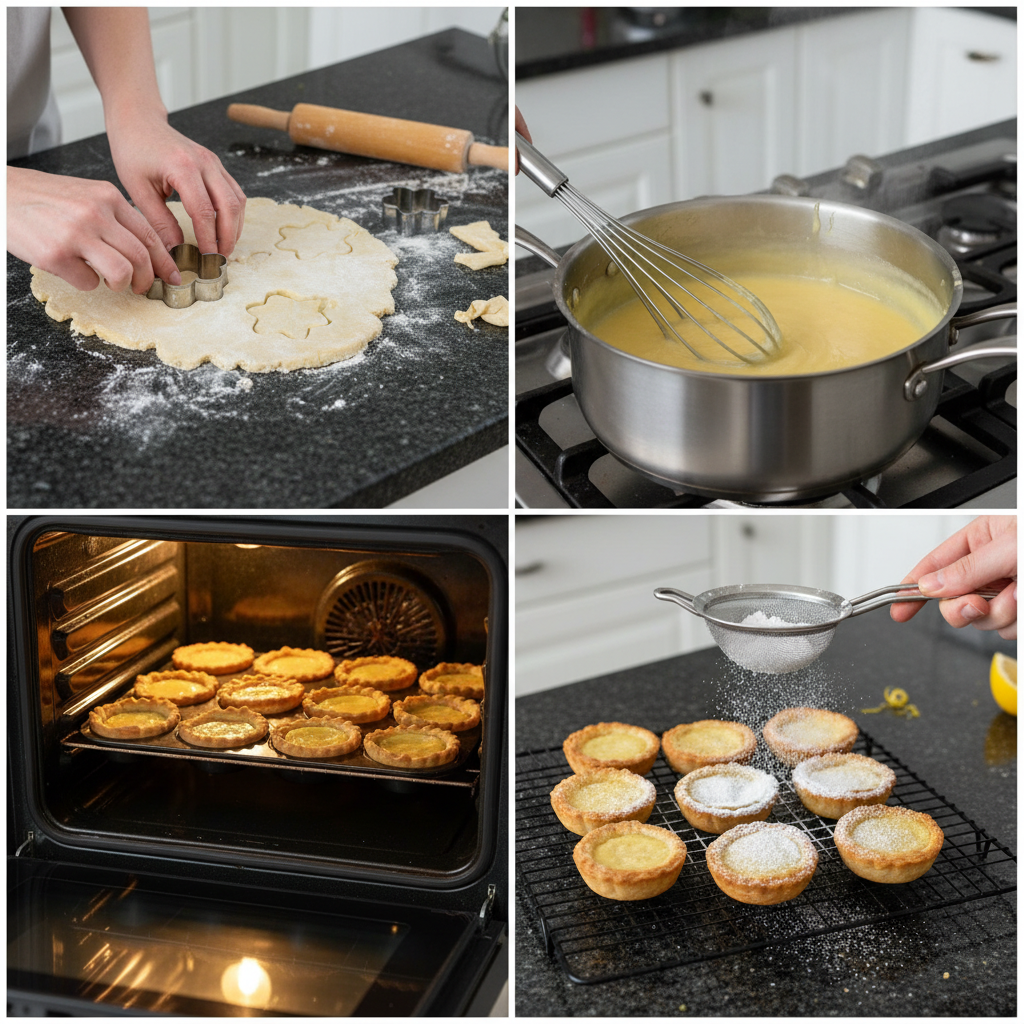
First, preheat your oven to 350 degrees Fahrenheit. Prepare your mini muffin pan by greasing and flouring it thoroughly, or use a nonstick cooking spray. This crucial step helps prevent the tarts from sticking. Set the pan aside. Unroll your pie crusts onto a silicon mat. Using a flower shaped cookie cutter that is 4-inches in diameter from petal tip to petal tip, cut out as many flower shapes as possible. After your first set of flowers is cut, you can gently ball up the dough scraps and roll them out again to cut more. You should be able to get 24 flower shaped dough pieces from two crusts. Place these dough pieces into the mini muffin tins, leaving an empty space between crusts if possible for even baking. Press them gently into the bottom and up the sides of each cup. Prick the bottoms of the crusts with a fork to allow steam to escape during baking, which helps prevent bubbles. For a beautiful finish, brush the top edges of each crust with an egg wash made from one egg. Bake the crusts for 15-20 minutes, or until the edges are golden brown. Watch them closely to prevent overbaking. Once baked, remove them from the oven and let them cool completely in the pan. Once cooled, use the tip of a knife to carefully loosen the crusts from the mini muffin cups.
Step 2: Making the Lemon Filling
While your crusts cool, prepare the luscious lemon filling. Whisk the four egg yolks in a medium-sized mixing bowl and set them aside. In a medium saucepan, combine the cornstarch, water, sugar, and salt. Stir this mixture constantly over medium-low heat until it comes to a boil. Allow it to boil for 1 minute, then remove it from the heat and reduce the heat on your stove to low. Slowly pour half of this hot mixture into your whisked egg yolks in a thin stream, whisking the egg yolks constantly to temper them and prevent scrambling. Then, pour the warmed egg mixture back into the saucepan, continuing to whisk constantly. Return the saucepan to the stove and cook for an additional 3 minutes, stirring constantly. This continuous whisking is key to preventing lumps and ensuring a smooth, thick, and glossy filling. Remove the pan from the heat and stir in the fresh lemon juice and finely grated lemon zest. Finally, whisk in the butter one tablespoon at a time, until each piece is fully incorporated and the filling is smooth and rich.
Step 3: Assembling and Finishing
Now it is time to assemble your beautiful tarts. Spoon the warm lemon filling mixture into each baked and cooled mini tart crust, filling them almost up to the top but being careful not to overfill. The filling will set as it cools. For the best presentation, dust the tops of the tarts with powdered sugar just before serving. The moist lemon filling in the center will absorb the sugar after a few minutes, leaving a beautiful powdered sugar outline only on the petals.
Preventing Tart Crust Shrinkage
It can be frustrating when your beautiful tart crusts shrink during baking. This often happens because the gluten in the flour tightens when exposed to heat, especially if the dough is overworked or not properly chilled. To prevent this, I have a few expert tips. First, thoroughly chill your dough before you roll it out and cut your flower shapes. Cold dough is less likely to shrink. Secondly, when blind baking your crusts, you can use pie weights or even dried beans to hold the dough in place. Line the unbaked crusts with parchment paper, then fill them with weights. Avoid overworking the dough, as this develops gluten too much, leading to a tough, shrink-prone crust. Finally, always prick the bottom of your crusts with a fork. This allows any steam to escape, preventing the crust from puffing up and shrinking away from the sides of the pan.
Pro Tips & Troubleshooting
Here are some of my top pro tips and common mistakes to avoid to ensure your mini lemon flower tarts are absolutely perfect for your Easter celebration.
Pro Tips
Using a high-quality mini muffin pan will ensure your tarts bake evenly and release easily. Grate the lemon zest finely to avoid any bitter pieces in your smooth lemon filling. Let the lemon filling cool slightly before you spoon it into the baked crusts. This helps prevent the crusts from becoming soggy. Dust the tarts with powdered sugar right before serving for the best visual appeal and a fresh finish. For an even richer lemon flavor, you can make a thin layer of homemade lemon curd a day ahead and spread it in the bottom of the tart shells before adding the main lemon filling. For easier cleanup, consider using mini muffin liners, though they might obscure the flower shape slightly.
Common Mistakes to Avoid
Be careful not to overbake the crusts. Watch them closely in the oven to prevent burning; you want them golden around the edges, not dark brown. Using too much lemon juice can throw off the balance, making the filling overly acidic. Make sure to stick to the recipe’s measurements for a perfect balance of tang and sweetness. Not chilling the dough properly is a common mistake that can lead to a tough crust. Always ensure your dough is well-chilled before rolling and cutting. Avoid overmixing the lemon filling after it has thickened, as this can cause it to become rubbery. When adding the butter to the filling, add it one tablespoon at a time, whisking until each piece is fully incorporated before adding the next. This ensures a smooth, emulsified filling.
Serving & Storage
These mini lemon flower tarts are wonderful for any occasion, especially for spring and Easter.
Serving Ideas
Serve these delightful tarts chilled or at room temperature. They are lovely either way. Garnish them with fresh berries like raspberries or blueberries, and a sprig of fresh mint for a pop of color and freshness. For an extra special touch, pair them with a small scoop of vanilla ice cream or a dollop of freshly whipped cream. They also make a fantastic addition to an Easter dessert spread, alongside other treats. Enjoy them with a warm cup of tea or coffee for a truly comforting experience.
Storage and Make-Ahead
To store your mini lemon flower tarts, place them in an airtight container in the refrigerator for up to 3 days. This recipe is also great for making ahead. You can prepare the crust and the lemon filling separately in advance and assemble them just before you plan to serve. The lemon filling can be made up to 2 days ahead of time and stored in an airtight container in the refrigerator. The baked tart shells can be kept at room temperature in an airtight container for up to 2 days. This flexibility makes them perfect for party preparation.
Conclusion
I hope you are excited to try these truly delicious and surprisingly easy mini lemon flower tarts. Their charming floral shape and the secret, luxurious lemon curd layer ensure an extra burst of intense lemon flavor that will delight everyone. These mini lemon flower tarts easter are a perfect addition to any celebration, especially for the spring holidays. I encourage you to try this recipe in your own kitchen and share your beautiful creations. Explore other wonderful Easter dessert recipes on my blog for more inspiration. Print this recipe and make it for your next Easter celebration!
FAQ
How far in advance can I make the lemon filling?
You can make the lemon filling up to 2 days in advance. Store it in an airtight container in the refrigerator.
How do I prevent the tart crust from shrinking while baking?
To prevent shrinking, chill the dough thoroughly before rolling, use pie weights during blind baking, and avoid overworking the dough. Pricking the bottom of the crust with a fork also helps.
What’s the best way to store the mini lemon tarts?
Store the tarts in an airtight container in the refrigerator for up to 3 days.
Can these tarts be frozen?
Yes, you can freeze the baked tarts. Wrap them individually in plastic wrap and then place them in a freezer-safe container. They can be frozen for up to 2 months. Thaw them in the refrigerator before serving.
What other types of crusts would work well with this recipe?
A graham cracker crust or a shortbread crust would also be delicious with this lemon filling. You could also try a gluten-free crust for dietary needs.
Can I use a different citrus fruit instead of lemon?
Yes, you can use lime, orange, or grapefruit juice and zest for a different flavor profile. Remember to adjust the amount of sugar as needed to balance the acidity of the different citrus fruits.
Where can I get the petal cut outs?
You can find flower-shaped cookie cutters at most craft stores or online retailers. Look for a 4-inch diameter cutter for the best results for these mini tarts.
Mini Lemon Flower Tarts
Ingredients
Equipment
Method
- Preheat your oven to 350 degrees Fahrenheit (175°C). Prepare your mini muffin pan by greasing and flouring it thoroughly, or use a nonstick cooking spray.
- Unroll your pie crusts onto a silicon mat. Using a 4-inch flower-shaped cookie cutter (from petal tip to petal tip), cut out as many flower shapes as possible. Gently ball up dough scraps and roll them out again to cut more, aiming for 24 flower-shaped dough pieces from two crusts.
- Place these dough pieces into the mini muffin tins, leaving an empty space between crusts if possible for even baking. Press them gently into the bottom and up the sides of each cup.
- Prick the bottoms of the crusts with a fork to allow steam to escape during baking.
- Brush the top edges of each crust with an egg wash made from one egg.
- Bake the crusts for 15-20 minutes, or until the edges are golden brown. Watch them closely to prevent overbaking. Once baked, remove them from the oven and let them cool completely in the pan.
- Once cooled, use the tip of a knife to carefully loosen the crusts from the mini muffin cups.
- Whisk the four egg yolks in a medium-sized mixing bowl and set them aside.
- In a medium saucepan, combine the cornstarch, water, sugar, and salt. Stir this mixture constantly over medium-low heat until it comes to a boil. Allow it to boil for 1 minute, then remove it from the heat.
- Reduce the heat on your stove to low. Slowly pour half of this hot mixture into your whisked egg yolks in a thin stream, whisking the egg yolks constantly to temper them and prevent scrambling.
- Then, pour the warmed egg mixture back into the saucepan, continuing to whisk constantly.
- Return the saucepan to the stove and cook for an additional 3 minutes, stirring constantly. This continuous whisking is key to preventing lumps and ensuring a smooth, thick, and glossy filling.
- Remove the pan from the heat and stir in the fresh lemon juice and finely grated lemon zest.
- Finally, whisk in the butter one tablespoon at a time, until each piece is fully incorporated and the filling is smooth and rich.
- Spoon the warm lemon filling mixture into each baked and cooled mini tart crust, filling them almost up to the top but being careful not to overfill. The filling will set as it cools.
- For the best presentation, dust the tops of the tarts with powdered sugar just before serving. The moist lemon filling in the center will absorb the sugar after a few minutes, leaving a beautiful powdered sugar outline only on the petals.
Notes

Sophie Reynolds is a baking specialist and dessert contributor at YumEasyMeals. She develops approachable, family-friendly dessert recipes focused on flavor, simplicity, and reliable results for everyday home cooks.