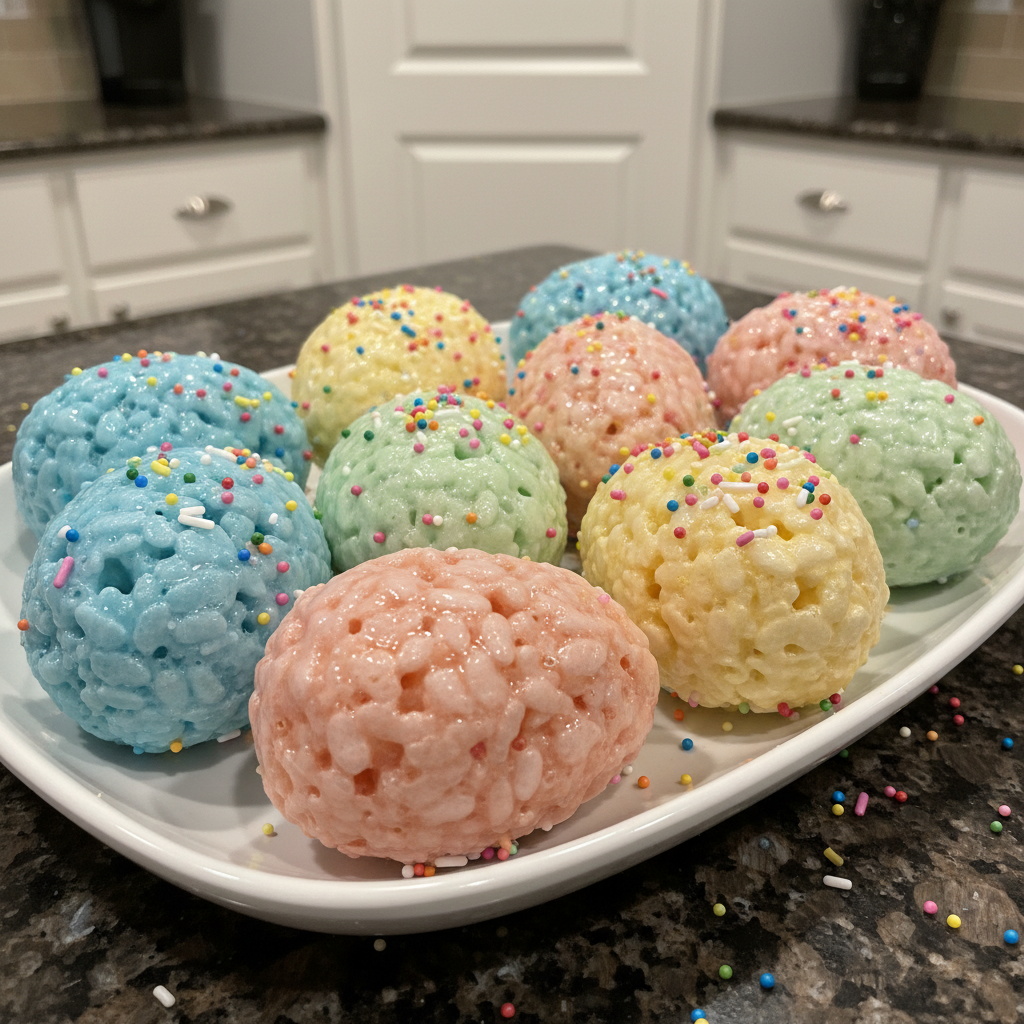
Easter is around the corner, and I know many of us dream of creating those picture-perfect, uniformly shaped treats. Often, our homemade delights end up a little lumpy or misshapen, don’t they? If you have ever struggled to get your treats to look as good as they taste, I have the perfect solution for you. These Rice Krispies Easter Egg Treats are not only delicious but also perfectly shaped every time, thanks to a simple trick. I am so excited to share my go-to recipe for making beautiful rice krispies easter egg treats molded with ease. You will learn how to achieve uniformly shaped Rice Krispie Easter eggs using plastic Easter egg molds, how to decorate them beautifully, and how to troubleshoot any common issues along the way.
Why You’ll Love This Recipe
Forget uneven, lumpy eggs! Our secret is using food-safe plastic Easter egg molds to create perfectly shaped Rice Krispies Easter Eggs every single time. This unique twist elevates a simple classic into a showstopper.
Here is why using molds makes all the difference:
Uniformity is guaranteed, ensuring each Easter egg is the same size and shape, which is lovely for display. The smooth surface from the mold provides a flawless canvas for decorating with melted chocolate and vibrant sprinkles. You will achieve a professional look, making your homemade treats bakery-worthy and impressive.
Beyond the flawless finish, these treats offer wonderful benefits. They are a family-friendly activity, making it a fun project to do with kids in the kitchen. The process is quick and easy, with minimal baking time required. The visually appealing results will truly impress your guests with these adorable dessert treats. If you love easy, no-bake creations, be sure to also check out our easy no-bake carrot cake truffles recipe.
Ingredients Needed
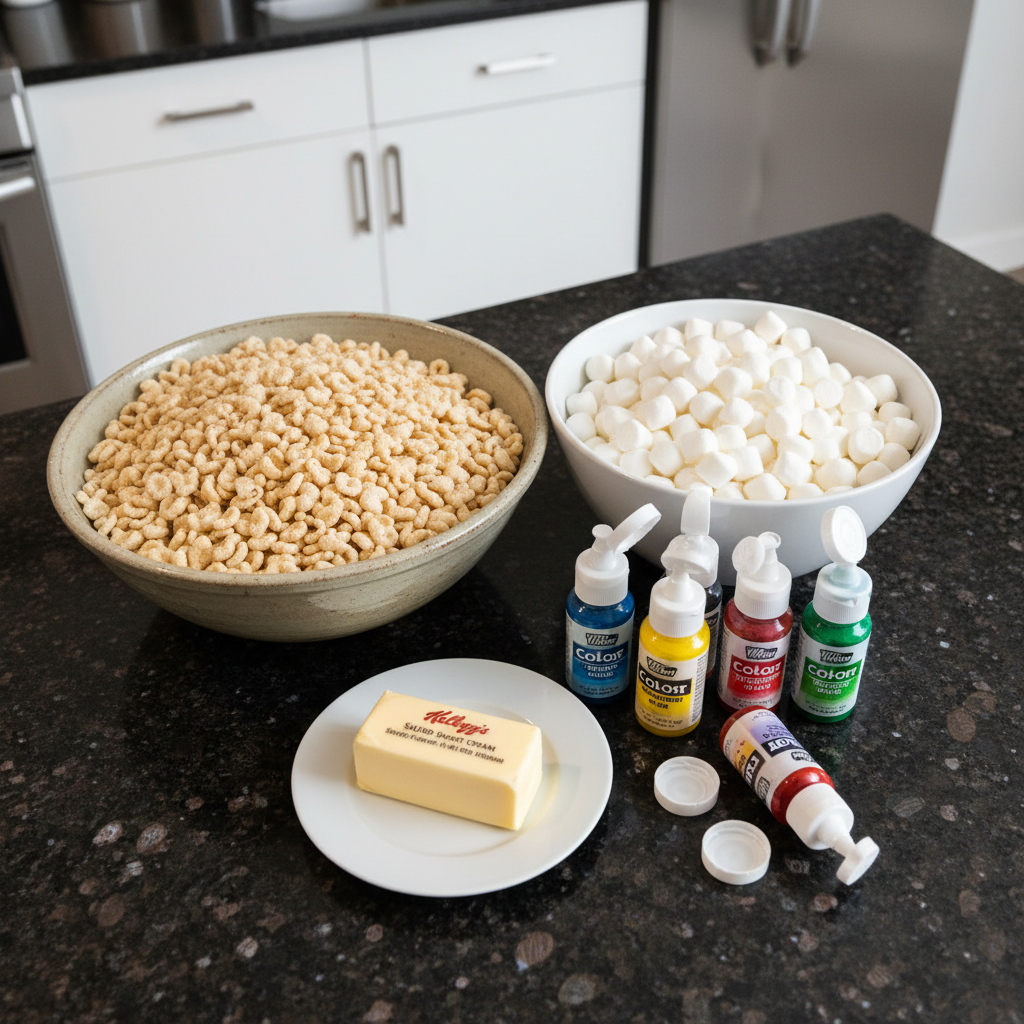
- 15 cups Kellogg’s Rice Krispies Cereal
- 15 tablespoons Butter (We use Salted, Sweet Cream Butter)
- 15 cups Mini Marshmallows
- Wilton Color Right Food Coloring
Ingredient Notes & Substitutions
For the butter, I prefer using salted sweet cream butter because it adds a wonderful depth of flavor to the treats. However, unsalted butter works perfectly fine too. For those needing a vegan option, dairy-free butter alternatives are a great substitute and yield excellent results.
When it comes to mini marshmallows, freshness is key. Fresh marshmallows melt much more smoothly, creating that perfect gooey texture. While marshmallow cream can be used in a pinch, I find it sometimes makes the treats a bit chewier and less traditional.
Regarding food coloring, I always recommend gel food coloring, specifically Wilton Color Right. It provides incredibly vibrant pastel colors without adding excess liquid to the mixture, which can alter the texture. Liquid food coloring can make the Rice Krispie mixture too sticky.
Of course, Rice Krispie cereal is the star here. If Kellogg’s Rice Krispies are unavailable, you can use other crispy Rice Krispie cereal brands. Just be aware that the taste and texture might vary slightly from the original recipe.
How to Make Rice Krispies Easter Egg Treats Molded
To create a beautiful rainbow of Easter eggs, you will need to make five separate batches of Rice Krispie Treat mixture, one for each of the five Easter Egg colors: Yellow, Green, Blue, Purple and Pink. Below are the directions for a single batch of Rice Krispie Easter Eggs.
Prepare the Marshmallow Mixture
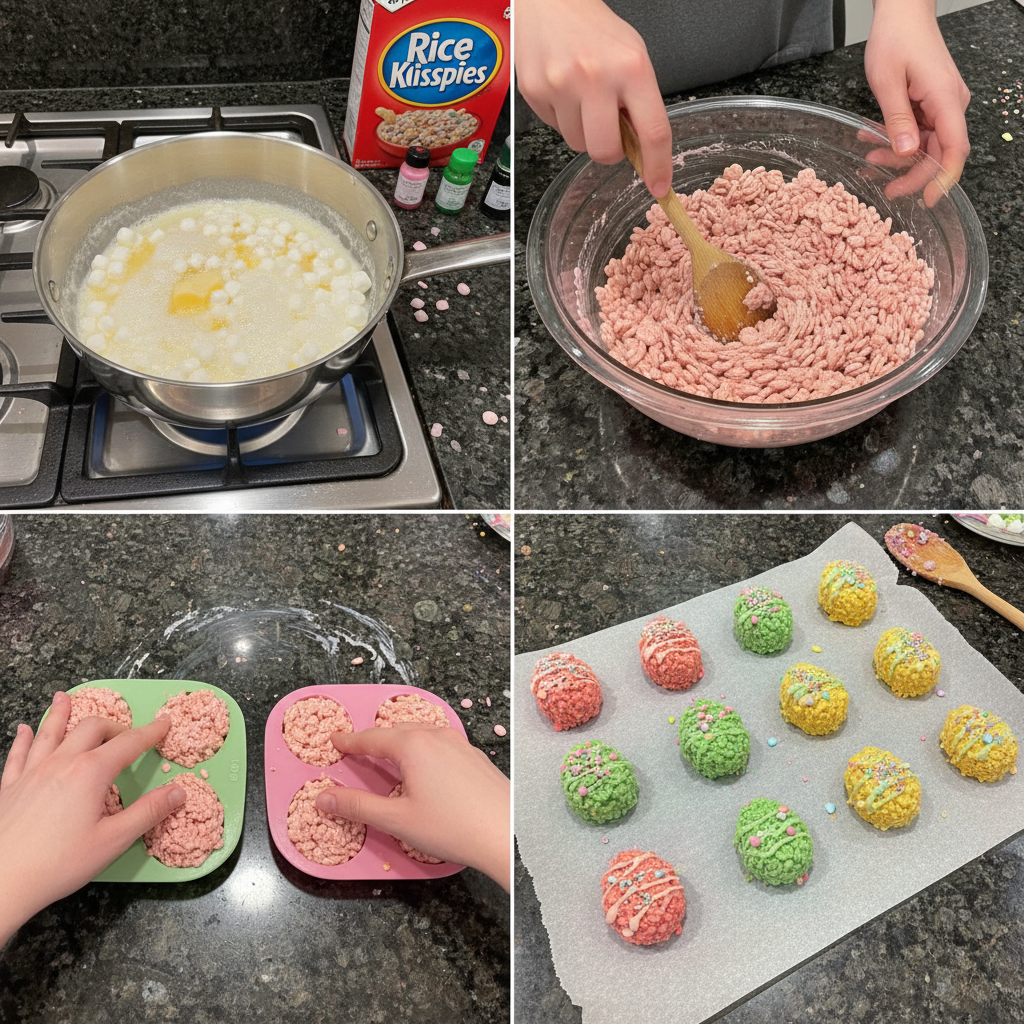
First, melt 3 tablespoons of butter in a medium pan over low heat to prevent burning. The butter should melt completely and become fragrant, filling your kitchen with a lovely aroma. Next, add 3 cups of mini marshmallows to the pan. Stir constantly until the marshmallows are completely melted, transforming into a smooth, gooey mixture. This constant stirring prevents sticking and ensures an even melt.
Take the pan off the heat. Then, add your desired food coloring a few drops at a time until you reach the desired vibrant color. Mix thoroughly to ensure even distribution throughout the marshmallow mixture.
Combine with Cereal
Now, add 3 cups of Rice Krispie cereal to the colored marshmallow mixture. Gently fold in the cereal to avoid crushing it, ensuring every piece is coated beautifully with the sweet, colorful marshmallow. This creates that delightful, chewy texture we all love.
Allow the Rice Krispie mixture to cool slightly. This step is important because it makes the mixture easier to handle without burning your hands during the molding process.
Mold the Easter Eggs
To prevent sticking, I always butter my hands before this step. Pack the slightly cooled Rice Krispie Treat mixture TIGHTLY into your plastic Easter egg molds, ensuring every crevice is filled. You might need to slightly overfill the mold, then use a spoon or your finger to scrape off the excess, creating a flat surface on one side of the egg. Carefully and gently open the mold to release the perfectly shaped Rice Krispie Easter egg.
Allow the molded Rice Krispie bites to cool completely on a parchment-lined baking sheet until firm. Repeat this entire process for the other four Easter Egg colors, creating a stunning array of pastel treats.
Decorating Your Rice Krispies Easter Eggs
Now for the fun part: decorating these perfectly molded Rice Krispie Easter eggs! This is where you can truly let your creativity shine and turn simple treats into edible art. For more inspiration on intricate designs, you might enjoy learning how to make edible flower decorated cookies.
Melting the Chocolate
For the best decorating results, I recommend using good quality melting wafers or chocolate chips combined with a tiny bit of coconut oil. The coconut oil helps thin the chocolate slightly, making it smoother for dipping and drizzling. You can melt the chocolate in the microwave in short 20-30 second intervals, stirring well after each, or use a double boiler on the stovetop. Be careful not to overheat the chocolate, as this can cause it to seize and become thick and unusable.
Applying the Chocolate
You have a couple of options for applying the melted chocolate. For a full coating, gently dip one half of the Rice Krispie Easter egg into the melted chocolate, letting any excess drip off before placing it on parchment paper. For a more artistic look, use a spoon or a piping bag with a small hole cut in the tip to drizzle patterns over the eggs. A smooth, even coating or elegant drizzle instantly elevates the appearance.
Sprinkles and Other Decorations
While the chocolate is still wet, it is the perfect time to add your sprinkles and other decorations. Jimmies, nonpareils, and sanding sugar are classic choices that add delightful texture and sparkle. You can also use edible glitter for an extra magical touch, or attach small candies with a dab of melted chocolate. Candy melts in various colors are also fantastic for creating contrasting patterns or dipping entire eggs. Get creative with different designs and textures!
Setting the Chocolate
Once your Rice Krispie Easter eggs are decorated, you need to set the chocolate. Place them on a parchment-lined baking sheet. To speed up the process, you can refrigerate them for about 10-15 minutes until the chocolate is firm. This ensures your beautiful decorations stay put.
Pro Tips & Troubleshooting
Pro Tips
I always use food-safe gloves when handling the Rice Krispie mixture. This prevents the sticky mixture from adhering to my hands and makes the molding process much easier and cleaner.
Lightly greasing the inside of your plastic Easter egg molds with butter or cooking spray is a game-changer for easy release. Your perfectly shaped eggs will pop right out.
Work quickly while the Rice Krispie mixture is still warm and pliable. As it cools, it becomes harder to mold effectively, so speed is your friend here.
For a truly professional finish, use a small offset spatula to smooth the surface of the eggs in the molds before closing them. This helps create a flawless canvas for decorating.
When melting chocolate for dipping, use a shallow dish. This makes it much easier to coat the eggs evenly without using an excessive amount of chocolate.
After decorating, chill your eggs briefly in the refrigerator to set the chocolate quickly. This prevents smudging and ensures your decorations are firm.
Common Mistakes to Avoid
Don’t overheat the marshmallows! If you do, the mixture will become hard and brittle once cooled, rather than deliciously chewy.
Avoid using too much liquid food coloring, as it can make the Rice Krispie mixture excessively sticky and difficult to handle. Gel food coloring is always preferred.
Don’t skip cooling the mixture slightly before molding. It will be too hot to handle comfortably, and you risk burning your hands.
Avoid overfilling the molds. While a slight overfill for scraping is fine, too much mixture can make the eggs difficult to release cleanly.
Do not store decorated Rice Krispie treats in a warm place. The chocolate can melt, and the Rice Krispie treats will become sticky and lose their shape.
Serving & Storage
Serving Ideas
These beautiful Rice Krispies Easter egg treats are perfect for any Easter celebration. Display the colorful eggs in a decorative Easter basket as a centerpiece. You can also wrap them individually in cellophane bags with a pretty ribbon to create charming party favors. They make wonderful edible decorations on an Easter dessert table, adding a festive touch. Serve them alongside other Easter treats like cookies and cupcakes for a delightful spread.
Storage and Make-Ahead
Undecorated Rice Krispie Easter eggs can be stored in an airtight container at room temperature for up to 3 days, maintaining their freshness and chewy texture. Once decorated with melted chocolate and sprinkles, store the eggs in an airtight container in the refrigerator for up to 1 week. I often make the eggs 1-2 days in advance and then decorate them on the day of serving to ensure they look their best. Freezing is generally not recommended for Rice Krispie treats, as it can significantly affect their texture, making them too hard or crumbly.
Conclusion
And there you have it, a foolproof method for creating perfectly molded Rice Krispies Easter Egg Treats! I truly hope you enjoy making these as much as I do. The simple steps, combined with these helpful tips, make this recipe accessible for everyone, from beginner bakers to seasoned kitchen pros.
Don’t be afraid to experiment with different colors, decorations, and even various mix-ins like chocolate chips or mini candies folded into the mixture for an extra treat. For another quick and wholesome no-bake snack, consider trying our delicious no-bake energy bites. The possibilities are endless!
Print this recipe and share your colorful creations with us! Happy Easter baking!
FAQ
How do I prevent the Rice Krispie mixture from sticking to my hands?
Lightly butter your hands or wear food-safe gloves. This will prevent the mixture from sticking and make it easier to shape.
How do I store Rice Krispie Easter Eggs?
Store undecorated eggs in an airtight container at room temperature for up to 3 days. Decorated eggs should be stored in an airtight container in the refrigerator for up to 1 week.
What kind of food coloring should I use to get the best results?
Gel food coloring, such as Wilton Color Right, is recommended for vibrant colors without adding excess liquid.
How do I get the perfect egg shape and a smooth surface?
Using food-safe plastic Easter egg molds is the key! Pack the Rice Krispie mixture tightly into the molds, slightly overfill, and scrape off the excess for a flat surface. Lightly greasing the molds also helps.
How can I add decorations to the Rice Krispie treats?
Melt chocolate and drizzle or dip the eggs, then add sprinkles, edible glitter, or small candies while the chocolate is still wet.
How long will the Rice Krispie Easter Eggs last?
Undecorated eggs will last up to 3 days at room temperature. Decorated eggs stored in the refrigerator will last up to 1 week.
Can I make these vegan?
Yes! Use vegan butter and marshmallows. Check labels carefully, as some brands may contain gelatin.
Rice Krispies Easter Egg Treats: Perfectly Molded!
Ingredients
Equipment
Method
- In a medium pan over low heat, melt 3 tablespoons of butter, being careful to prevent burning.
- Add 3 cups of mini marshmallows to the pan. Stir constantly until the marshmallows are completely melted and form a smooth, gooey mixture.
- Remove the pan from the heat. Then, add your desired gel food coloring a few drops at a time until you reach the desired vibrant color. Mix thoroughly to ensure even distribution.
- Now, add 3 cups of Rice Krispie cereal to the colored marshmallow mixture. Gently fold in the cereal to avoid crushing it, ensuring every piece is coated beautifully.
- Allow the Rice Krispie mixture to cool slightly. This step makes the mixture easier to handle without burning your hands.
- Lightly butter your hands or wear food-safe gloves to prevent sticking. Lightly grease the inside of your plastic Easter egg molds with butter or cooking spray.
- Pack the slightly cooled Rice Krispie Treat mixture TIGHTLY into your plastic Easter egg molds, ensuring every crevice is filled. You might need to slightly overfill the mold, then use a spoon or your finger to scrape off the excess, creating a flat surface on one side.
- Carefully and gently open the mold to release the perfectly shaped Rice Krispie Easter egg. Allow the molded Rice Krispie bites to cool completely on a parchment-lined baking sheet until firm.
- Repeat this entire process (from 'Prepare the Marshmallow Mixture' to 'Mold the Easter Eggs') for the other four Easter Egg colors, creating a stunning array of pastel treats (Yellow, Green, Blue, Purple, Pink).
- Melt good quality melting wafers or chocolate chips combined with a tiny bit of coconut oil. You can melt the chocolate in the microwave in short 20-30 second intervals, stirring well after each, or use a double boiler on the stovetop. Be careful not to overheat the chocolate.
- For a full coating, gently dip one half of the Rice Krispie Easter egg into the melted chocolate, letting any excess drip off before placing it on parchment paper. For an artistic look, use a spoon or a piping bag with a small hole cut in the tip to drizzle patterns over the eggs.
- While the chocolate is still wet, add sprinkles (jimmies, nonpareils, sanding sugar), edible glitter, or attach small candies with a dab of melted chocolate. Get creative with different designs and textures!
- Once your Rice Krispie Easter eggs are decorated, place them on a parchment-lined baking sheet. To speed up the process, refrigerate them for about 10-15 minutes until the chocolate is firm.
Notes

Sophie Reynolds is a baking specialist and dessert contributor at YumEasyMeals. She develops approachable, family-friendly dessert recipes focused on flavor, simplicity, and reliable results for everyday home cooks.