Easter is a time for joyful celebrations, family gatherings, and of course, delightful treats. There is something truly special about making desserts that bring smiles to everyone’s faces, especially when little hands can help in the kitchen. Today, I am thrilled to share my recipe for the most adorable and delicious Easter Oreo truffles with white chocolate. This no-bake dessert is a springtime dream, perfect for filling Easter baskets or enjoying after a festive meal. If you’re looking for other fun, no-bake options, you might also enjoy making some easy bunny Oreo balls. You will learn how to create perfectly balanced, festive truffles that are surprisingly easy to make, even if you are new to baking.
Why You’ll Love This Recipe
Balanced Flavor: My secret ingredient, a tiny pinch of sea salt, elevates these truffles from simply sweet to perfectly balanced. The salt delicately cuts through the richness of the white chocolate and cream cheese, creating a harmonious flavor that is truly addictive. It is a subtle but impactful twist that makes all the difference.
No-Bake Convenience: You will appreciate that these delightful truffles require absolutely no baking. This means less time in a hot kitchen and more time enjoying the spring weather. They are quick to assemble and perfect for those busy holiday preparations.
Family-Friendly Fun: This recipe is wonderfully engaging for all ages. Kids especially love helping to crush the Oreos, roll the truffle balls, and, of course, add the colorful Easter-themed sprinkles. For more simple and fun kid-friendly baking, consider making Rice Krispies Easter egg treats. It is a fantastic way to create lasting memories together.
Perfect for Gifting: These charming pastel truffles make excellent edible gifts. Arrange them in decorative boxes or bags for Easter baskets, hostess gifts, or a lovely surprise for neighbors and friends. For another delightful Easter treat perfect for gifting, try these irresistible Cadbury Egg cookie cups. They are a thoughtful and delicious way to spread some holiday cheer.
Ingredients Needed
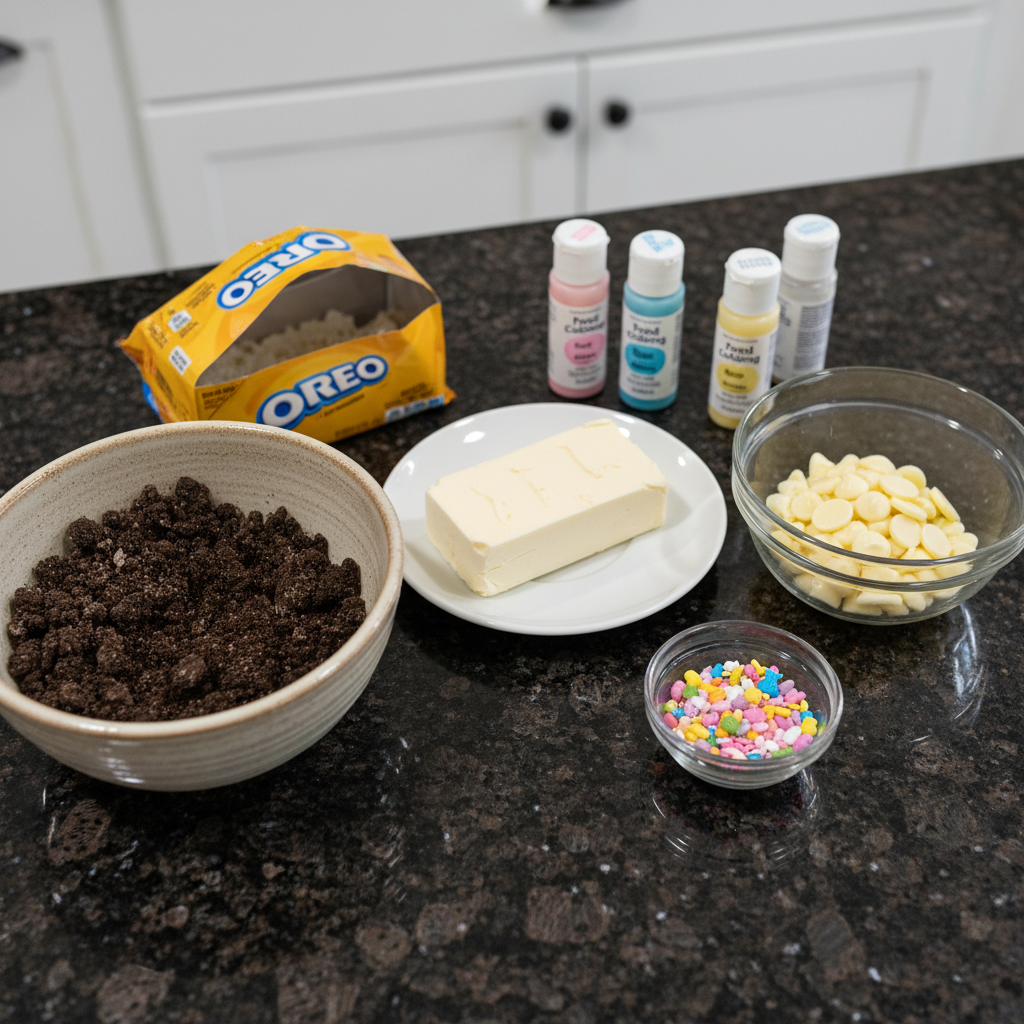
- 1 (350g) package Golden Oreos
- 8 ounces (225g) cream cheese (softened)
- 4 cups (680g) white chocolate chips or candy coating
- Pastel-colored food coloring (see notes)
- Easter-themed or pastel-colored sprinkles
Ingredient Notes & Substitutions
Golden Oreos: While I adore the light flavor of Golden Oreos for these Easter Oreo truffles with white chocolate, you can certainly experiment with other varieties. Regular chocolate Oreos will give you a classic flavor, or try Lemon Oreos for a zesty twist.
Cream Cheese: For the best texture and richness, I always recommend using full-fat cream cheese. Make sure it is softened to room temperature for a lump-free mixture. If you are short on time, a quick 15-second microwave session can help it soften up nicely.
White Chocolate Chips or Candy Coating: You have options here. White chocolate chips provide a richer, more traditional chocolate flavor. Candy coating, also known as melting wafers, is designed to melt smoothly and set quickly, making it easier to work with. You can also find pre-colored candy coatings to save a step with food coloring.
Food Coloring: For vibrant, streak-free colors, I strongly recommend using gel food coloring. Oil-based gel food colorings are ideal when working with chocolate as they blend beautifully without causing the chocolate to seize.
Sprinkles: This is where you can truly let your Easter creativity shine. Choose a variety of Easter-themed sprinkles, pastel jimmies, nonpareils, or even tiny edible pearls. A mix of shapes and sizes adds wonderful visual interest to your finished truffles.

How to Make Easter Oreo truffles with white chocolate
Step 1: Crush the Oreos
In the bowl of a large food processor, add your Golden Oreo cookies. Pulse them until they form very fine crumbs, resembling sand. If you do not have a food processor, you can place the cookies in a sturdy Ziploc bag and crush them with a rolling pin until they are finely ground.
Step 2: Mix with Cream Cheese and Salt
Add the softened cream cheese to the Oreo crumbs in the food processor. Now, for my secret ingredient: add a tiny pinch, about 1/8 teaspoon, of sea salt. Blend the mixture until it is completely smooth and creamy, with no lumps of cream cheese visible. The mixture should be thick and pliable, easily formable into balls. Remove the mixture from the bowl, cover it, and refrigerate for 30 minutes to allow it to firm up. This chilling step is essential for easier handling.
Step 3: Shape the Truffles
While your truffle mixture is chilling, prepare a baking sheet by lining it with parchment paper. Once the mixture is firm, use a small cookie scoop or a spoon to portion out the truffle mixture. Each portion should be roughly 1.5 tablespoons in volume. Roll each portion between the palms of your hands until it forms a smooth, round ball. Place the shaped truffle balls onto your prepared baking sheet.
Step 4: Freeze the Truffles
Once all your truffles are shaped, cover the baking sheet and transfer it to the freezer for 15 minutes. Freezing them briefly ensures they are firm enough to dip without falling apart, giving you a perfectly coated truffle.
Step 5: Melt the Chocolate
While the truffles are freezing, it is time to melt your white chocolate chips or candy coating. Follow the package directions carefully. You can melt it gently in the microwave in short 30-second intervals, stirring between each, or use a double boiler on the stovetop for even, gentle heat.
Step 6: Color the Chocolate (optional)
If you wish to create a variety of pastel colors for your Easter Oreo truffles, separate the melted candy coating into 4 small bowls. Add a drop or two of pastel-colored gel food coloring to each bowl. Mix thoroughly until the color is smooth and vibrant, with no streaks visible. You can, of course, simply use one color or leave the white chocolate uncolored.
Step 7: Dip the Truffles
Working quickly, retrieve your chilled Oreo truffle balls from the freezer. Lower each truffle ball one at a time into the melted candy coating. Use a fork to lift the truffle out, allowing any excess coating to drip back into the bowl. This helps ensure a smooth, even layer of chocolate.
Step 8: Decorate
Gently place the coated Oreo truffle balls back onto your parchment-lined baking sheet. Before the chocolate sets, drizzle additional colors of melted candy coating over each truffle ball if desired, creating pretty patterns. Immediately top with your chosen Easter-themed sprinkles. Allow the truffles to sit undisturbed until the coating is completely set and hardened before serving.
Tips for Melting White Chocolate (Without Seizing!)
Melting white chocolate can sometimes be tricky, but it does not have to be intimidating. The key is to understand what causes it to seize and how to prevent it. Seizing happens when even a tiny amount of water gets into the chocolate, or when it gets too hot too quickly.
Always use a low and slow heat when melting white chocolate. A double boiler method is fantastic because it provides indirect, gentle heat. If you are using a microwave, use a microwave-safe bowl and heat in short bursts, like 15-30 second intervals, stirring well after each one.
Another critical point is to avoid any water contamination. Ensure your bowl and any utensils you use are completely dry. Even a single drop of water can cause the chocolate to clump and thicken.
Stir your melting chocolate frequently but gently. This helps distribute the heat evenly and prevents hot spots that can scorch the chocolate.
If your white chocolate does seize up, do not despair. You can often rescue it. Try adding a teaspoon of vegetable oil or coconut oil at a time to the seized chocolate, stirring vigorously until it becomes smooth again. It might slightly alter the consistency, but it will still be usable for dipping.
Achieving a Smooth, Even Chocolate Coating
Getting that perfectly smooth, glossy chocolate coating on your truffles is all about technique and preparation. It makes a big difference in the final presentation of your Easter Oreo truffles with white chocolate.
First, always ensure your truffle centers are thoroughly chilled or even frozen. Cold truffles help the warm chocolate set more quickly and prevent the truffle base from melting and mixing with your coating.
Use the right tools. A regular dinner fork can work, but a candy dipping fork or a set of dipping tools will give you more control and allow excess chocolate to drain off more efficiently.
Work quickly once you start dipping. If your chocolate starts to cool and thicken too much, it will be harder to get a smooth coat. You might need to gently reheat your chocolate if you are dipping a large batch.
After dipping, gently tap the fork against the side of the bowl to encourage any excess chocolate to drip off. This prevents a thick “foot” from forming at the bottom of your truffles.
For an extra thick and decadent coating, you can allow the first layer to set completely, then double dip your truffles. Just make sure the second dip is also done quickly to prevent melting the first layer.
Pro Tips & Troubleshooting
Pro Tips
Use a food processor for the smoothest truffle base. This ensures your Golden Oreos are finely crushed and blend perfectly with the cream cheese. If you do not have one, a Ziploc bag and a rolling pin will work for crushing the cookies, but the texture might be slightly different.
Do not skip the chilling and freezing steps. They are crucial for easy handling and ensure your truffle balls hold their shape during dipping. Cold truffles mean less mess.
Microwave your cream cheese for 15 seconds if you forgot to let it come to room temperature. Softened cream cheese blends much more smoothly.
Use gel food coloring for vibrant colors that do not thin or seize your white chocolate. Oil-based options are always best for chocolate work.
If the candy coating seizes up, add a teaspoon of coconut or vegetable oil. Stir it in thoroughly to bring back a smoother consistency.
Add a tiny pinch of sea salt to enhance sweetness. This simple trick balances the rich flavors beautifully.
Common Mistakes to Avoid
Overheating the white chocolate, causing it to seize. Always use low heat and stir frequently.
Not chilling the truffle mixture long enough, making it difficult to roll into firm balls. Ensure it has at least 30 minutes in the refrigerator.
Using water-based food coloring, which can affect the chocolate’s consistency and cause it to seize. Stick to gel or oil-based colorings.
Adding too many sprinkles can make the truffles overly sweet. A light dusting is often all you need.
Skipping the chilling or freezing steps leads to a melty mess. Your truffles need to be firm to dip properly.
Serving & Storage
Serving Ideas
These Easter Oreo truffles with white chocolate are incredibly versatile. I love to serve them on a festive Easter platter, showcasing their beautiful pastel colors. They are also absolutely perfect for including in Easter baskets as a homemade, edible gift. Pair them with a warm cup of coffee, a refreshing glass of tea, or simply a cold glass of milk for a delightful treat.
Storage and Make-Ahead
To keep your truffles fresh, store them in an airtight container in the refrigerator for up to a week. They taste wonderful chilled.
For longer storage, these truffles freeze beautifully. Place them in a single layer on a parchment-lined tray to freeze solid, then transfer them to a freezer-safe bag or container. They can be frozen for up to 2 months. Thaw them in the refrigerator before serving.
You can easily make these truffles 1-2 days in advance of your Easter celebration. This helps reduce stress and ensures you have a delicious dessert ready to go.
Adaptations for Special Occasions
These truffles are not just for Easter. By simply changing the sprinkle colors, you can adapt this recipe for virtually any holiday or special occasion. Think red and green for Christmas, orange and black for Halloween, or even team colors for game day treats. For another delicious no-bake treat with a different flavor profile, consider our easy no-bake carrot cake truffles.
Conclusion
I hope you are as excited as I am to make these easy and fun Easter Oreo truffles with white chocolate. This recipe truly delivers a delightful experience, from their simple preparation to their perfectly balanced sweetness, thanks to that secret pinch of sea salt. Whether you are whipping up a batch with your kids or preparing a thoughtful edible gift, these truffles are sure to be a hit. Do not hesitate to experiment with different Oreo flavors or sprinkle combinations to make them uniquely yours. I encourage you to try them out this spring and share your beautiful creations on social media. Happy Easter baking!
FAQ
What kind of Oreos can I use for this recipe?
Golden Oreos are recommended for a light, spring flavor, but you can certainly use regular chocolate Oreos or Lemon Oreos for a different taste.
How do I prevent the white chocolate from seizing when melting?
Melt the chocolate slowly using a double boiler or microwave in short intervals, stirring frequently. Avoid any water contamination. If it does seize, try adding a teaspoon of vegetable oil or coconut oil at a time to smooth it out.
What is the best way to color the white chocolate?
For best results, use gel food coloring. Oil-based food coloring is preferred over water-based, as water can cause the chocolate to seize.
How long can I store the Oreo truffles?
Store them in an airtight container in the refrigerator for up to a week.
Can these truffles be frozen for longer storage?
Yes, you can freeze them for up to 2 months. Thaw them in the refrigerator before serving.
What are some creative sprinkle options for decorating?
Beyond traditional Easter-themed sprinkles, you can use pastel colors, edible glitter, or even finely crushed nuts for a different texture.
Can I make these without a food processor?
Yes, but the texture might be slightly different. You can crush the Oreos in a sturdy Ziploc bag using a rolling pin until very fine crumbs appear.
Can I use a stand mixer instead of a food processor?
Yes, you can use a stand mixer to combine the crushed Oreos and cream cheese. Just ensure you blend the ingredients until they are completely smooth and creamy.

Easy Easter Oreo Truffles with White Chocolate
Ingredients
Equipment
Method
- In the bowl of a large food processor, add your Golden Oreo cookies. Pulse them until they form very fine crumbs, resembling sand. If you do not have a food processor, you can place the cookies in a sturdy Ziploc bag and crush them with a rolling pin until they are finely ground.
- Add the softened cream cheese to the Oreo crumbs in the food processor. Add a tiny pinch, about 1/8 teaspoon, of sea salt. Blend the mixture until it is completely smooth and creamy, with no lumps of cream cheese visible. The mixture should be thick and pliable, easily formable into balls. Remove the mixture from the bowl, cover it, and refrigerate for 30 minutes to allow it to firm up. This chilling step is essential for easier handling.
- While your truffle mixture is chilling, prepare a baking sheet by lining it with parchment paper. Once the mixture is firm, use a small cookie scoop or a spoon to portion out the truffle mixture. Each portion should be roughly 1.5 tablespoons in volume. Roll each portion between the palms of your hands until it forms a smooth, round ball. Place the shaped truffle balls onto your prepared baking sheet.
- Once all your truffles are shaped, cover the baking sheet and transfer it to the freezer for 15 minutes. Freezing them briefly ensures they are firm enough to dip without falling apart, giving you a perfectly coated truffle.
- While the truffles are freezing, it is time to melt your white chocolate chips or candy coating. Follow the package directions carefully. You can melt it gently in the microwave in short 30-second intervals, stirring between each, or use a double boiler on the stovetop for even, gentle heat.
- If you wish to create a variety of pastel colors for your Easter Oreo truffles, separate the melted candy coating into 4 small bowls. Add a drop or two of pastel-colored gel food coloring to each bowl. Mix thoroughly until the color is smooth and vibrant, with no streaks visible. You can, of course, simply use one color or leave the white chocolate uncolored.
- Working quickly, retrieve your chilled Oreo truffle balls from the freezer. Lower each truffle ball one at a time into the melted candy coating. Use a fork to lift the truffle out, allowing any excess coating to drip back into the bowl. This helps ensure a smooth, even layer of chocolate.
- Gently place the coated Oreo truffle balls back onto your parchment-lined baking sheet. Before the chocolate sets, drizzle additional colors of melted candy coating over each truffle ball if desired, creating pretty patterns. Immediately top with your chosen Easter-themed sprinkles. Allow the truffles to sit undisturbed until the coating is completely set and hardened before serving.
Notes

Sophie Reynolds is a baking specialist and dessert contributor at YumEasyMeals. She develops approachable, family-friendly dessert recipes focused on flavor, simplicity, and reliable results for everyday home cooks.