There’s something wonderfully nostalgic about biting into a piece of chewy, naturally sweet fruit leather. It’s a delightful, healthy snack that evokes childhood memories, yet remains a favorite for all ages. As a professional chef, I’ve always loved how customizable homemade fruit leather is, allowing for endless flavor combinations. Today, I’m thrilled to share my easy, step-by-step recipe that not only guides you through making perfect fruit leather but also introduces a unique gourmet twist that will truly elevate your snacking experience.
Why You’ll Love This Gourmet Herb-Infused Fruit Leather Recipe
I know what you’re thinking – fruit leather is simple, so how can we elevate it? My secret lies in a subtle, yet sophisticated, herbal infusion that transforms a classic treat into something truly special.
The Gourmet Herbal Twist: This recipe introduces a unique infusion of fresh herbs like basil or mint during the simmering process. This isn’t just a garnish; it’s a method to subtly permeate the fruit puree with aromatic notes, balancing the fruit’s sweetness with a sophisticated, fresh counterpoint. The herbs’ volatile oils gently permeate the puree, adding an unexpected layer of flavor complexity that I adore.
Healthier Snacking: By making your own fruit leather at home, you gain complete control over the ingredients. Say goodbye to excessive added sugars, artificial colors, and preservatives often found in store-bought versions. This recipe allows you to create a genuinely wholesome snack for yourself and your family.
Customizable & Versatile: From ripe apricots to luscious berries, this recipe is a fantastic way to utilize seasonal produce or preserve a bountiful harvest. Experiment with different fruits to discover your favorite combinations.
Kid-Friendly & On-the-Go: Chewy, sweet, and bursting with natural flavor, homemade fruit leather is an ideal snack for lunchboxes, hiking trips, or any time you need a portable, wholesome treat. It’s a wonderful vegetarian and healthy option.
Ingredients Needed

To embark on this delightful journey of making gourmet fruit leather, gather these simple ingredients:
- Fresh fruit (apricots, peaches, plums, berries, apples, pears, grapes)
- Water
- Lemon juice
- Sugar (if needed)
- Spices such as cinnamon and nutmeg (optional)
Ingredient Notes & Substitutions
Selecting the right ingredients is key to delicious fruit leather. Let me guide you through making the best choices and adapting the recipe to your pantry.
Fruit Selection & Prep: The best fruit leather starts with ripe, naturally sweet fruits. My favorites include sweet apricots, juicy peaches, vibrant plums, and a medley of berries. While sweet fruits may need little to no added sugar, tart varieties like some apples or grapes might benefit from a touch to balance the flavor. For grapes, especially, I recommend straining the juice after cooking to remove seeds and skins for the smoothest puree.
Using Frozen Fruit: Absolutely! Frozen fruit works perfectly for making fruit leather. Just ensure it’s fully thawed before you begin the cooking process. This helps release its natural juices and ensures even cooking.
Sweeteners & Sugar-Free Options: My goal is often to let the natural sweetness of the fruit shine. If you’re using very ripe apricots or sweet berries, you may find no added sugar is necessary at all, making for truly sugar-free fruit leather. If your fruit is on the tart side, a small amount of granulated sugar, or a touch of natural sweeteners like maple syrup, can be added to taste. Remember to sweeten in moderation.
Lemon Juice’s Role: Don’t skip the lemon juice! It’s crucial for brightening the fruit‘s flavor and enhancing its natural tang. Beyond flavor, the acidity from the lemon juice also acts as a natural preservative, helping to extend the shelf life of your homemade fruit leather.
Spices & Herbs: This is where our unique twist comes in! While the recipe mentions optional cinnamon and nutmeg, I encourage you to infuse 1-2 sprigs of fresh herbs like basil, mint, or even a sprig of rosemary during the simmering stage. These fragrant additions add an incredible layer of sophistication to your fruit leather. Just remember to remove the herb sprigs before pureeing!
How to Make Homemade Herb-Infused Fruit Leather
Making homemade fruit leather is a rewarding process, and with my herb-infused twist, it’s truly an experience. Let’s get cooking!
Phase 1: Fruit Preparation and Simmering
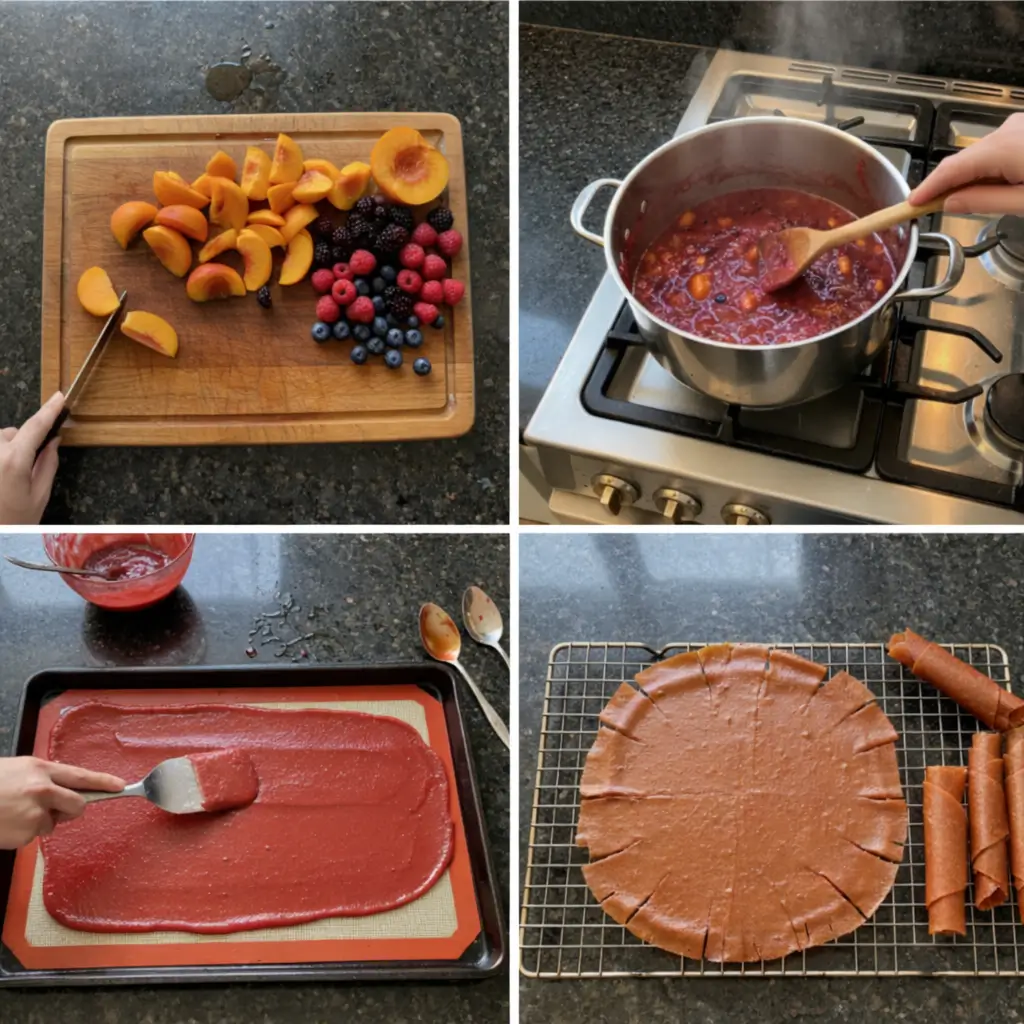
First, select your fresh fruit. Wash it thoroughly under cool running water. For apples and pears, I recommend peeling and coring them for a smoother texture, then chopping them into small, even pieces. For peaches, plums, and apricots, simply pit them and chop. Berries need minimal prep, just a quick rinse. For grapes, halve them to aid cooking.
Place your prepped fruit into a heavy-bottomed saucepan. Add a splash of water, about 1/4 to 1/2 cup, depending on the juiciness of your fruit, to prevent sticking. Cook over medium-low heat, stirring occasionally, until the fruit softens. You’ll notice the bright colors deepen and a wonderful aroma filling your kitchen.
Phase 2: Infusing and Pureeing
Once the fruit is cooked through and easily mashed, remove it from the heat. This is the moment to introduce our unique twist: add 1-2 sprigs of fresh basil or mint directly into the warm fruit mixture. If using, stir in any desired sugar, cinnamon, or nutmeg now. Let the herbs steep in the warm fruit for about 10-15 minutes, allowing their delicate flavors to infuse.
After infusion, remove and discard the herb sprigs. Now, transfer the softened fruit to a food mill, chinoise, blender, or food processor. Process until you achieve a perfectly smooth puree. For the absolute smoothest texture, especially with seedy berries or grapes, a food mill or chinoise is ideal for straining out any unwanted bits. Stir in the lemon juice to brighten the flavors.
Phase 3: Spreading and Dehydrating
Prepare your baking sheet(s). Line them with either parchment paper, a silicone mat, or heat-proof plastic wrap. If using parchment paper or a silicone mat, a very light greasing can aid in easy removal later. Carefully pour the fruit puree onto the lined sheet. Using an offset spatula, spread the puree evenly to a thickness of about 1/8 to 1/4 inch. This consistent thickness is crucial for uniform drying. Ensure no edges are too thin, as they will dry out much faster than the center.
Preheat your oven to its lowest setting, ideally around 140°F (60°C). If your oven’s lowest temperature is higher, say 170°F, you can still proceed, but be extra vigilant. Prop the oven door open slightly with a wooden spoon to allow moisture to escape and prevent the fruit from cooking rather than dehydrating. If your oven has a convection setting, use it for more even drying. Place the baking sheet in the oven and slowly dry out the fruit leather for 8-12 hours, or until it is no longer sticky to the touch and peels easily from the surface. The final product should be pliable but firm, with no wet spots. If using plastic wrap, ensure it doesn’t touch the oven sides or racks to prevent melting or uneven drying.
Mastering Your Fruit Leather: Fruit Variations & Drying Techniques
Crafting perfect fruit leather is an art, and understanding how different fruits behave, along with mastering drying techniques, will elevate your results every time.
Fruit Variations and Adjustments
Different fruits bring their own unique qualities to the fruit leather making process, requiring slight adjustments for the best outcome.
- High Water Content Fruits (e.g., Berries, Grapes): Berries and grapes are incredibly juicy. When working with these, you might need to simmer them a bit longer to reduce their moisture content before pureeing. For grapes, I always recommend straining the cooked puree through a fine-mesh sieve or chinoise to remove any tiny seeds and tough skins, resulting in a perfectly smooth fruit leather.
- Low Water Content Fruits (e.g., Apples, Pears): Denser fruits like apples and pears will require a bit more water initially in the saucepan to help them break down and soften fully. They may also need a longer cooking time during the initial simmering phase. Peeling and coring these fruits is highly recommended for a silky smooth finish.
- Tart vs. Sweet Fruits: Taste your fruit puree! If you’re using tart fruits like cranberries or some plum varieties, you’ll likely want to add a bit more sugar to balance their acidity. Conversely, if your fruit is very sweet, like ripe peaches or sweet apricots, you might reduce the amount of lemon juice or skip the added sugar entirely.
- Peeling vs. Skin-on: For apples and pears, peeling yields a smoother, more refined fruit leather. For berries or certain thin-skinned stone fruits (like some plums), leaving the skin on can contribute to color, flavor, and additional nutrients, provided your blender or food mill can break them down sufficiently for a smooth puree.
Tips for Even Drying
Achieving uniform drying is paramount for excellent fruit leather. Follow these tips to avoid sticky spots or brittle edges.
- Consistent Thickness: This is arguably the most important tip. After pouring the puree onto your lined baking sheet, use an offset spatula or the back of a spoon to spread it out evenly to a consistent 1/8 to 1/4 inch thickness. Any thinner areas will become brittle, while thicker spots will remain sticky.
- Lining Options: My preferred liners are parchment paper or a silicone mat. Both are naturally non-stick and heat-safe. If you use parchment paper, a very light spray of neutral oil can ensure the fruit leather peels off effortlessly. Heat-proof plastic wrap can also be used, but ensure it doesn’t touch the oven walls or racks.
- Air Circulation: Good airflow is essential for moisture to evaporate efficiently. When using an oven, always slightly prop open the oven door (a wooden spoon works perfectly) to allow humid air to escape. If your oven has a convection setting, activate it; the circulating air significantly speeds up and evens out the dehydrating process.
- Dehydrator Use: A dedicated dehydrator is an excellent alternative to an oven, often more energy-efficient and designed for precise temperature control. Spread your puree onto the dehydrator trays lined with non-stick sheets or lightly oiled parchment paper. Set the temperature to around 135-140°F (57-60°C). Drying times can vary from 6-12 hours, depending on your dehydrator model and the fruit‘s water content. Rotate trays periodically for consistent drying.
Pro Tips & Troubleshooting
Even seasoned chefs encounter quirks in the kitchen. Here are my best tips and solutions to common issues you might face when making homemade fruit leather.
Pro Tips for Perfect Fruit Leather
These insights will help you achieve gourmet results every time.
- Flavor Customization with Herbs: Beyond basil and mint, don’t be afraid to experiment! A sprig of fresh rosemary can be wonderful with plum or apple fruit leather, while lemon verbena or even a hint of ginger can add zing to apricot or peach varieties. This is your chance to truly make the recipe your own.
- Optimal Fruit Ripeness: The best fruit leather comes from very ripe fruit. This means maximum natural sweetness and deep, concentrated flavor. Avoid anything overripe or fermenting, but don’t be afraid to use fruit that’s just past its prime for eating fresh—it’s perfect for fruit leather!
- Smooth Puree is Key: For the ideal texture, your puree needs to be perfectly smooth. Bits of skin or chunks of fruit can lead to an inconsistent final product. Invest in a good blender, food processor, or a traditional food mill or chinoise for truly restaurant-quality smoothness.
- The Doneness Test: Knowing when your fruit leather is done is crucial. It should be pliable and flexible, not brittle or crispy. When you touch it, it should not feel sticky and should peel away cleanly from the parchment paper or silicone mat without leaving any residue.
- Using a Dehydrator: If you’re using a dehydrator, make sure to spread the puree thinly and evenly on the non-stick sheets or lightly oiled parchment paper that come with your trays. Rotating the trays every few hours helps ensure even drying, especially if your dehydrator has hotspots.
Common Mistakes to Avoid
Learning from common pitfalls will save you time and produce better results.
- Uneven Spreading: This is the number one culprit for inconsistent fruit leather. If some areas are thicker than others, you’ll end up with parts that are still sticky and under-dried, while others are already brittle and over-dried. Take your time to spread it evenly.
- Oven Temperature Too High: Resist the urge to crank up the heat to speed things up! An oven temperature above 140°F (or slightly higher, as a last resort) will cook the fruit rather than dehydrate it. This often leads to brittle, crispy, or even burnt fruit leather instead of the desired chewy texture.
- Insufficient Drying Time: Patience is a virtue here. Under-dried fruit leather will be sticky, difficult to store, prone to molding, and will have a significantly shorter shelf life. If in doubt, give it another hour.
- Too Much Added Liquid: While a splash of water helps initial cooking, adding excessive water during the simmering stage or too much lemon juice can drastically prolong the overall drying time. Aim for a thick puree after cooking.
- Plastic Wrap Issues in Oven: If using heat-safe plastic wrap, ensure it doesn’t touch the oven sides or racks, as it can melt. Also, avoid folding the plastic wrap over the puree itself, as this traps moisture and prevents proper drying.
- Not Adjusting Sweetness: Always taste your puree before and after adding sugar and lemon juice. Different fruits have varying levels of natural sweetness and tartness, and adjusting accordingly ensures a perfectly balanced flavor, avoiding overly tart or cloyingly sweet results.
Serving & Storage
Once your gourmet fruit leather is ready, you’ll want to enjoy it and store it properly to maintain its freshness.
Creative Serving Ideas
My herb-infused fruit leather is so versatile, perfect for much more than just a simple bite!
- Snack Time: It’s the ultimate healthy snack. Cut into strips, it’s perfect for kids’ lunchboxes, a guilt-free after-school treat, or a satisfying pick-me-up for adults.
- Outdoor Adventures: Portable and packed with natural energy, fruit leather is an ideal companion for hiking, camping, cycling, or any outdoor activity where you need a convenient boost.
- Gourmet Garnish: For a sophisticated touch, cut small strips or shapes and serve alongside a cheese board, or use as an elegant garnish for yogurt parfaits or creamy oatmeal.
- Gift Giving: Roll the strips, tie them with a pretty ribbon, and package them in a lovely tin. Homemade fruit leather makes a thoughtful and delicious gift for friends and family.
- Breakfast Topper: Chop your fruit leather into small pieces and sprinkle it over homemade granola, your morning cereal, or smoothie bowls for a chewy burst of fruity flavor.
Storage and Make-Ahead Tips
Proper preservation is key to enjoying your homemade fruit leather for longer.
Once cooled, roll the fruit leather, still attached to its parchment paper or plastic wrap, into a tight log. This crucial step prevents the sticky sides from adhering to each other.
- Short-Term Storage (Room Temperature): Store the rolled fruit leather in an airtight container at cool room temperature for up to 1-2 weeks. Humidity can affect its texture and shelf life, so a dry environment is best.
- Medium-Term Storage (Refrigeration): For a slightly longer shelf life, you can store your fruit leather in an airtight container in the refrigerator for up to 1-2 months. The colder temperature helps maintain freshness.
- Long-Term Storage (Freezing): Fruit leather freezes beautifully! Wrap the rolled logs tightly in additional plastic wrap or foil, then place them in a freezer-safe bag or container. It can last for 6 months to a year in the freezer. Thaw at room temperature before enjoying.
- Make-Ahead: Fruit leather is an excellent make-ahead snack, making it perfect for meal prepping. Whip up a large batch on the weekend, and you’ll have healthy, homemade treats on hand for weeks or even months.
Conclusion
Making homemade herb-infused fruit leather is a rewarding culinary adventure that brings together healthy snacking with gourmet flair. I hope this detailed guide empowers you to create perfectly chewy, naturally sweet treats with that sophisticated herbal twist. With these instructions and my expert tips, even beginners will achieve delicious results.
Don’t hesitate to experiment with different fruit combinations and herb infusions to discover your personal favorite flavors. I’d love to hear your creative twists and successful batches! Please feel free to rate this recipe or leave a comment below to share your experience. Happy snacking!
FAQ
Frequently Asked Questions About Fruit Leather
Q: Can you use parchment paper instead of plastic?
A: Yes, absolutely! Parchment paper is an excellent alternative to plastic wrap for lining your baking sheet. Silicone mats are also a fantastic, reusable option. Both provide a non-stick, heat-safe surface that allows the fruit leather to peel off easily once dry.
Q: Can you use frozen fruit to make these as well?
A: Yes, you certainly can! Frozen fruit works perfectly for making fruit leather. Just be sure to fully thaw the fruit before you begin the cooking process; this helps release its natural juices and ensures even simmering.
Q: What fruits work best for fruit leather and how should they be prepped?
A: Ripe, flavorful fruits like apricots, peaches, berries, apples, and pears are ideal. For prep, always wash the fruit. For apples and pears, peeling and coring are recommended for a smoother texture. For stone fruits like peaches and apricots, pit them and chop. For grapes, halve them and consider straining the puree to remove seeds.
Q: How long does the fruit leather last and how should it be stored?
A: When stored rolled in its lining and in an airtight container, fruit leather can last 1-2 weeks at room temperature, 1-2 months in the refrigerator, and 6-12 months in the freezer. Always ensure it’s completely dry before storing to prevent mold.
Q: How can I tell when the fruit leather is done?
A: Your fruit leather is done when it’s pliable and firm, but no longer sticky to the touch. It should peel cleanly from its lining (parchment paper, silicone mat, or plastic wrap) without leaving any wet residue behind. It should feel like firm, slightly leathery fruit.
Q: How can I make sugar-free fruit leather?
A: To make sugar-free fruit leather, select naturally sweet, very ripe fruits like sweet apricots, peaches, or ripe berries. These often have enough natural sugars that no additional sweetener is needed. You can also slightly reduce the amount of lemon juice if your chosen fruit is exceptionally sweet, as the tartness can sometimes highlight the need for more sugar.
Q: My oven has the lowest temperature of 170F. Is that too high?
A: While 140°F is ideal for slow dehydrating without cooking, 170°F can work, but it requires careful monitoring. To help lower the effective temperature and prevent cooking or burning, definitely prop your oven door open slightly with a wooden spoon to allow constant airflow. Check your fruit leather more frequently, as it will dry faster and risks becoming brittle or crispier than desired. A dehydrator is a great alternative if consistent low temperatures are an issue with your oven.
Q: Is fruit leather healthy?
A: Yes, homemade fruit leather is a very healthy snack, especially compared to many store-bought versions. When you make it yourself, it’s typically made from whole fruit with controlled (or no) added sugar, providing fiber and natural vitamins without artificial additives, colors, or excessive preservatives.

Gourmet Herb-Infused Fruit Leather: Easy Homemade Recipe
Ingredients
Equipment
Method
- Wash your chosen fresh fruit thoroughly. For apples and pears, peel, core, and chop into small, even pieces. For peaches, plums, and apricots, pit and chop. For berries, rinse. For grapes, halve.
- Place the prepped fruit into a heavy-bottomed saucepan. Add about 1/4 to 1/2 cup of water, depending on the fruit’s juiciness, to prevent sticking.
- Cook over medium-low heat, stirring occasionally, until the fruit softens.
- Once the fruit is cooked and easily mashed, remove it from the heat. Add 1-2 sprigs of fresh basil or mint into the warm fruit mixture. If desired, stir in any sugar, cinnamon, or nutmeg now.
- Let the herbs steep for about 10-15 minutes to infuse their delicate flavors.
- After infusion, remove and discard the herb sprigs. Transfer the softened fruit to a food mill, chinoise, blender, or food processor and process until you achieve a perfectly smooth puree.
- Stir in the lemon juice to brighten the flavors.
- Prepare your baking sheet(s) by lining them with parchment paper, a silicone mat, or heat-proof plastic wrap. Lightly grease parchment paper or a silicone mat if needed for easy removal.
- Carefully pour the fruit puree onto the lined sheet. Use an offset spatula to spread the puree evenly to a consistent thickness of about 1/8 to 1/4 inch, ensuring no thin edges.
- Preheat your oven to its lowest setting, ideally around 140°F (60°C). If using a higher oven temperature (e.g., 170°F), prop the oven door open slightly with a wooden spoon to allow moisture to escape and prevent cooking. Use a convection setting if available.
- Place the baking sheet in the oven and slowly dry the fruit leather for 8-12 hours, or until it is no longer sticky to the touch and peels easily from the surface. The final product should be pliable but firm, with no wet spots.
Notes

Taya Bennett is the founder of YumEasyMeals, a platform dedicated to easy, delicious, and quick-to-prepare recipes for busy families. Passionate about everyday cooking, she simplifies meals with practical, accessible, and always delicious ideas.
Discover her creations at: yumeasymeals.com