Welcome to my kitchen, where today we are diving into the delightful world of homemade fermented pickles. This recipe will guide you through making delicious, homemade fermented pickles with a simple twist that ensures a successful and flavorful ferment every time. Whether you are a beginner or an experienced fermenter, you will learn how to create crisp, tangy pickles packed with probiotics. Get ready to enjoy the satisfying crunch and refreshing taste of your own fermented creations.
Why You’ll Love This Fermented Pickles Recipe
The Kombucha Secret: This recipe includes a unique twist. A small amount of kombucha or other raw fermented product like sauerkraut brine is added to jumpstart the fermentation process. This is especially helpful in cooler temperatures or when your water source might lack minerals.
Faster, More Reliable Fermentation: The kombucha introduces a diverse culture of bacteria and yeast, helping ensure a quicker and more robust fermentation. The acidity also helps lower the pH, inhibiting unwanted microbial growth. It takes the guesswork out of wild fermentation.
Crisp and Flavorful: The recipe utilizes tannic acid sources like bay leaves and grape leaves to help maintain a satisfying crunch.
Easy to Customize: Adjust the spices and chili peppers to your taste preference. My kitchen is all about making recipes your own.
Gut-Friendly Goodness: Enjoy the probiotic benefits of homemade fermented foods.
Ingredients Needed
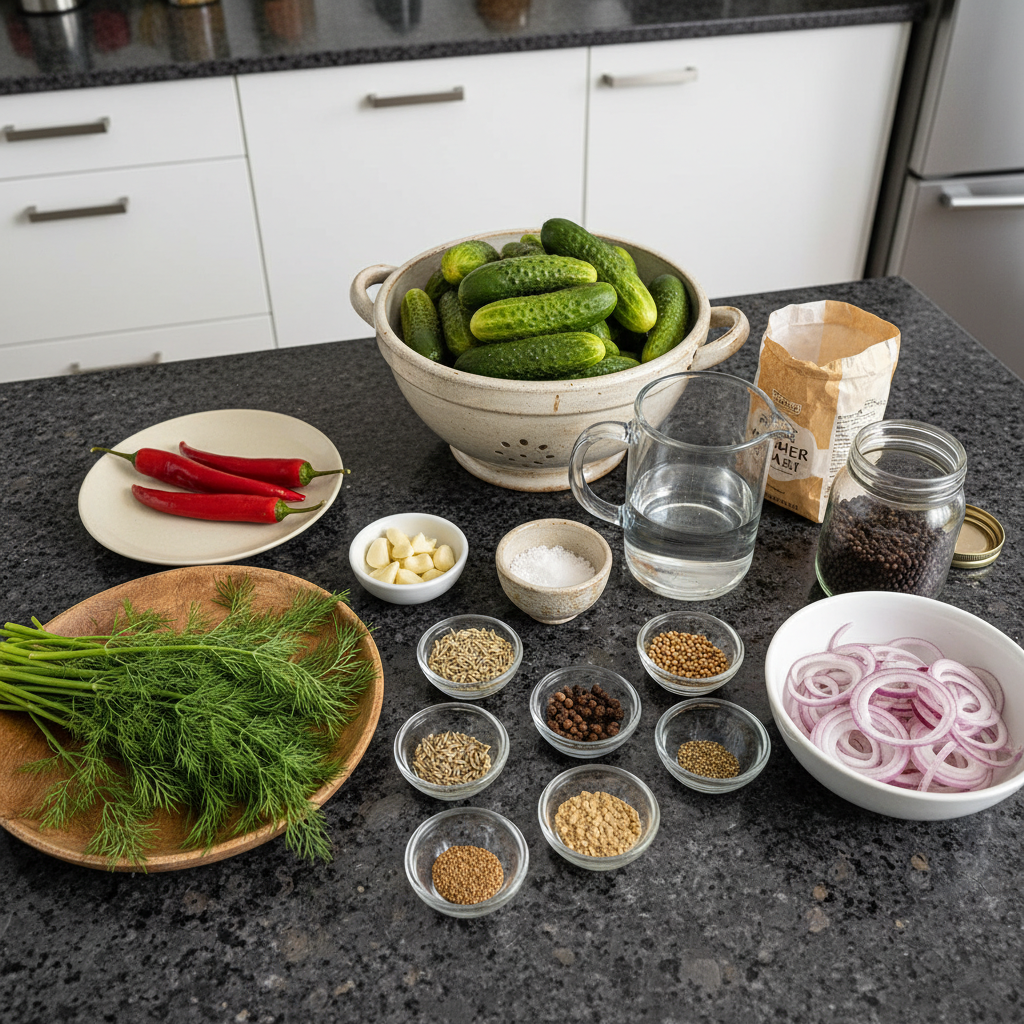
* 2- 2 1/2 lbs pickling cucumbers– all similar size ( 5 inches)
* 5 cups filtered water or tap water (that is not overly chlorinated)
* 2 tablespoons fine sea salt or Himalayan salt (or basically one heaping teaspoon fine sea salt (7 grams) per one cup of water, to make a 3% brine.) * see notes.
* 1/4 teaspoon turmeric (optional, adds a “fresh” flavor)
* 1 teaspoon each: fennel seeds, coriander seeds, allspice, peppercorns, dill seeds, mustard seeds, celery seeds- and feel free to add more peppercorns!
* 10-20 garlic cloves, sliced (or double for extra garlicky)
* 1/2 onion, thinly sliced (optional)
* big handful of fresh dill
* 1-3 fresh red chilies – or dried arbol chilies, or add chili flakes (all optional)
* 3-4 bay leaves (or a grape leaf or oakleaf) – these are sources of tannic acid to help them stay crisp.
Ingredient Notes & Substitutions
Cucumbers: It is very important to use pickling cucumbers for the best results. Varieties like Kirby cucumbers are ideal because they have thicker skins and a lower moisture content, which helps them stay crisp throughout the fermentation process. Look for firm, blemish-free cucumbers of similar size, ideally around 5 inches long. Different cucumber varieties can impact the final texture, so choosing the right ones is key.
Salt: Salt plays a critical role in lacto-fermentation. It inhibits the growth of undesirable bacteria while promoting the beneficial lactobacillus bacteria. To understand more about this metabolic process, you can explore lactic acid fermentation on Wikipedia. I always recommend using fine sea salt or Himalayan salt. Avoid table salt, as the anti-caking agents and iodine can interfere with fermentation. The precise salt concentration, usually around 3 percent for brine, is crucial for both safety and successful fermentation. My preferred brands are readily available in most US grocery stores.
Spices: While the classic combination of fresh dill and garlic is always a winner for fermented pickles, I encourage you to experiment with various spices to find your perfect flavor profile. Fresh spices like fennel seeds, coriander seeds, allspice, peppercorns, mustard seeds, and celery seeds will generally impart stronger, more vibrant flavors.
Tannins: To ensure your pickles remain wonderfully crisp, a source of tannic acid is essential. Bay leaves, grape leaves, or oak leaves are excellent choices for this purpose. Learn more about how tannins contribute to crispy pickles. If you cannot find these, a small amount of black tea leaves (from a tea bag) can be used sparingly as a substitute.
How to Make Fermented Pickles
Making fermented pickles is a rewarding process, and I will guide you through each step to ensure success.
Prepare the Cucumbers
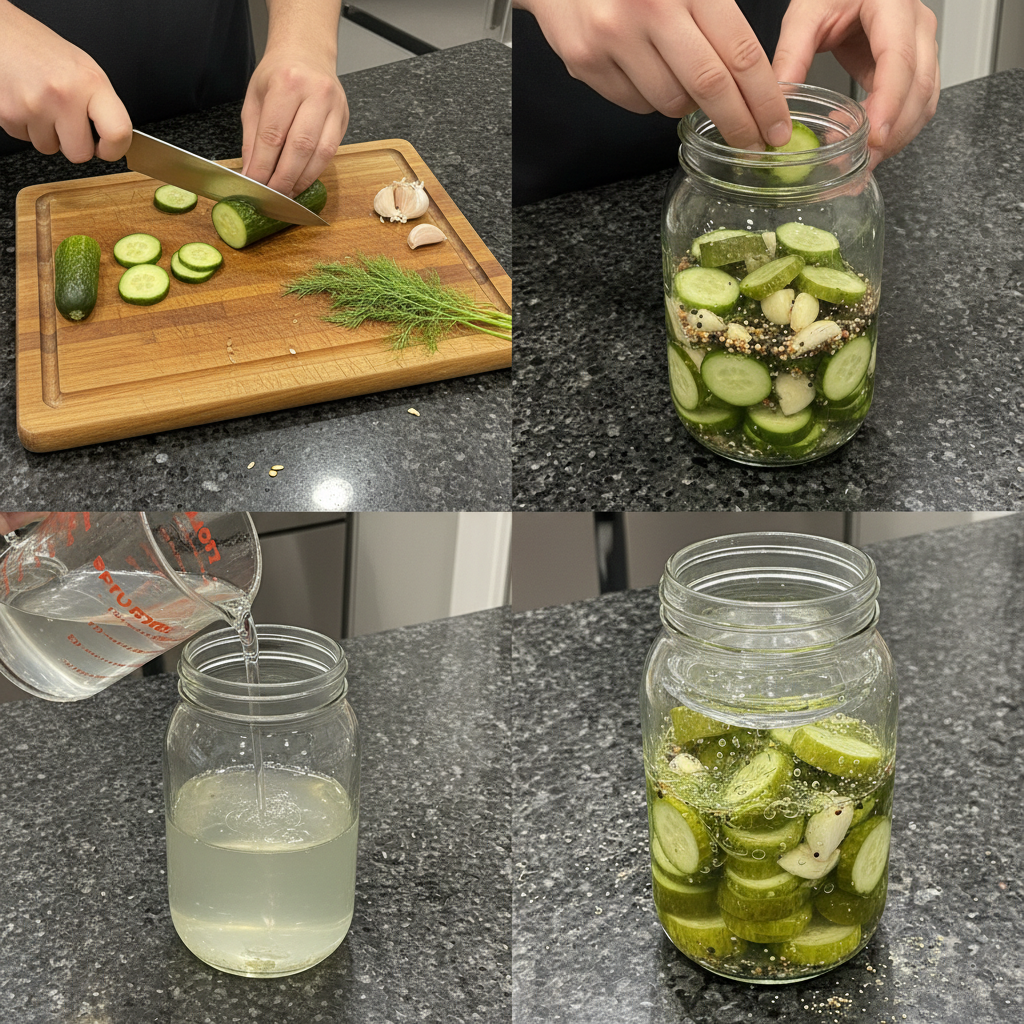
Rinse the pickling cucumbers thoroughly under cold water. An important step to prevent soft pickles is to remove approximately 1/16 inch from the flower end of each cucumber. This helps eliminate enzymes that can lead to softening. After trimming, place the cucumbers in an ice-water bath for 15-30 minutes. You will notice how the cold water firms up the cucumbers, preparing them for an extra crisp texture.
Prepare the Brine
In a separate container, mix 2 tablespoons of fine sea salt or Himalayan salt with 5 cups of cold filtered water. Stir until the salt is completely dissolved and the water appears clear. Taste a small amount of the brine to ensure a balanced salinity. This 3 percent brine ratio is essential for safe and effective fermentation.
Assemble the Jar
Ensure you have a clean two-quart mason jar. Sterilization is not necessary for fermentation, a good wash is sufficient. Place all the whole spices, including fennel seeds, coriander seeds, allspice, peppercorns, dill seeds, mustard seeds, and celery seeds, into the bottom of the jar. Add the sliced garlic, optional sliced onion, and turmeric if you are using it. You will smell the aromatic scents rising from the spices as you layer them.
Pack the Jar
With clean hands, tightly pack one layer of cucumbers standing on end in the jar. Add the bay leaves, then carefully add the second layer of cucumbers, also standing on end. Press everything down firmly. You want to leave about 1 ½ inches of headspace at the top of the jar.
Add Brine and Weights
Pour the saltwater brine over the cucumbers, making sure they are fully submerged. It is crucial to use fermentation weights to keep the cucumbers under the brine. If any spices float to the surface, gently remove them to prevent potential mold growth. This keeps everything safely fermenting beneath the surface.
First Fermentation
Cover the jar loosely with a lid or a clean cloth, allowing air to escape easily. Place the jar in a pan or a bowl to catch any potential overflow during active fermentation. Store the jar in a cool, dark place, ideally between 60-70F. A basement or a lower kitchen cupboard often works well. Let it ferment for 2-3 days. Check daily for bubbles or overflow, which are good signs of active fermentation. Half-sour pickles will typically take 3-5 days, developing a crisp, white interior. For full sour pickles, which are much tangier, allow 14-21 days. Remember, warmer temperatures will accelerate fermentation, so adjust your timing accordingly.
Check for Fermentation
After about 2 days, begin checking for signs of life. Look for bubbles rising, any overflow, or a slight clouding of the brine. Tap the jar gently and observe if tiny bubbles rise to the top. I usually ferment for 3-4 days for a good crunch. You can taste the pickles after a few days; they should have a pleasant tang and still be crunchy. The brine will become cloudy as it ferments, which is a perfectly normal and positive sign.
Refrigerate
Once you see active bubbles and the pickles have reached your desired level of tanginess and crispness, you can place the jar in the refrigerator. This will slow down the fermentation process considerably, preserving their flavor and texture. Continue to keep the pickles fully submerged in the brine while stored.
Taste and Adjust
Once chilled, give your fermented pickles a taste. They should be crispy, flavorful, and have a delightful tang. If you prefer a tangier or softer pickle, you can absolutely remove them from the refrigerator and allow them to ferment for a few more days at room temperature. Trust your palate.
Optional Fizzy Brine
For those who enjoy a fizzy brine, tighten the lid on your mason jar. Remember to “burp” the jar by opening it briefly every week or so to release built-up gases. Alternatively, you can use an airlock system. If you prefer a hands-off approach, simply give the lid one loose twist. This allows gases to escape naturally without daily monitoring.
Troubleshooting Soft Pickles
Soft fermented pickles are a common frustration, but understanding the causes can help you prevent them.
Temperature: Fermentation temperature is a major factor. Too high of a temperature, especially above 70F, can encourage the growth of undesirable bacteria that soften pickles. Aim for a consistent temperature range of 60-70F for ideal crispness. If your home is warmer, consider placing your jar in a cooler with ice packs, monitoring the brine temperature to keep it stable.
Enzymes: Failing to remove the flower end of the cucumber is a frequent culprit. Cucumbers contain enzymes in their blossom end that can break down pectin, leading to soft pickles. Always snip off about 1/16 inch from the flower end to prevent this.
Brine Strength: An insufficient salt concentration in your brine will not properly inhibit spoilage organisms. It is crucial to maintain the correct salt-to-water ratio, which is approximately 3 percent, or 2 tablespoons of fine sea salt per 5 cups of water. Precise measurement is key.
Cucumber Variety: Not all cucumbers are created equal for fermenting. Certain varieties, particularly those labeled “slicing” cucumbers, are more prone to softening due to their higher water content and thinner skins. Always choose firm, fresh pickling cucumbers like Kirby or Persian cucumbers for the best texture.
Over-Fermentation: While fermentation develops flavor, fermenting pickles for too long at room temperature can also lead to a softer texture. Taste your pickles regularly after a few days to catch them at your preferred crispness level. Refrigeration will slow this process significantly.
Canning Fermented Pickles (Safety First!)
While fermented pickles are delicious and last a good while in the refrigerator, some home cooks prefer to can them for long-term pantry storage. However, it is absolutely critical to prioritize safety when canning, especially with fermented vegetables. Botulism is a serious risk if proper procedures are not followed. I strongly recommend adhering to the latest USDA guidelines for all home canning.
Water bath canning is generally suitable for high-acid foods. However, for fermented vegetables, which start at a lower pH but whose final acidity can be variable, pressure canning is the safest and most recommended method. This ensures that the internal temperature reaches levels high enough to destroy any potential botulism spores.
Here is a simplified guide to pressure canning fermented pickles:
Prepare the jars and lids: Wash canning jars and two-piece lids in hot soapy water and rinse. Jars do not need to be sterilized if they will be processed for 10 minutes or more in a pressure canner. Keep jars hot until ready to fill.
Pack the pickles: Gently remove your fermented pickles from the brine. You can rinse them if desired, but many people prefer to keep some of the fermented flavor. Pack them snugly into the hot canning jars, leaving 1/2 inch of headspace.
Add liquid: If you like, you can strain and reuse your existing fermented brine, or you can prepare a fresh brine using the same salt-to-water ratio. Heat the brine to a simmer and pour it over the packed pickles, still maintaining 1/2 inch of headspace. Remove any air bubbles with a non-metallic utensil.
Clean rims and seal: Wipe jar rims clean with a damp cloth. Center the warmed lids on the jars and apply screw bands until fingertip tight.
Process in a pressure canner: Follow your pressure canner’s specific instructions for venting and processing. Process pint jars at 10 pounds pressure for 10 minutes (adjust for altitude if necessary). Quart jars may require longer processing times. Refer to the USDA complete guide to home canning for precise times and pressures.
Cool and check seals: Once processing is complete, turn off the heat and allow the canner to depressurize naturally. Do not force cool. Remove jars and place them on a towel to cool for 12-24 hours. Check seals by pressing the center of the lid; it should not flex. Remove screw bands, wipe jars clean, label, and store in a cool, dark place.
Disclaimer: Home canning is done at one’s own risk. It is absolutely crucial to follow tested, up-to-date safety guidelines from reputable sources like the USDA to ensure the safety of your canned goods.
Pro Tips & Troubleshooting
Pro Tips
Cooler Fermentation: For the crispiest fermented pickles, aim to ferment at cooler temperatures, ideally between 60-70F. If your home is on the warmer side, a simple trick is to place the jar in a cooler with ice packs, replacing the ice as needed. Always monitor the brine temperature with a thermometer.
Taste as You Go: Fermentation is a dynamic process. The longer you let your pickles ferment (unrefrigerated), the tangier they will become, though they may also soften slightly. Start tasting them after you see active bubbles to achieve your desired level of tanginess and crispness.
Fizzy Brine: To create a delightfully fizzy brine, tighten the lid on your jar or use an airlock. If using a tight lid, remember to “burp” the jar daily if it is fermenting at room temperature, or weekly if stored in the refrigerator, to release excess gas.
Kombucha Boost: Our unique twist involves using a small amount of unflavored kombucha or sauerkraut brine. A tablespoon is usually sufficient to kickstart fermentation, especially beneficial in cooler weather or if you suspect your water has low mineral content.
Tannic Acid Power: To help maintain that satisfying crunch, always ensure you include a source of tannic acid. Bay leaves, grape leaves, or oak leaves are excellent for this purpose.
Submerge Everything: To prevent mold growth, it is absolutely crucial to keep all the cucumbers and spices fully submerged under the brine. Fermentation weights are your best friend here.
Common Mistakes to Avoid
Warm Temperatures: Avoid fermenting your pickles in excessively warm temperatures, as this can lead to mushy, soft pickles. Aim for that 60-70F sweet spot.
Ignoring the Flower End: Do not forget to remove the flower end of the cucumber. This small but critical step prevents enzymes from softening your pickles.
Floating Spices: Regularly check for and remove any spices or vegetable bits that float above the brine. These exposed pieces can become a breeding ground for mold.
Insufficient Salt: Always ensure you use the correct salt-to-water ratio. Too little salt can allow undesirable bacteria to thrive, making your fermentation unsafe.
Using Chlorinated Water: Highly chlorinated tap water can inhibit the beneficial bacteria needed for fermentation. Opt for filtered water instead to ensure a successful ferment.
Impatience: Do not be afraid to let your pickles ferment longer for a deeper, more complex flavor. Sometimes, the best things come to those who wait!
Serving & Storage
Serving Ideas
Fermented pickles are incredibly versatile and can elevate many dishes.
They are perfect enjoyed simply as a low-calorie, probiotic-rich snack straight from the jar.
Slice them thinly and add them to your favorite sandwiches or burgers for a tangy crunch.
Serve them as a tasty and refreshing side dish alongside grilled meats or roasted vegetables.
Get creative and use the brine in cocktails, such as a unique Gin and Brine martini.
Finely chop them and incorporate into potato salad, tuna salad, or even egg salad for a burst of flavor.
Storage and Make-Ahead
Fermented pickles should always be stored in the refrigerator to significantly slow down the fermentation process. While they will continue to ferment slowly, the cold temperature preserves their texture and flavor.
It is vital to ensure that the pickles remain fully submerged in the brine during storage to prevent spoilage and maintain quality.
Properly stored in the refrigerator, your homemade fermented pickles can last for several months, continuing to develop subtle flavors over time.
You can definitely make these fermented pickles well in advance. The fermentation process itself takes several days to complete, so plan accordingly. The longer they ferment before refrigeration, the tangier and more developed their flavor will become.
Conclusion
Making your own fermented pickles at home is an incredibly easy and rewarding culinary adventure. With our simple recipe and the clever kombucha twist, you will be enjoying crunchy, tangy, and probiotic-rich pickles in no time. Do not be afraid to experiment with different spices and flavors to create your perfect pickle batch. Remember, even if you are a beginner, with a little patience and attention to detail, you can achieve delicious results in your own kitchen. Get ready to impress your friends and family with your homemade fermented creations. I love serving them with my next BBQ or adding them to my favorite sandwich. Happy fermenting!
FAQ
What is the correct salt to water ratio for fermented pickles?
The correct salt-to-water ratio is approximately 3%. This means you should use 2 tablespoons of fine sea salt or Himalayan salt per 5 cups of water. It is crucial to measure accurately for safe and effective fermentation.
How long does it take to ferment pickles, and how do I know when they are ready?
Fermentation time varies depending on the temperature of your environment. Half-sour pickles typically take 3-5 days, while full-sour pickles require 14-21 days for a deeper tang. Taste them regularly after a few days to determine when they reach your desired level of tanginess and crispness. Look for bubbles and cloudiness in the brine as clear signs of active fermentation.
How do I prevent mold and ensure a successful fermentation?
To prevent mold, always keep the cucumbers fully submerged under the brine using fermentation weights. Remove any spices or vegetable bits that float to the surface. Ensure you use the correct salt-to-water ratio, and always start with a clean jar. Our kombucha boost also helps by introducing beneficial bacteria.
How do I keep my fermented pickles crisp?
To keep your fermented pickles crisp, start with fresh pickling cucumbers. Always remove the flower end of each cucumber, as it contains enzymes that can soften them. Add a source of tannic acid, such as bay leaves, grape leaves, or oak leaves, to your jar. Lastly, ferment your pickles at a cooler temperature, ideally between 60-70F.
Are fermented pickles good for you, and what are their health benefits?
Yes, fermented pickles are very good for you! They are an excellent source of probiotics, which can significantly promote gut health and boost immunity. They are also low in calories and can serve as a healthy and flavorful snack option. Additionally, the fermented garlic included in this recipe provides other beneficial health properties.
How long do fermented pickles last, and how should I store them for best results?
Fermented pickles can last for several months in the refrigerator if stored properly. For the best results, always ensure the pickles remain fully submerged in their brine. The cold temperature of the refrigerator will slow down the fermentation process, preserving their flavor and crispness.
Easy Fermented Pickles with Kombucha Boost
Ingredients
Equipment
Method
- Rinse the pickling cucumbers thoroughly under cold water.
- Remove approximately 1/16 inch from the flower end of each cucumber to eliminate enzymes that can lead to softening.
- Place the trimmed cucumbers in an ice-water bath for 15-30 minutes to firm them up for an extra crisp texture.
- In a separate container, mix 2 tablespoons of fine sea salt or Himalayan salt with 5 cups of cold filtered water.
- Stir until the salt is completely dissolved and the water appears clear.
- Taste a small amount of the brine to ensure a balanced salinity. This 3 percent brine ratio is essential for safe and effective fermentation.
- Ensure you have a clean two-quart mason jar. A good wash is sufficient for fermentation; sterilization is not necessary.
- Place all the whole spices, including fennel seeds, coriander seeds, allspice, peppercorns, dill seeds, mustard seeds, and celery seeds, into the bottom of the jar.
- Add the sliced garlic, optional sliced onion, and turmeric if you are using it.
- With clean hands, tightly pack one layer of cucumbers standing on end in the jar.
- Add the bay leaves.
- Carefully add the second layer of cucumbers, also standing on end. Press everything down firmly, leaving about 1 ½ inches of headspace at the top of the jar.
- If using, add 1 tablespoon of unflavored kombucha or sauerkraut brine to the jar.
- Pour the saltwater brine over the cucumbers, making sure they are fully submerged.
- It is crucial to use fermentation weights to keep the cucumbers under the brine. If any spices float to the surface, gently remove them to prevent potential mold growth.
- Cover the jar loosely with a lid or a clean cloth, allowing air to escape easily.
- Place the jar in a pan or a bowl to catch any potential overflow during active fermentation.
- Store the jar in a cool, dark place, ideally between 60-70F. Let it ferment for 2-3 days.
- Check daily for bubbles or overflow, which are good signs of active fermentation. Half-sour pickles will typically take 3-5 days, while full sour pickles require 14-21 days.
- After about 2 days, begin checking for signs of life. Look for bubbles rising, any overflow, or a slight clouding of the brine.
- Tap the jar gently and observe if tiny bubbles rise to the top. Taste the pickles after a few days; they should have a pleasant tang and still be crunchy.
- Once you see active bubbles and the pickles have reached your desired level of tanginess and crispness, place the jar in the refrigerator. This will slow down the fermentation process considerably.
- Continue to keep the pickles fully submerged in the brine while stored.
- Once chilled, give your fermented pickles a taste. They should be crispy, flavorful, and have a delightful tang.
- If you prefer a tangier or softer pickle, you can remove them from the refrigerator and allow them to ferment for a few more days at room temperature.
- For those who enjoy a fizzy brine, tighten the lid on your mason jar.
- Remember to "burp" the jar by opening it briefly every week or so to release built-up gases.
- Alternatively, you can use an airlock system, or simply give the lid one loose twist to allow gases to escape naturally.
Notes

Taya Bennett is the founder of YumEasyMeals, a platform dedicated to easy, delicious, and quick-to-prepare recipes for busy families. Passionate about everyday cooking, she simplifies meals with practical, accessible, and always delicious ideas.
Discover her creations at: yumeasymeals.com