Oh, the glorious crunch! There’s nothing quite like biting into a perfectly crispy roasted chickpea. If you’re anything like me, you’re always on the hunt for a healthy snack that doesn’t compromise on flavor or texture. My kitchen has been a hub of experimentation to achieve that ideal crunch, and I’m thrilled to share my foolproof method for truly irresistible Garlic Baked Chickpeas . This article is your go-to guide for a simple, yet profoundly delicious, recipe. Get ready to master a snack that’s not just good for you, but absolutely addictive, thanks to a unique flavor twist and all my best tips for success.
Why You’ll Love This Garlic Baked Chickpeas
What sets these crispy garlic baked chickpeas apart from the rest? It’s all in the twist! While garlic alone is wonderful, adding a teaspoon of aromatic smoked paprika transforms them from merely good to absolutely extraordinary. This subtle addition introduces incredible notes of wood smoke, boosting the perceived savoriness and richness to new heights. The mild heat of the paprika also beautifully balances the potent garlic, ensuring a deep, complex flavor that is never overpowering.
- Incredibly Easy & Quick: This recipe is designed for real life. It’s so simple and fast to throw together, making it perfect for those busy days when you need a healthy snack or a quick meal addition without a fuss.
- Versatile & Wholesome: Beyond being a delicious treat, these chickpeas are a nutritional powerhouse. They’re naturally vegan , vegetarian , and gluten-free , packed with high protein and fiber . Enjoy them as a standalone snack, sprinkle them over salads, or add them to grain bowls for an extra boost.
- Satisfying Crunch & Flavor: Prepare for a truly satisfying experience! Each bite delivers a fantastic crispy texture, bursting with savory, salty, and smoky flavors that will keep you coming back for more.
Ingredients Needed
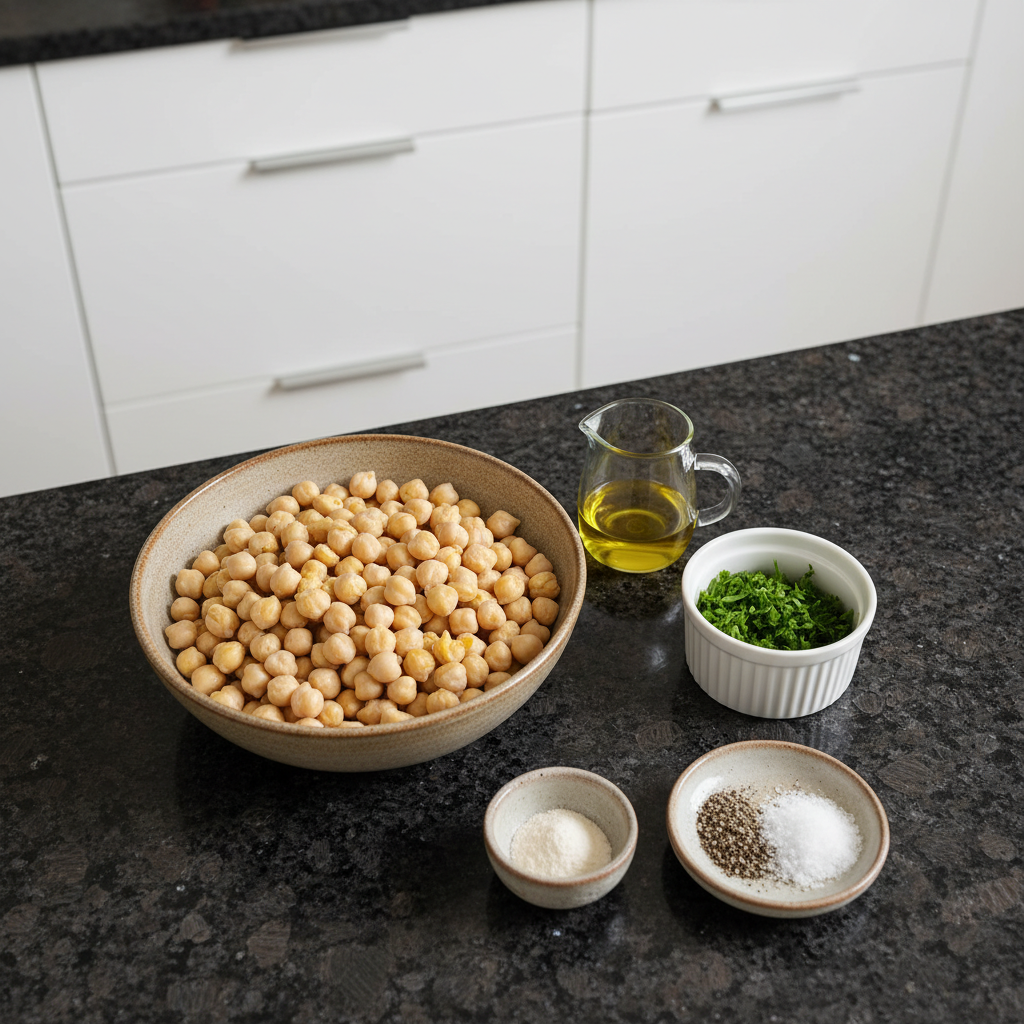
Gathering your ingredients is the first step to creating these delightful bites. Here’s exactly what you’ll need for my favorite garlic baked chickpeas :
- 1 – 15 oz. can of chickpeas, drained and rinsed
- 1/4 cup fresh parsley [chopped]
- 1/2 T. olive oil
- 1 tsp. garlic powder
- 1/4 tsp. sea salt
- 1/4 tsp. fresh black pepper
Ingredient Notes & Substitutions
A few tips on selecting and preparing your ingredients to ensure the best possible results:
- Chickpeas (Garbanzo Beans): For this quick and easy recipe, canned chickpeas are incredibly convenient. Just be sure to drain and rinse them thoroughly to remove any excess sodium and the starchy liquid, known as aquafaba. If you prefer, you can use dried chickpeas but they will require soaking and cooking first, adding significant prep time.
- Olive Oil: I always recommend using a good quality extra virgin olive oil . It not only helps the spices adhere but also contributes healthy fats and a lovely subtle flavor.
- Fresh Parsley: The fresh parsley adds a bright, herbaceous note and a pop of color. While dried parsley could technically be used, I highly recommend fresh for its vibrant taste and aromatic qualities.
- Garlic Powder: For roasted chickpeas , garlic powder is my secret weapon. Unlike fresh garlic, which can burn easily at high temperatures, garlic powder provides an even coating and ensures that irresistible garlic flavor without the risk of charring.
- Smoked Paprika (The Twist!): This is where the magic happens! Be sure to add 1 teaspoon of smoked paprika to your spice mix. Its smoky depth is the unique twist that makes these garlic baked chickpeas truly unforgettable.
- Salt & Pepper: My recipe calls for sea salt and black pepper , but feel free to adjust these to your personal taste preference after roasting.
This simple, naturally vegan , vegetarian , and gluten-free recipe is a testament to how delicious wholesome eating can be!
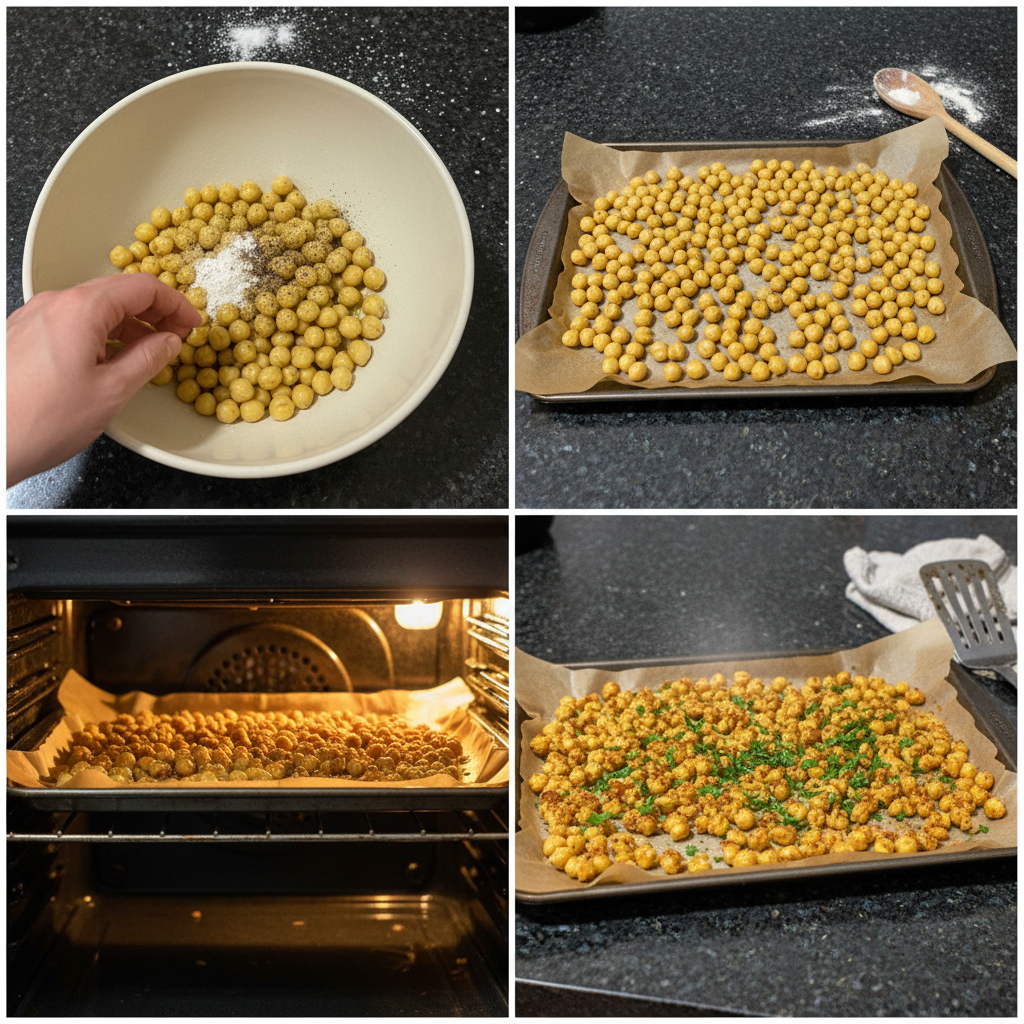
How to Make Garlic Baked Chickpeas
Follow these steps closely for a batch of perfectly crispy, flavor-packed garlic baked chickpeas every time. My goal is to guide you to success, making your kitchen fragrant with savory garlic and smoky spice!
Prepare Your Oven and Chickpeas
- First things first, line a baking sheet with parchment paper . This prevents sticking and makes cleanup a breeze.
- Preheat your oven to a robust 415°F (218°C). A high temperature is crucial for crispiness.
- Now, drain and rinse your chickpeas thoroughly under cold water. This removes the canning liquid.
- Pat them as dry as possible with a paper towel. This step is critical! Excess moisture creates steam in the oven, preventing your chickpeas from getting truly crispy. The dryer they are, the crunchier they’ll be.
Season and Roast to Perfection
- In a large bowl or a Ziplock bag, combine the fresh parsley, olive oil , garlic powder , sea salt , black pepper , and our unique twist: 1 teaspoon of smoked paprika .
- Add the dried chickpeas to the bowl or bag and mix until they are all well-coated with the delicious seasoning. Make sure every chickpea gets its share of that amazing flavor.
- Empty the seasoned chickpeas onto the prepared baking sheet and spread them out into a single layer. For best results, try to situate the chickpeas mostly together in the center of the pan. Outliers have a tendency to burn because they get too much direct heat without the communal warmth of the other chickpeas. This placement promotes even roasting.
- Bake for 25 minutes. During this time, you’ll need to toss the chickpeas every 5 to 7 minutes to ensure all sides get evenly exposed to the heat, turning them golden brown and slightly shriveled as they crisp up. You’ll know they’re ready when they are firm and wonderfully crunchy.
Cool and Serve
- Remove the chickpeas from the oven and let them cool on the baking sheet for a few minutes. They will continue to crisp up as they cool.
- Then, enjoy your perfectly crunchy and fragrant garlic baked chickpeas !
How to Achieve Perfectly Crispy Roasted Chickpeas
The quest for perfectly crispy roasted chickpeas is a noble one, and I’ve unlocked the secrets to achieving that satisfying crunch every single time. It’s all about understanding a few key principles of roasting:
Thorough Drying is Key: This is arguably the most crucial step. After rinsing your chickpeas , pat them *very* dry with paper towels. Any residual moisture will create steam in the oven , causing your chickpeas to steam rather than roast, resulting in a soft, chewy texture instead of a crunchy exterior. My rule of thumb: when you think they’re dry enough, pat them a little more!
Don’t Overcrowd the Pan: For optimal crispiness, your chickpeas need space! Spread them in a single layer on your baking sheet . If you pile too many onto the pan, they’ll end up steaming each other, which again prevents them from getting that golden, crunchy finish. If you’re making a double batch, use two baking sheets .
High Heat is Your Friend: A high oven temperature, like the 415°F (218°C) recommended in this recipe, is essential. This intense heat promotes quick evaporation of any remaining surface moisture and helps the chickpeas develop a beautiful golden-brown color and crispy texture rapidly.
Tossing for Evenness: Don’t skip the tossing! Shaking or stirring the chickpeas every 5-7 minutes during baking ensures that all sides get evenly exposed to the direct heat. This prevents some from burning while others remain soft, leading to uniformly crispy results.
Cooling for Crunch: Patience is a virtue, even after baking! Your chickpeas will continue to crisp up as they cool down on the baking sheet . Resist the urge to dive in immediately if you want that maximum crunch.
Air Fryer Garlic Chickpeas: A Quick Alternative
For those of you who love the speed and efficiency of an air fryer , you’re in luck! Making garlic baked chickpeas in an air fryer is a fantastic alternative that can yield incredibly crispy results even faster than the oven method.
Preparation is the Same: The initial steps remain identical. You’ll still drain, rinse, and thoroughly dry your chickpeas , then toss them with the olive oil , garlic powder , smoked paprika , sea salt , black pepper , and fresh parsley as described in the main recipe.
Air Fryer Temperature & Time: Once seasoned, place the chickpeas in your air fryer basket. I recommend setting your air fryer to 375-400°F (190-200°C) and starting with a cooking time of about 15-20 minutes. Adjust as needed for your specific air fryer model.
Frequent Shaking: Just like with oven roasting, shaking the air fryer basket every 5 minutes is key. This ensures that the hot air circulates evenly around all the chickpeas , promoting uniform crisping and preventing any burnt spots.
Avoid Overcrowding: The same rule applies here as with the oven: do not overcrowd the basket! Cook in batches if necessary to ensure the chickpeas are in a single layer, allowing for optimal air circulation and crispiness.
The air fryer method offers a quicker cooking time and can sometimes deliver an even crispier exterior, making it a great option for a fast, healthy snack .
Pro Tips & Troubleshooting
Even the simplest recipes benefit from a few expert insights. Here are my top tips for perfecting your garlic baked chickpeas and avoiding common pitfalls.
Pro Tips
- Maximize the Smoked Paprika Flavor: Ensure your smoked paprika and other seasonings are thoroughly and evenly distributed on every chickpea. This guarantees that deep, complex flavor with every single bite.
- Season to Taste: While I provide specific measurements for sea salt and black pepper , always taste and adjust after the chickpeas are roasted. Your preference is paramount!
- The Dryer, The Crispier: I can’t stress this enough! The absolute most critical step for ultimate crunch is to thoroughly dry the chickpeas with paper towels before seasoning. Residual moisture will steam them instead of crisping.
- Smart Pan Placement: As mentioned in the instructions, “Try to situate the chickpeas mostly together in the center of the pan. Outliers have a tendency to burn.” Keeping them clustered slightly helps them roast more evenly and prevents the edges from overcooking.
- Check for Doneness: Perfectly roasted chickpeas should be golden brown, slightly shriveled, and feel firm and wonderfully crispy to the touch. Don’t be afraid to pull one out and taste it!
Common Mistakes to Avoid
- Not Drying Chickpeas Enough: This is the number one culprit for soft, chewy chickpeas . If they’re not thoroughly dry, they’ll steam in the oven and never achieve that desired crunch.
- Overcrowding the Baking Sheet: Too many chickpeas on one baking sheet restricts air circulation, leading to steaming instead of roasting. Spread them out in a single layer, even if it means using two pans.
- Forgetting to Toss: Skipping the regular tossing can result in unevenly cooked chickpeas – some might be burnt, while others remain disappointingly soft.
- Too Much Oil: While oil is necessary for crisping and flavor, too much can make the chickpeas greasy and prevent them from getting truly crunchy. Stick to the recommended amount.
- Impatience (Not Baking Long Enough): It’s tempting to pull them out early, but chickpeas need adequate time in the oven to develop their full crispness and depth of flavor. Trust the process!
Serving & Storage
Once your garlic baked chickpeas are perfectly roasted, the possibilities for enjoying them are endless!
Serving Ideas
These crispy bites are incredibly versatile and can be enjoyed in so many ways:
- As a Snack: My absolute favorite! Keep a stash in your purse for sudden hanger strikes, or sneak them into the movies for a healthy treat. They’re excellent right out of the oven for peak crispness, at room temperature, or even chilled.
- Salad Topping: Forget croutons! Sprinkle them generously over any salad for a protein-packed, crunchy element. They’re especially good on a fresh green salad with a light vinaigrette.
- Meal Enhancer: Add them to sweet potato noodles , toss them into grain bowls, or use them as a textural contrast in stuffed sweet potatoes . They also make a fantastic, healthy appetizer at any gathering.
- Dinner Topping: Keep some at home for dinner topping situations! They elevate simple vegetable dishes, pasta, or rice bowls with their savory crunch.
- Garnish: A final sprinkle of fresh herbs like fresh parsley can add an extra layer of freshness and visual appeal.
Storage and Make-Ahead
To keep your garlic baked chickpeas fresh and delicious:
- Airtight Container: Once completely cooled, store your roasted chickpeas in an airtight container at room temperature, ideally in your pantry.
- Crispness & Shelf Life: For maximum crispness, they are truly best enjoyed the day they are made. They will gradually soften over time but will still be delicious for 3-5 days.
- Expert Tip: I find that storing them in a glass jar helps maintain their texture slightly better than plastic. There’s no need to refrigerate them; in fact, refrigeration can sometimes make them lose their crispness faster due to moisture.
- Reheating: If you want to revive some of their crispness, spread them on a baking sheet and reheat in a 350°F (175°C) oven for 5-7 minutes, or in an air fryer at 375°F (190°C) for 3-5 minutes, until warm and re-crisped.
- Freezing: I advise against freezing roasted chickpeas , as it significantly impacts their texture and crispness, leading to a mushy result when thawed.
Conclusion
And there you have it – the secret to perfectly crispy, deeply flavorful Garlic Baked Chickpeas ! This recipe is more than just a snack; it’s a versatile, high protein , fiber -rich addition to your healthy eating routine. The unique smoked paprika twist truly elevates these humble chickpeas , offering a depth of flavor that’s both unexpected and incredibly satisfying.
Whether you’re new to roasting or a seasoned home chef, this recipe is approachable and guarantees delicious results. I encourage you to try it soon, experiment with different flavor variations (perhaps a touch of lemon pepper or chili powder!), and make these wholesome bites a regular part of your daily meals. I’d love to hear how yours turn out – share your results in the comments below, or pass this recipe along to a friend who needs a new favorite healthy snack!
FAQ
How do I make sure my roasted chickpeas are crispy?
Achieving crispiness is all about managing moisture and heat! Ensure your chickpeas are thoroughly dried after rinsing, spread them in a single layer on the baking sheet without overcrowding, use a high oven temperature (415°F), and toss them frequently during baking. Allowing them to cool on the pan also helps them crisp up further. If you’re looking for more tips on achieving perfect texture with plant-based proteins, check out our guide to crispy pan-fried tofu. You can find more detailed tips in our section on “How to Achieve Perfectly Crispy Roasted Chickpeas.”
What are some different seasoning variations for roasted chickpeas?
While my recipe highlights smoked paprika for its deep flavor, the possibilities are endless! You could try lemon pepper, chili powder with cumin, a spicy blend with cayenne, or even a sweeter version with cinnamon and a touch of maple syrup for a different kind of snack. For another fantastic chickpea dish, consider our zesty vegan sweet and sour chickpeas. Don’t be afraid to experiment!
How should I store roasted chickpeas to keep them fresh?
Once completely cooled, store your roasted chickpeas in an airtight container, preferably a glass jar, at room temperature in your pantry. Avoid refrigeration, as the moisture can cause them to lose their crispness faster. For more details, refer to the “Storage and Make-Ahead” section.
How long do roasted chickpeas last, and how can I tell if they’ve gone bad?
Roasted chickpeas are best enjoyed the day they are made for maximum crispness but will last for 3-5 days when stored properly. Signs of spoilage include mold growth, an off-smell, or if they become excessively mushy. If in doubt, it’s always best to discard them.
Can I use an air fryer instead of an oven?
Absolutely! The air fryer is a fantastic alternative for making crispy chickpeas even quicker. The preparation steps are the same, but you’ll cook them in the air fryer at 375-400°F (190-200°C) for about 15-20 minutes, shaking the basket frequently. Check out our “Air Fryer Garlic Chickpeas” section for full instructions.
Are roasted chickpeas a healthy snack?
Yes, they are! Roasted chickpeas are an excellent healthy snack option. They are naturally vegan , gluten-free , and rich in protein and fiber , making them a satisfying and nutritious alternative to less healthy processed snacks. They support digestive health and can help keep you feeling full.
Can I use dried chickpeas for this recipe?
While you can use dried chickpeas , they require significant additional preparation. You would first need to soak them overnight and then cook them until tender before proceeding with the roasting steps of this recipe. For convenience and speed, I recommend using canned chickpeas for this particular method.
Why are my roasted chickpeas not crispy?
Several common issues can prevent crispiness. The most frequent culprits are not drying the chickpeas enough before roasting, overcrowding the baking sheet , or not baking them at a high enough temperature or for a sufficient duration. Refer to the “Common Mistakes to Avoid” section for detailed troubleshooting tips.

Crispy Garlic Baked Chickpeas with Smoked Paprika (Vegan)
Ingredients
Equipment
Method
- First things first, line a baking sheet with parchment paper. This prevents sticking and makes cleanup a breeze.
- Preheat your oven to a robust 415°F (218°C). A high temperature is crucial for crispiness.
- Now, drain and rinse your chickpeas thoroughly under cold water. This removes the canning liquid.
- Pat them as dry as possible with a paper towel. This step is critical! Excess moisture creates steam in the oven, preventing your chickpeas from getting truly crispy. The dryer they are, the crunchier they'll be.
- In a large bowl or a Ziplock bag, combine the fresh parsley, olive oil, garlic powder, sea salt, black pepper, and our unique twist: 1 teaspoon of smoked paprika.
- Add the dried chickpeas to the bowl or bag and mix until they are all well-coated with the delicious seasoning. Make sure every chickpea gets its share of that amazing flavor.
- Empty the seasoned chickpeas onto the prepared baking sheet and spread them out into a single layer. For best results, try to situate the chickpeas mostly together in the center of the pan. Outliers have a tendency to burn because they get too much direct heat without the communal warmth of the other chickpeas. This placement promotes even roasting.
- Bake for 25 minutes. During this time, you'll need to toss the chickpeas every 5 to 7 minutes to ensure all sides get evenly exposed to the heat, turning them golden brown and slightly shriveled as they crisp up. You'll know they're ready when they are firm and wonderfully crunchy.
- Remove the chickpeas from the oven and let them cool on the baking sheet for a few minutes. They will continue to crisp up as they cool.
- Then, enjoy your perfectly crunchy and fragrant garlic baked chickpeas!
Notes

Taya Bennett is the founder of YumEasyMeals, a platform dedicated to easy, delicious, and quick-to-prepare recipes for busy families. Passionate about everyday cooking, she simplifies meals with practical, accessible, and always delicious ideas.
Discover her creations at: yumeasymeals.com