As the holiday season twinkles into view, my kitchen inevitably fills with the comforting aroma of eggnog. There’s something truly magical about this festive drink that transports me straight to cherished memories. While a glass of spiked eggnog is always a treat, I’ve perfected an easy no-bake eggnog pie that truly captures the spirit of the season. This delightful eggnog dessert recipe is a guaranteed showstopper for any holiday gathering, offering all the rich, creamy flavor without the oven time. Get ready to discover your new favorite Christmas or Thanksgiving dessert!
Why You’ll Love This No-Bake Eggnog Pie Recipe
I believe every recipe should have a little something extra, a secret touch that elevates it from good to unforgettable. For this no-bake eggnog pie, my unique twist is a simple yet profound vanilla bean infusion that truly sets it apart.
The Vanilla Bean Difference: Before I even think about mixing, I gently infuse the eggnog with a real vanilla bean. I split the bean, scrape out those aromatic, tiny seeds, and let them marry with the eggnog. Once infused, I remove the bean pod itself, leaving behind an incredibly fragrant eggnog base. This process deeply enhances the creamy, custardy flavor, reinforcing the vanilla notes from the pudding and adding a richer, natural depth that a simple extract just can’t replicate. It transforms a standard eggnog dessert recipe into something truly extraordinary, tasting much like a gourmet custard pie.
Effortless & Quick: The beauty of a “no-bake” recipe cannot be overstated, especially during the bustling holiday season. This pie comes together in minutes, freeing you up to enjoy family, decorate, or simply relax. It’s the perfect solution for a last-minute holiday dessert.
Crowd-Pl
easing Holiday Dessert: Forget the stress of traditional baking! This pie is a delightful alternative to heavier, baked desserts. Its festive flavors and light texture make it an ideal Christmas dessert or Thanksgiving dessert, always met with rave reviews.
Creamy, Light & Fluffy Texture: Each bite is a dream – an ethereal blend that’s perfectly creamy, surprisingly light, and wonderfully fluffy. It’s the kind of dessert that leaves you feeling satisfied, not stuffed, and eager for another slice.
Ingredients Needed
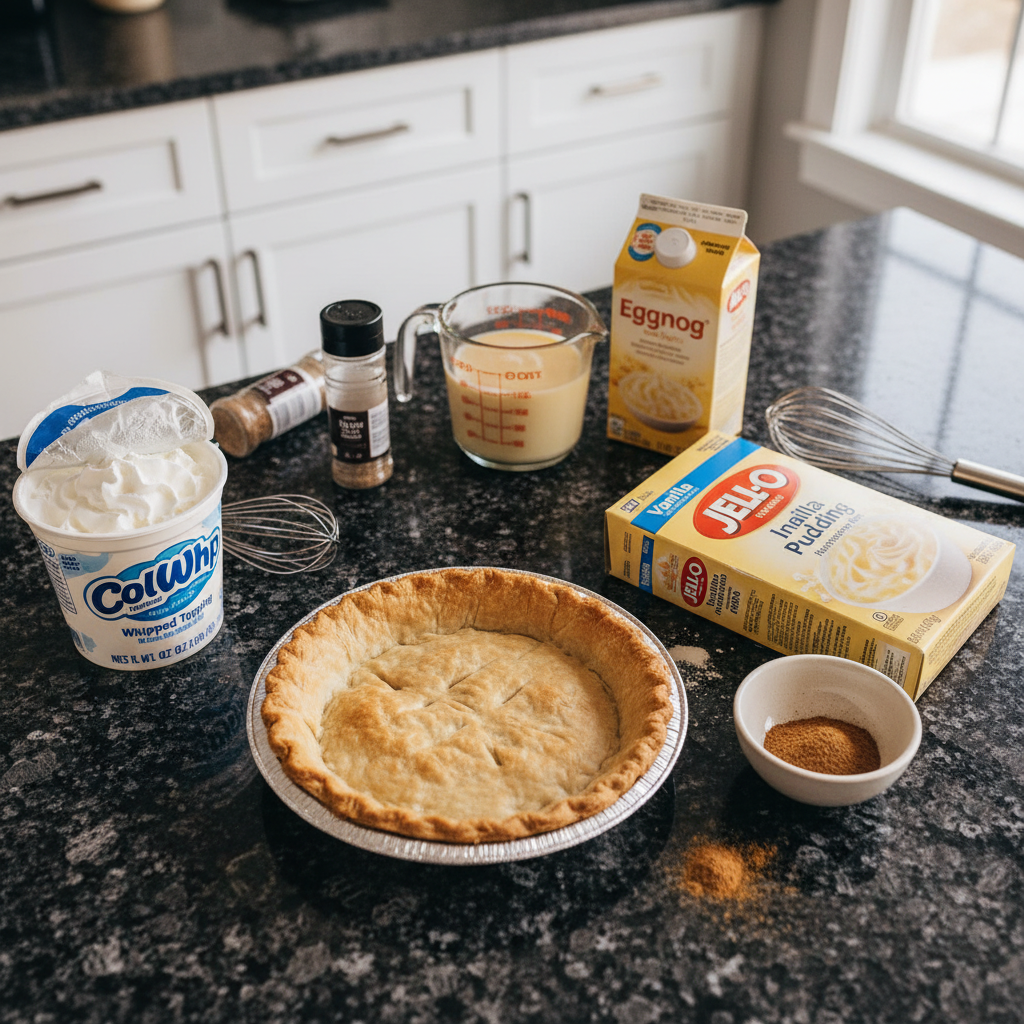
Here’s what you’ll need to create this dreamy dessert in your kitchen:
- 1 prepared pie crust
- 1 3.4 oz box vanilla instant pudding mix (NOT stovetop!)
- 1 ½ cups eggnog (one and one half cups)
- 2 cups whipped topping, like Cool Whip (thawed) (light topping may not set)
- dash nutmeg
Ingredient Notes & Substitutions
Crafting the perfect eggnog dessert recipe starts with understanding your ingredients. Here are my chef’s notes for success:
Pie Crust Options: For ultimate convenience, I always recommend a prepared pie crust for this no-bake recipe. A ready-made graham cracker crust is fantastic, providing a lovely textural contrast. You could also use a pre-baked traditional pastry crust for a more classic feel, or even a gingersnap crust for an extra spiced kick. The key is a crust that requires no baking once filled.
Eggnog Selection: For the best results and a pie that sets beautifully, I highly advise using full-fat eggnog. The higher fat content contributes to a richer flavor and a superior, firmer set. If you’re catering to dietary needs, a lactose-free eggnog can certainly be used; just be sure to check its thickness and fat content to ensure it will set well with the instant pudding.
Vanilla Instant Pudding (Crucial!): This is non-negotiable! You absolutely *must* use vanilla instant pudding mix. Stovetop pudding mixes contain different starches and setting agents that require heat to activate. Without that heat, they simply will not set up correctly in this no-bake application, leading to a runny, disappointing pie. Instant pudding is the secret to its firm, creamy texture.
Whipped Topping: Using a full-fat whipped topping like Cool Whip (thawed) is essential for the pie to achieve its proper set. “Light” or “fat-free” varieties often lack the stability needed, which can result in a softer, less firm pie. For a truly decadent experience, you can certainly use homemade whipped cream, just ensure it’s well-stabilized (perhaps with a touch of cream cheese or gelatin) to hold its shape.
Nutmeg: While a pre-ground nutmeg will work, I always recommend freshly grated nutmeg. The aroma and flavor are unparalleled, adding a warm, pungent spice that perfectly complements the eggnog. A pinch of cinnamon or a tiny dash of allspice could also be lovely variations.
The Vanilla Bean (Unique Twist): As mentioned, this is where the magic happens! A single vanilla bean is infused into the eggnog before mixing. This step provides an incredible depth of natural vanilla flavor, a truly luxurious enhancement that transforms this pie into a gourmet experience.
How to Make Your No-Bake Eggnog Pie
Get ready for an incredibly simple yet profoundly delicious journey to your new favorite holiday dessert!
Step 1: Infuse the Eggnog with Vanilla Bean
First, take your eggnog and gently warm about ½ cup of it in a small saucepan or microwave, just enough to be warm, not hot. Split your vanilla bean lengthwise with a sharp knife, scrape out all those tiny, fragrant seeds, and add both the seeds and the scraped pod to the warm eggnog. Let this mixture steep for at least 15-20 minutes, or even longer for a more intense flavor. This infusion process is key to our unique twist. Once infused, remove the vanilla bean pod, ensuring all the precious seeds remain in the eggnog. Now, combine this vanilla-infused eggnog with the remaining cold eggnog.
Step 2: Combine & Beat the Pudding Mixture
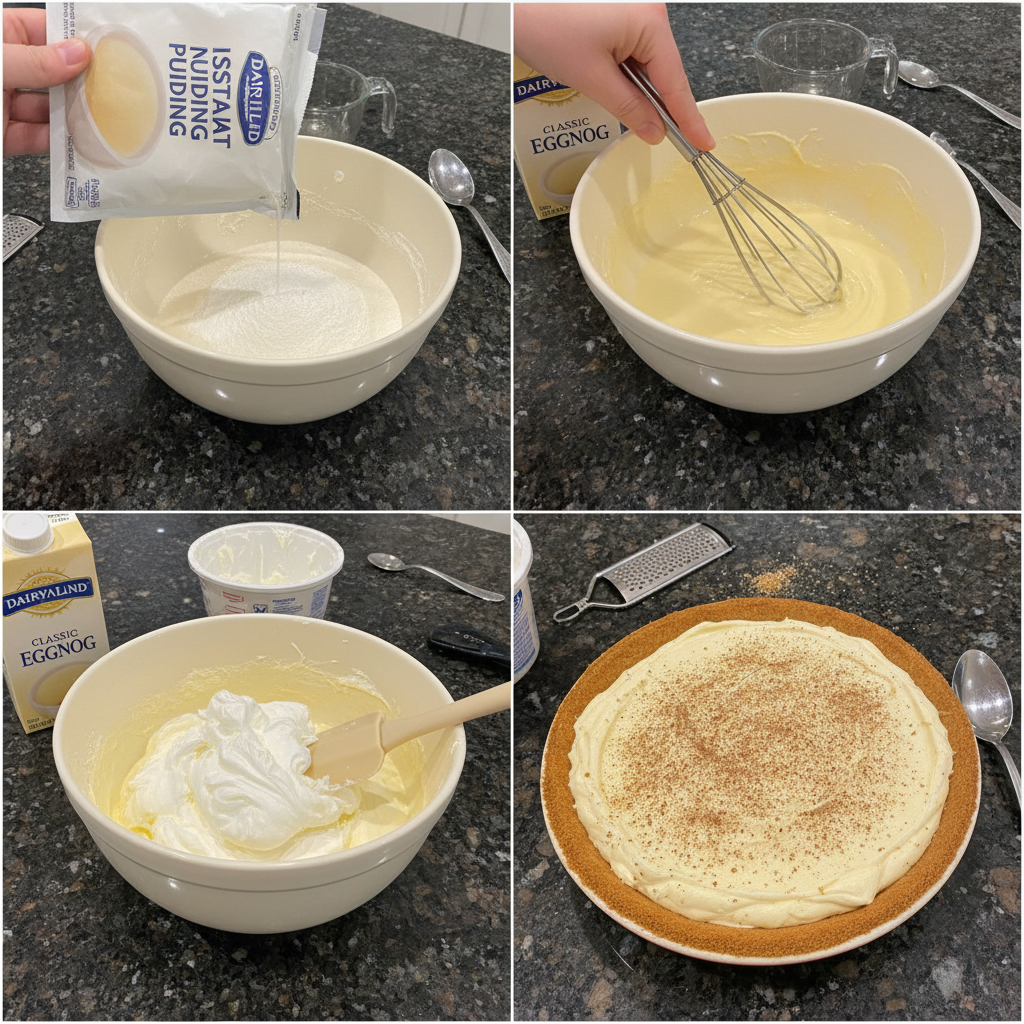
In a medium-sized bowl, pour your vanilla-infused eggnog and add the vanilla instant pudding mix. Using an electric mixer, beat the mixture on medium speed. You’ll notice it start to thicken quite quickly, transforming from a liquid to a smooth, creamy base. Continue to beat until it’s visibly thick and luscious, usually just 2-3 minutes. Don’t overmix, but ensure it’s well combined and has a custard-like consistency.
Step 3: Add a Dash of Nutmeg
Now, sprinkle in a generous dash nutmeg into the thickened pudding mixture. Give it another brief whirl with the mixer or a quick stir with a spatula to incorporate that warm, festive spice. The aroma will instantly make your kitchen feel like the holidays!
Step 4: Gently Fold in Whipped Topping
Next, it’s time to incorporate the thawed whipped topping. This step is crucial for achieving that light, fluffy texture. Using a rubber spatula, gently fold the whipped topping into the eggnog-pudding mixture. Use a soft, scooping motion from the bottom up, being careful not to deflate the mixture. Continue folding until the mixture is uniformly fluffy and has a beautiful, pale yellow color, with no streaks of plain whipped topping remaining.
Step 5: Fill the Pie Crust
Carefully spoon the fluffy eggnog mixture into your prepared pie crust. Use your spatula to gently spread and smooth the top until the filling is even and fills the crust beautifully. Make sure it’s appealingly level for a professional finish.
Step 6: Refrigerate Until Firm
This is arguably the most important step for a perfect no-bake pie! Once filled, cover the pie loosely with plastic wrap and immediately transfer it to the refrigerator. It needs to chill for a minimum of 4 hours or until firm. For the best results and easiest slicing, I often recommend refrigerating it overnight. This crucial chilling time allows the pudding to fully set, giving you that wonderfully firm, sliceable pie.
Perfecting Your Eggnog Pie: Crusts, Pudding & Toppings
Detailed Information on Different Types of Pie Crusts
While a store-bought graham cracker crust offers unbeatable convenience for this no-bake dessert, exploring other options can add a personalized touch. A pre-baked traditional shortbread or pastry crust can provide a buttery, flaky base, contrasting beautifully with the creamy filling. For those who love a bit of spice, a crushed gingersnap cookie crust is a phenomenal choice, echoing the warm notes of the eggnog. To make your own, simply combine 1 ½ cups of finely crushed cookies or graham crackers with ¼ cup of melted butter and 2 tablespoons of sugar, then press firmly into a 9-inch pie plate and chill before filling.
The Instant Pudding Imperative: Why it’s Non-Negotiable
I cannot stress this enough: for a successful no-bake eggnog pie, vanilla instant pudding mix is the only way to go. The science behind it is simple: instant puddings contain specific starches and gelling agents that activate rapidly upon contact with cold liquid, setting quickly without heat. Stovetop pudding mixes, on the other hand, rely on starches that require heat to thicken and achieve a set consistency. If you use a stovetop variety, your pie will remain a liquidy mess, no matter how long you chill it. Always double-check your box to ensure it clearly states “instant”!
Beyond the Classic: Creative Toppings for Your Eggnog Pie
While a simple dusting of nutmeg and a dollop of whipped topping are classic, don’t be afraid to get creative with your garnishes! Elevate your holiday dessert with these ideas:
- Meringue: A swirl of toasted meringue, either homemade or store-bought, adds an elegant touch and a delightful texture.
- Chocolate Shavings or Curls: A sprinkle of dark or white chocolate shavings offers a sophisticated look and a complementary flavor.
- Caramel Drizzle: A light drizzle of homemade or good-quality store-bought caramel sauce can enhance the creamy notes.
- Spiced Dusting: Beyond nutmeg, consider a light sprinkle of cinnamon, allspice, or even a tiny pinch of cardamom for a unique twist.
- Candied Nuts: Candied pecans or walnuts add a satisfying crunch and nutty flavor that pairs wonderfully with eggnog.
- Cranberry Sprigs: For a vibrant, festive look, a few fresh cranberry sprigs can make your pie shine on any holiday table.
Pro Tips & Troubleshooting for Success
Pro Tips
- Embrace the Vanilla Bean Twist: Don’t skip the vanilla bean infusion! This simple step, splitting the bean and scraping the seeds into warm eggnog, makes a world of difference in flavor depth. It’s what truly elevates this eggnog dessert recipe.
- Chill Your Tools: For extra insurance against a runny pie, especially if making homemade whipped cream, chill your mixing bowl and electric mixer beaters in the freezer for 10-15 minutes before you begin. Colder ingredients and tools contribute to a more stable, fluffy mixture.
- Gentle Folding is Key: When incorporating the whipped topping, use a light, gentle folding motion with your spatula. This preserves the airiness of the whipped topping, ensuring your pie filling remains wonderfully light and fluffy.
- Fresh Nutmeg for the Win: I always recommend freshly grated nutmeg. Its pungent, warm aroma is far superior to pre-ground versions and will truly enhance the festive flavors of your holiday dessert.
- Don’t Rush the Chill: Patience is a virtue, especially with no-bake pies! Adequate refrigerate time—at least 4 hours or until firm, ideally overnight—is absolutely critical for the pie to set properly and be sliceable.
Common Mistakes to Avoid
- Using Stovetop Pudding Mix: This is the number one culprit for a runny pie! As discussed, stovetop pudding will not set without heat. Always use vanilla instant pudding mix to ensure your pie firms up beautifully.
- Ignoring Whipped Topping Type: “Light whipped topping” often contains less fat and fewer stabilizers, which can prevent your pie from setting properly. Stick to regular, full-fat whipped topping for the best structural integrity.
- Over-Mixing: While you want to beat the pudding until thick, avoid over-mixing, which can sometimes make the mixture too stiff or grainy. Similarly, over-folding the whipped topping can deflate it, resulting in a denser pie.
- Insufficient Chilling: Pulling the pie out of the fridge too early is a common error. If your pie isn’t chilled for the full recommended time, it will be soft and difficult to slice, leading to a disappointing presentation. “Why didn’t my eggnog pie set?” usually comes down to this or the pudding type!
Serving & Storage Suggestions
Serving Ideas
This no-bake eggnog pie is a star on its own, but a little presentation goes a long way to make it truly shine as an American cuisine classic. Just before serving, I love to add a little more fresh whipped topping to each slice and a final, delicate dash nutmeg for a beautiful finish. For pairing, it’s wonderful alongside a warm cup of coffee, a rich homemade hot chocolate, or even another glass of chilled eggnog. For holiday celebrations, consider festive garnishes like a sprig of cranberries, a cinnamon stick, or even some edible glitter for extra sparkle!
Storage and Make-Ahead
One of the beauties of this eggnog dessert recipe is its make-ahead potential! You can prepare this pie a day or two in advance, making it an excellent choice for a stress-free holiday dessert. Store the pie, tightly covered with plastic wrap, in the fridge for up to 3-4 days. For longer storage, this pie also freezes beautifully. To freeze, place the unset pie in the freezer uncovered for about an hour to firm up, then wrap it tightly in several layers of plastic wrap, followed by a layer of aluminum foil. It can be frozen for 1-2 months. Thaw it overnight in the refrigerator before serving for optimal texture.
Adaptations for Holiday Celebrations
Want to dial up the festive factor for your Christmas dessert or Thanksgiving dessert? Consider adding a hint of rum extract (non-alcoholic) or a tiny splash of rum, bourbon, or brandy directly to the eggnog when you’re preparing it. A tablespoon or two can really bring out those classic holiday notes. Another fun idea is to make individual mini eggnog pies in small tart shells or ramekins for easy serving at parties.
Conclusion
There you have it – a truly dreamy, effortlessly delicious no-bake eggnog pie! This eggnog dessert recipe is everything you could want in a holiday treat: it’s incredibly easy to make, requires no oven time, and delivers a spectacular creamy flavor, especially with that special vanilla bean infusion. It’s a guaranteed crowd-pleaser that will have everyone asking for the recipe. So go ahead, whip up this beautiful, festive pie. I promise, even if you’re new to pie making, you’ll create a stunning, custard pie-like dessert that tastes like a professional pastry chef made it. I encourage you to make it for your next gathering and share the joy (and maybe a slice or two!).
Eggnog Pie FAQ
Here are some frequently asked questions about this delicious eggnog pie:
What type of pie crust works best for eggnog pie?
For this no-bake recipe, a prepared graham cracker crust is a fantastic and convenient choice. You can also use a pre-baked traditional pastry crust or even a spiced gingersnap crust for added flavor. The key is to use a crust that doesn’t require further baking once filled.
What type of eggnog works best for eggnog pie?
I recommend using full-fat eggnog for the best possible texture and setting. The higher fat content contributes to a richer flavor and helps the pie firm up nicely. Don’t forget to infuse it with a real vanilla bean for unparalleled flavor depth!
How long does eggnog pie last in the fridge?
When properly covered with plastic wrap, your eggnog pie will last beautifully in the refrigerator for 3-4 days. It’s a great make-ahead holiday dessert!
Can eggnog pie be frozen?
Yes, absolutely! To freeze, place the pie in the freezer uncovered until firm (about an hour). Then, wrap it tightly in several layers of plastic wrap, followed by a layer of aluminum foil. It can be stored in the freezer for 1-2 months. Thaw overnight in the refrigerator before serving.
How can I make sure my eggnog pie sets properly?
To ensure your pie sets perfectly, always use vanilla instant pudding mix (not stovetop!), allow sufficient chilling time in the refrigerator (at least 4 hours, or overnight), and use regular, full-fat whipped topping instead of a light variety.
Can I use alcohol in this recipe?
Yes, you can! For an adult twist, you can add a small amount of liquor to the eggnog mixture. I recommend 1-2 tablespoons of rum, bourbon, or brandy, which complement the eggnog flavor beautifully. Be cautious not to add more, as alcohol can interfere with the pudding’s ability to set properly.
Can lactose-free eggnog be used?
Absolutely, lactose-free eggnog can be used in this recipe. Just be sure to check its thickness and fat content, as some lighter versions might not contribute to as firm a set. It should still work well with the instant pudding mix.

Dreamy No-Bake Eggnog Pie Recipe with Vanilla Bean Twist
Ingredients
Equipment
Method
- Gently warm about ½ cup of eggnog in a small saucepan or microwave until warm (not hot). Split a vanilla bean lengthwise with a sharp knife, scrape out the tiny, fragrant seeds, and add both the seeds and the scraped pod to the warm eggnog. Let this mixture steep for at least 15-20 minutes, or even longer for a more intense flavor. Once infused, remove the vanilla bean pod, ensuring all the precious seeds remain in the eggnog. Now, combine this vanilla-infused eggnog with the remaining cold eggnog.
- In a medium-sized bowl, pour your vanilla-infused eggnog and add the vanilla instant pudding mix. Using an electric mixer, beat the mixture on medium speed. You'll notice it start to thicken quite quickly, transforming from a liquid to a smooth, creamy base. Continue to beat until it's visibly thick and luscious, usually just 2-3 minutes. Don't overmix, but ensure it's well combined and has a custard-like consistency.
- Now, sprinkle in a generous dash of nutmeg into the thickened pudding mixture. Give it another brief whirl with the mixer or a quick stir with a spatula to incorporate that warm, festive spice.
- Next, it’s time to incorporate the thawed whipped topping. This step is crucial for achieving that light, fluffy texture. Using a rubber spatula, gently fold the whipped topping into the eggnog-pudding mixture. Use a soft, scooping motion from the bottom up, being careful not to deflate the mixture. Continue folding until the mixture is uniformly fluffy and has a beautiful, pale yellow color, with no streaks of plain whipped topping remaining.
- Carefully spoon the fluffy eggnog mixture into your prepared pie crust. Use your spatula to gently spread and smooth the top until the filling is even and fills the crust beautifully. Make sure it's appealingly level for a professional finish.
- Once filled, cover the pie loosely with plastic wrap and immediately transfer it to the refrigerator. It needs to chill for a minimum of 4 hours or until firm. For the best results and easiest slicing, I often recommend refrigerating it overnight. This crucial chilling time allows the pudding to fully set, giving you that wonderfully firm, sliceable pie.
Notes

Taya Bennett is the founder of YumEasyMeals, a platform dedicated to easy, delicious, and quick-to-prepare recipes for busy families. Passionate about everyday cooking, she simplifies meals with practical, accessible, and always delicious ideas.
Discover her creations at: yumeasymeals.com