There’s nothing quite like the comforting aroma of freshly baked banana muffins wafting through my kitchen. It’s a scent that instantly brings warmth and happiness, and I believe everyone deserves to experience that joy, regardless of dietary needs. That’s why I’m so thrilled to share my absolute favorite recipe for truly exceptional Gluten Free Banana Muffins. This isn’t just another gluten-free recipe; it’s a game-changer, elevated by the magical touch of browned butter. Get ready for bakery-quality results that are moist, tender, and bursting with rich flavor. You’ll find detailed instructions, my expert tips, common mistake avoidance, and answers to all your baking questions, ensuring success every time for home cooks across the US!
Why You’ll Love These Browned Butter Gluten-Free Banana Muffins
Our secret? Browned butter. I’ll guide you through easily browning butter until it develops an incredible nutty aroma and golden-brown color. This simple step unlocks the Maillard reaction, infusing your muffins with complex, toasted, and caramel notes that perfectly complement the sweet banana flavor, creating a far richer and more sophisticated taste profile.
- Perfectly Moist Texture: Achieve perfectly soft, moist, and tender muffins every single time, even without gluten, ensuring a delightful texture.
- Bakery-Quality Results: This recipe is surprisingly simple, yielding bakery-quality results that will impress family and friends.
- Versatile Treat: A versatile treat ideal for a wholesome breakfast, a satisfying snack, or even a light dessert, fitting into any busy schedule.
Ingredients You’ll Need
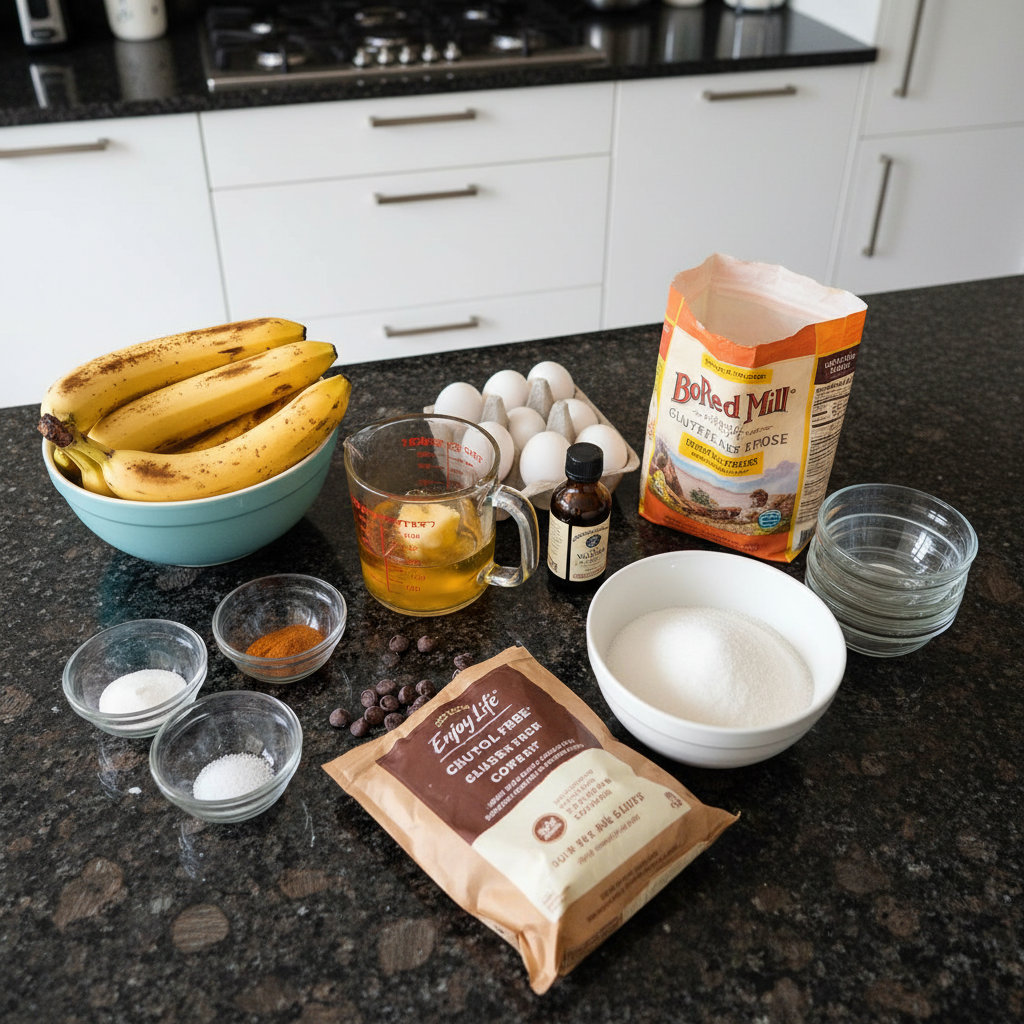
- 3 large bananas, ripe
- 1 teaspoon baking soda
- 1/3 cup butter, melted (For dairy-free use Smart Balance or coconut oil. )
- 1/2 cup granulated sugar (For no refined sugar use pure maple syrup or coconut sugar.)
- 1/2 teaspoon ground cinnamon
- 1/8 teaspoon salt
- 1 teaspoon pure vanilla extract
- 2 large eggs, whisked (For egg-free use Bob’s Red Mill gluten-free egg replacer.)
- 1 1/2 cups gluten-free flour all-purpose flour with xanthan gum
- 1/2 cup gluten-free chocolate chips (For dairy-free use Nestle Allergen Free Semi-Sweet Morsels or Enjoy Life.)
Ingredient Notes & Substitutions
- Bananas: The secret to the best Gluten Free Banana Muffins lies in using very ripe bananas, those with plenty of brown spots. They’re naturally sweeter and provide more moisture, which is crucial for a tender crumb. Unripe bananas simply won’t yield the same depth of flavor or desired texture. These ripe bananas are also perfect for whipping up a refreshing kale banana smoothie.
- Butter: This is where the magic happens! The butter will be browned to create those incredible nutty notes, per our unique twist. For a dairy-free option, you can easily substitute with Smart Balance or coconut oil.
- Gluten-Free Flour: I specify a gluten-free all-purpose flour with xanthan gum because the xanthan gum acts as a binder, providing structure that gluten normally would. Different gluten-free flour blends can vary significantly in their composition (e.g., brown rice flour, tapioca starch, potato starch) and will impact the final texture of your muffins. While almond flour or oat flour are also gluten-free options, they behave very differently and usually require significant recipe adjustments, not 1:1 swaps. Always measure your gluten-free flour using the “spoon & level” method to prevent dense muffins.
- Sugar: If you’re looking for refined sugar-free alternatives, feel free to use pure maple syrup or coconut sugar as suggested in the ingredients list.
- Baking Soda: This powerful leavening agent plays a vital role in giving our muffins their beautiful rise. We’ll delve deeper into its science shortly.
- Eggs: For an egg-free version, Bob’s Red Mill gluten-free egg replacer works wonderfully in this recipe, maintaining moisture and structure.
- Chocolate Chips: I love chocolate chips in my banana muffins! For dairy-free options, I recommend Nestle Allergen Free Semi-Sweet Morsels or Enjoy Life brands. You could also try other variations like chopped nuts or dried fruit.
How to Make The Best Browned Butter Gluten-Free Banana Muffins
Creating these incredible Gluten Free Banana Muffins is straightforward. Follow these steps for perfect, bakery-style results every time.
1. Prep Oven & Brown the Butter (The Flavor Secret!)
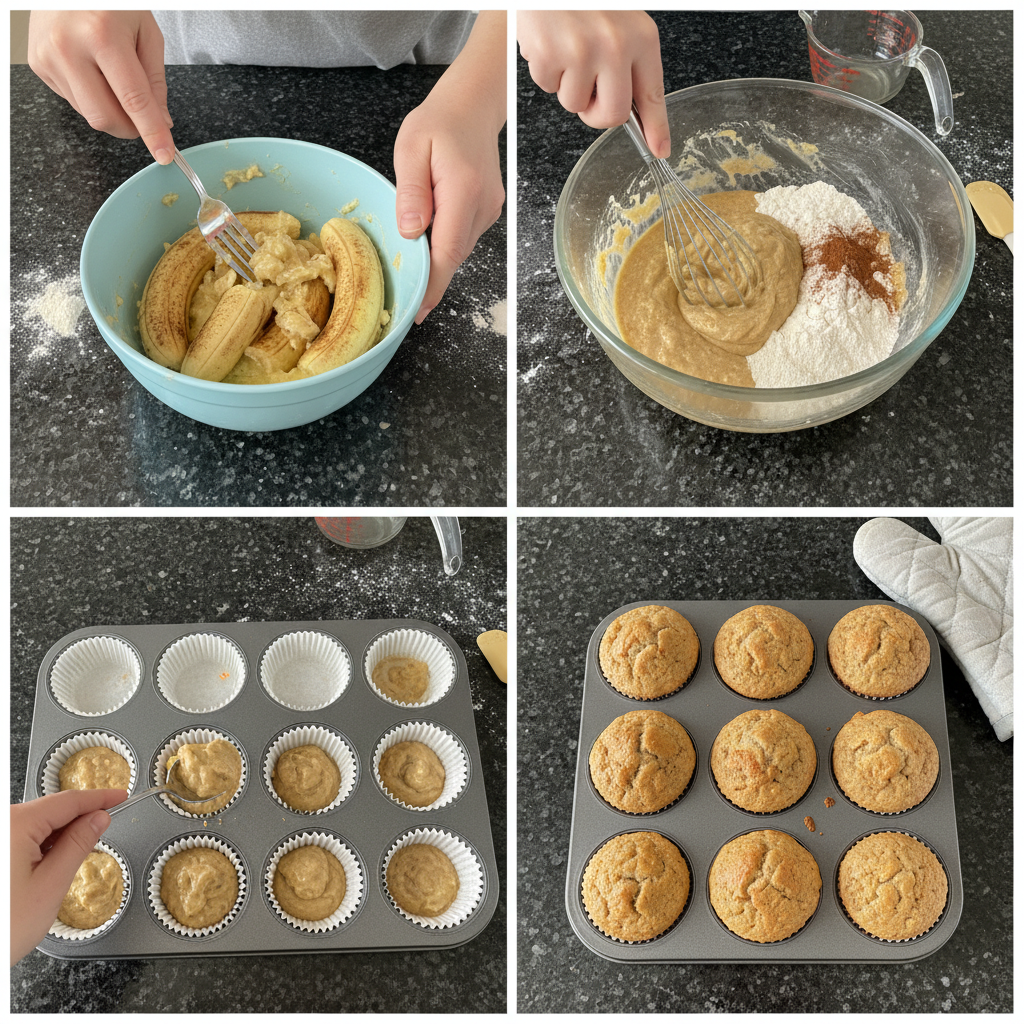
First, preheat your oven to 350°F (175°C). Line a muffin tin with cupcake liners or spray it generously with gluten-free cooking spray. Now, for the star of the show: In a small saucepan, melt the 1/3 cup butter over medium heat. Continue cooking, stirring frequently, until it transforms into a beautiful golden-brown color and releases a rich, nutty aroma. This browning process typically takes about 5-7 minutes. Immediately remove from heat and let it cool slightly – you don’t want it too hot when added to the bananas!
2. Mash Bananas & Activate Baking Soda
In a large mixing bowl, mash the ripe bananas with a fork until they are completely smooth. Add the baking soda and stir to combine thoroughly with the mashed bananas. Allow the mixture to sit for 1 to 2 minutes. Do not skip this crucial step! The chemical reaction between the baking soda and the acid in the bananas is vital for a good rise in gluten-free muffins.
3. Combine Wet Ingredients
Stir the slightly cooled browned butter into the mashed bananas, creating a smooth and fragrant mixture. Then, add the granulated sugar, salt, ground cinnamon, pure vanilla extract, and whisked eggs. Stir until just combined, ensuring all the wet ingredients are well incorporated.
4. Incorporate Dry Ingredients & Mix-Ins
Add in the gluten-free flour and stir until fully combined. Be careful not to overmix the batter once the flour is added. Overmixing can activate starches in gluten-free flour and lead to tough or gummy gluten-free muffins. Mix just until no dry streaks remain. Finally, gently stir in your chocolate chips or any other desired mix-ins.
5. Fill Muffin Cups & Bake
Using a greased ice cream scoop or measuring cup, scoop the batter evenly into the prepared muffin tin cups. For perfectly uniform, bakery-style muffins, use a greased ice cream scoop to fill the muffin cups. For extra visual appeal, you can fill the cups generously and sprinkle a little sugar on top before baking.
Bake for 15-20 minutes in the preheated oven. Begin checking at 15 minutes. Muffins are done when the tops are golden brown, spring back gently when lightly touched, and a wooden skewer or toothpick inserted into the center comes out clean or with only moist crumbs attached. Watch your oven closely, as baking times can vary significantly.
6. Cool & Enjoy
Allow the muffins to cool in the muffin tin for a few minutes before transferring them to a wire rack to cool completely. Once fully cooled, they are ready to enjoy! Store the completely cooled muffins in an airtight container to maintain freshness.
Gluten-Free Baking Success: Flour Blends & Troubleshooting
Baking gluten-free doesn’t have to be daunting. Understanding a few key principles can help you achieve amazing results every time.
Demystifying Gluten-Free Flour Blends & Substitutions
This recipe calls for a gluten-free all-purpose flour with xanthan gum. This type of blend is incredibly convenient because the xanthan gum is already included, mimicking the binding properties that gluten provides in traditional baking. These blends typically combine various gluten-free flours like brown rice flour, tapioca starch, and potato starch to create a balanced texture that closely resembles wheat flour.
While alternative flours like almond flour, oat flour, or even coconut flour are popular in gluten-free baking, it’s crucial to understand they behave very differently from all-purpose blends. These flours absorb liquid differently and have unique protein structures, meaning they often require significant recipe adjustments (e.g., more liquid, different binding agents) rather than simple 1:1 substitutions. Always stick to the specified blend unless you’re an experienced gluten-free baker accustomed to making these adjustments.
The Science Behind the Rise: Bananas, Baking Soda & Preventing Sticky Muffins
The Baking Soda & Banana Interaction: That brief resting period after adding baking soda to the mashed bananas is incredibly important! The acidity naturally present in ripe bananas reacts with the baking soda to produce carbon dioxide gas. This gas creates tiny air bubbles, which are essential for helping your Gluten Free Banana Muffins rise and become wonderfully light and fluffy.
Preventing Sticky Muffins: There’s nothing more frustrating than a delicious muffin stuck to its liner! To prevent your muffins from sticking to paper liners, I have a few tricks. First, always use high-quality cupcake liners. Second, lightly spray paper liners with a gluten-free cooking spray before filling them with batter. Third, ensure muffins are fully cooked and completely cooled on a wire rack before attempting to remove or store them. Avoid overfilling muffin cups. Alternatively, you can use silicone liners or thoroughly grease your muffin tin directly, skipping paper liners altogether.
Expert Tips & Common Mistakes to Avoid
Achieving bakery-level perfection with your Gluten Free Banana Muffins is entirely possible with a few insider tips and by sidestepping common pitfalls.
Pro Tips for Bakery-Style Results
- Brown Butter Magic: Don’t rush the browning butter step! This is the unique twist that truly elevates these muffins. Ensure the butter reaches a beautiful golden-brown and nutty aroma, then let it cool slightly before adding to the batter.
- Choose Ripe Bananas: For maximum sweetness and moisture, always use very ripe bananas with plenty of brown spots. They lend the best flavor and texture to your banana muffins.
- Accurate Flour Measurement: Gluten-free flours can be tricky. Always use the “spoon & level” method for measuring your gluten-free flour: spoon the flour into your measuring cup, then level off with a straight edge. This prevents overpacking and dry, dense muffins.
- Bakery-Style Dome: For that classic domed top, fill your muffin cups almost to the top. Optionally, sprinkle a pinch of granulated sugar on top before baking for a lovely sparkle and a slightly crisp crust.
- Uniform Muffins: For consistent size and even baking, use an ice cream scoop to portion the batter into each muffin cup.
- The Baking Soda Rest: Remember the critical step of letting the baking soda sit with the mashed bananas for a few minutes. This ensures a proper chemical reaction and a perfect rise.
Common Mistakes to Avoid
- Overmixing the Batter: Once you add the gluten-free flour, mix just until no dry streaks remain. Overmixing can activate the starches and lead to tough or gummy gluten-free muffins.
- Overbaking: Overbaking is the enemy of moist muffins. Keep a close eye on your oven and check for doneness around the 15-minute mark. Look for golden-brown tops that spring back gently when touched, and a clean toothpick.
- Using Unripe Bananas: Underripe bananas will result in less flavorful and less moist banana muffins. Stick to those deliciously spotty ones!
- Incorrect Flour Measurement: Scooping flour directly from the bag will compact it, resulting in too much flour. This leads to dry, crumbly muffins. Always spoon and level!
Serving Suggestions & Storage Tips
Once your amazing Gluten Free Banana Muffins are baked, the enjoyment can continue for days!
Ways to Enjoy Your Muffins
These muffins are absolutely delicious served warm, right out of the oven. For an extra treat, consider a dollop of soft butter, a smear of cream cheese, or a drizzle of warm maple syrup. They are the perfect accompaniment to your morning coffee or tea and make for a wholesome breakfast or satisfying snack. For presentation, you can always add a sprinkle of cinnamon or a dusting of powdered sugar.
Storage and Make-Ahead Instructions
- Room Temperature Storage: Once completely cooled, store your Gluten Free Banana Muffins in an airtight container at room temperature for 2-3 days. This helps maintain their moisture and freshness.
- Freezing Instructions: These Gluten Free Banana Muffins freeze beautifully! Once they are completely cool, wrap each muffin individually in plastic wrap. Then, place them in a freezer-safe bag or container. They can be stored in the freezer for up to 3 months.
- Thawing & Reheating: To thaw frozen muffins, simply let them sit at room temperature for a few hours. If you prefer them warm, you can gently reheat them in the microwave for 20-30 seconds or in a preheated oven at 300°F (150°C) for about 5-7 minutes.
Bake Your Best Gluten-Free Banana Muffins Today!
I hope you’re as excited as I am to try these incredible Gluten Free Banana Muffins. The irresistible flavor depth from the browned butter, combined with a perfectly moist and tender gluten-free texture, makes this recipe a true standout. And despite its gourmet taste, the steps are surprisingly simple, making it accessible for bakers of all skill levels. With the detailed instructions and expert tips I’ve shared, you can confidently succeed, even if you are new to gluten-free baking. Don’t be afraid to experiment with different mix-ins like nuts or berries to make them your own. Happy baking, and don’t forget to bookmark this recipe for future use or share it with fellow banana muffin lovers!
Frequently Asked Questions (FAQ)
What does adding baking soda to the mashed bananas do?
Adding baking soda to the mashed ripe bananas is a crucial step! The baking soda reacts with the natural acids in the bananas to create carbon dioxide gas. This gas acts as a leavening agent, helping the muffins rise and become wonderfully light and fluffy.
How can I make these muffins dairy-free, egg-free, or refined sugar-free?
This recipe is very versatile! For dairy-free, use Smart Balance or coconut oil instead of butter. For egg-free, use Bob’s Red Mill gluten-free egg replacer as directed on its package. For refined sugar-free, substitute the granulated sugar with pure maple syrup or coconut sugar as indicated in the ingredients list.
What are some good mix-ins and variations for these banana muffins?
While chocolate chips are classic (remember dairy-free options like Nestle Allergen Free Semi-Sweet Morsels or Enjoy Life!), you can get creative! Other popular additions include chopped nuts (like walnuts or pecans), fresh or frozen blueberries, peanut butter chips, or white chocolate chips. For a spiced twist, try adding a little extra cinnamon and a sprinkle of turbinado sugar on top before baking.
How do I properly measure gluten-free flour?
To avoid dense or dry gluten-free muffins, always use the “spoon & level” method for measuring gluten-free flour. Use a spoon to lightly scoop the flour into your measuring cup, then level off the top with a straight edge (like the back of a knife). Do not scoop directly from the bag, as this compacts the flour and results in using too much.
Can I freeze gluten-free banana muffins, and how long do they last?
Yes, gluten-free banana muffins freeze beautifully! Once completely cool, wrap each muffin individually in plastic wrap, then place them in a freezer-safe bag or container. They will last for up to 3 months in the freezer. To thaw, simply leave them at room temperature for a few hours or gently reheat in the microwave or oven for a few minutes.
My gluten-free muffin batter is too runny, what should I do?
If your batter seems too runny, it could be due to very overripe or watery bananas, or slightly inaccurate flour measurement. To fix this, gradually add a tablespoon or two more of your gluten-free flour blend until the desired consistency is reached. Remember to be careful not to overmix!
How do I prevent gluten-free muffins from being gummy?
Gummy muffins are often a result of overmixing the batter or incorrect flour measurement. To prevent this, mix the gluten-free flour into the wet ingredients only until just combined, with no dry streaks remaining. Also, ensure you are measuring your gluten-free flour accurately using the “spoon & level” method to avoid adding too much.

Browned Butter Gluten-Free Banana Muffins
Ingredients
Equipment
Method
- First, preheat your oven to 350°F (175°C). Line a muffin tin with cupcake liners or spray it generously with gluten-free cooking spray.
- In a small saucepan, melt the 1/3 cup butter over medium heat. Continue cooking, stirring frequently, until it transforms into a beautiful golden-brown color and releases a rich, nutty aroma. This browning process typically takes about 5-7 minutes.
- Immediately remove from heat and let it cool slightly – you don't want it too hot when added to the bananas!
- In a large mixing bowl, mash the ripe bananas with a fork until they are completely smooth.
- Add the baking soda and stir to combine thoroughly with the mashed bananas. Allow the mixture to sit for 1 to 2 minutes. Do not skip this crucial step! The chemical reaction between the baking soda and the acid in the bananas is vital for a good rise in gluten-free muffins.
- Stir the slightly cooled browned butter into the mashed bananas, creating a smooth and fragrant mixture.
- Then, add the granulated sugar, salt, ground cinnamon, pure vanilla extract, and whisked eggs. Stir until just combined, ensuring all the wet ingredients are well incorporated.
- Add in the gluten-free flour and stir until fully combined. Be careful not to overmix the batter once the flour is added. Overmixing can activate starches in gluten-free flour and lead to tough or gummy gluten-free muffins. Mix just until no dry streaks remain.
- Finally, gently stir in your chocolate chips or any other desired mix-ins.
- Using a greased ice cream scoop or measuring cup, scoop the batter evenly into the prepared muffin tin cups. For perfectly uniform, bakery-style muffins, use a greased ice cream scoop to fill the muffin cups. For extra visual appeal, you can fill the cups generously and sprinkle a little sugar on top before baking.
- Bake for 15-20 minutes in the preheated oven. Begin checking at 15 minutes. Muffins are done when the tops are golden brown, spring back gently when lightly touched, and a wooden skewer or toothpick inserted into the center comes out clean or with only moist crumbs attached. Watch your oven closely, as baking times can vary significantly.
- Allow the muffins to cool in the muffin tin for a few minutes before transferring them to a wire rack to cool completely.
- Once fully cooled, they are ready to enjoy! Store the completely cooled muffins in an airtight container to maintain freshness.
Notes

Taya Bennett is the founder of YumEasyMeals, a platform dedicated to easy, delicious, and quick-to-prepare recipes for busy families. Passionate about everyday cooking, she simplifies meals with practical, accessible, and always delicious ideas.
Discover her creations at: yumeasymeals.com