Oh, the glorious tang of fresh lemon! There’s something undeniably refreshing about its bright, zesty aroma, and when it meets the rich, creamy texture of a cheesecake-like treat, magic happens. Today, I’m thrilled to share my absolute favorite recipe for Lemon Fat Bombs – a simple, delicious, and foolproof creation perfect for anyone embracing a keto or low-carb lifestyle.
Imagine a frozen, tart, and perfectly sweet bite that melts in your mouth, leaving you revitalized and utterly satisfied. My secret to the best Lemon Fat Bombs? A unique, flavor-boosting twist that takes these already delightful treats to an entirely new level of vibrant citrusy bliss.
Why You’ll Love This Recipe
I’ve experimented with countless fat bomb recipes, but this one for Lemon Fat Bombs is truly a game-changer, all thanks to one simple, yet profound, technique:
- The Unique Twist: Before blending, I add a tiny pinch of salt (just 1/8 teaspoon!) to the lemon zest and sweetener mixture, letting it sit for 10 minutes. This isn’t just a quirky step; it’s a scientific marvel!
- Enhanced Flavor & Sweetness: The salt works its magic by drawing out the essential oils from the lemon zest and amplifying the natural sweetness of the swerve sweetener. This allows the flavors to meld beautifully, creating a far more complex and vibrant lemon profile that truly pops.
Beyond this incredible flavor secret, you’ll adore these Lemon Fat Bombs because:
- Unrivaled Bright Lemon Flavor: That intense, fresh lemon juice and lemon zest taste shines through, unmuted and utterly delicious.
- Perfectly Balanced Sweetness: It’s an irresistible keto treat without being overly sweet, keeping your low-carb goals on track.
- Incredibly Easy & No-Bake: Ideal for busy schedules, meal prep, or whenever you need a quick, satisfying treat without turning on the oven.
- Satisfying & Creamy: A bite-sized dessert or snack that’s rich, keeps you full, and curbs those cravings for something sweet and decadent.
Ingredients Needed
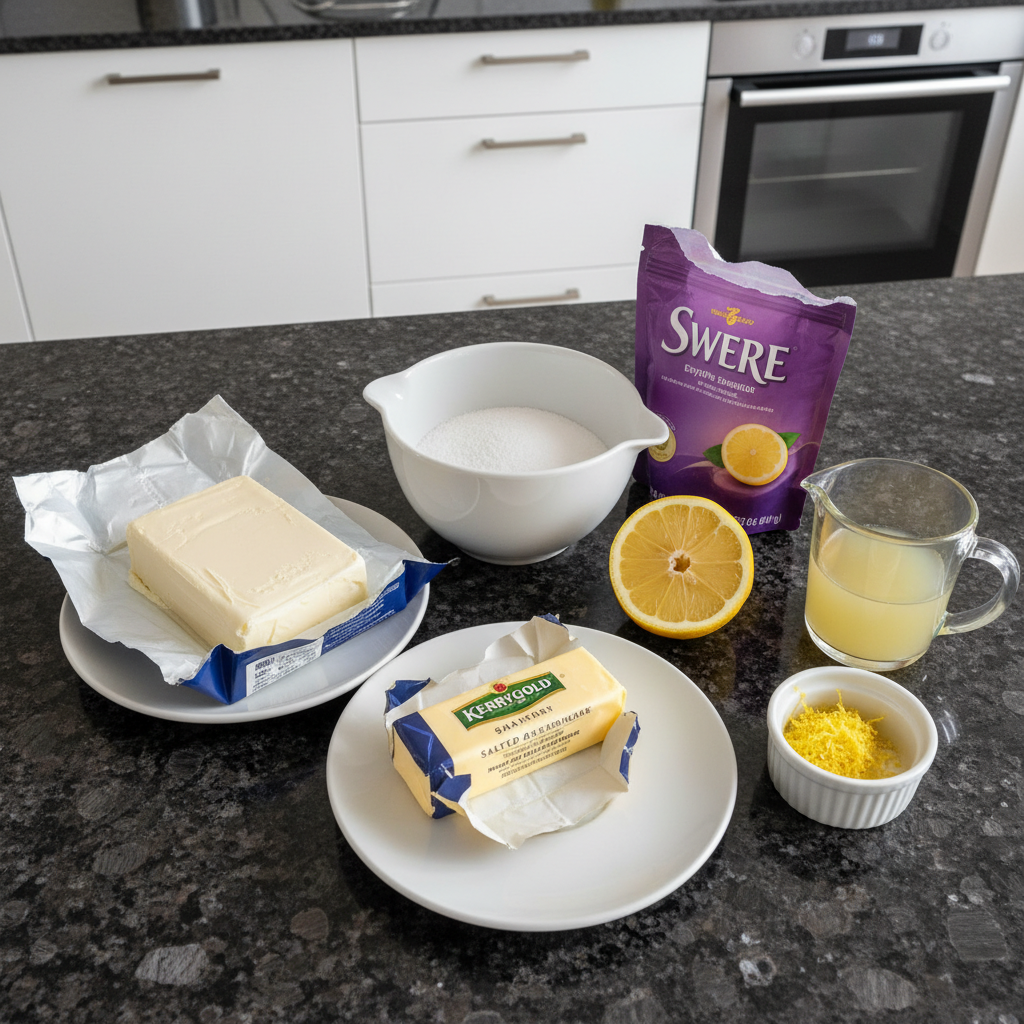
Here’s what you’ll need to create these bright and creamy delights. I always recommend using high-quality ingredients for the best results!
- 6 ounces cream cheese
- 4 tablespoons salted butter
- 3 tablespoons granular swerve sweetener
- 2 tablespoons lemon juice
- 1 tablespoon lemon zest
Ingredient Notes & Substitutions
Getting the right ingredients is crucial for perfect Lemon Fat Bombs. Here’s a little more detail from my kitchen to yours:
- Cream Cheese: This is the heart of your fat bombs! Full-fat cream cheese is absolutely essential for the luscious, creamy texture and to ensure your fat bombs have the proper fat content for a keto lifestyle. Please, avoid low-fat, whipped, or vegan varieties – they simply won’t set correctly or provide the desired richness.
- Sweetener Options: While I call for granular swerve sweetener here, you can easily substitute with other erythritol-based sweeteners like erythritol or monk fruit sweetener. If you have a confectioners’ style sweetener, it can create an even smoother batter. A light dusting of confectioners sugar (keto-friendly, of course!) can also be a nice garnish.
- Lemon Juice & Zest: The secret to truly vibrant Lemon Fat Bombs lies in using fresh lemon juice and lemon zest. Bottled juice just can’t compare! When zesting, always avoid the bitter white pith beneath the bright yellow skin. Use a microplane zester and go lightly. And always, *always* taste your lemon first – if it’s not good on its own, it won’t be good in your fat bombs.
- Salted Butter: The recipe specifically calls for salted butter. If you only have unsalted, you can use it, but you might want to add another tiny pinch of salt to the main mixture to ensure that perfectly balanced flavor.
- Optional Color Boost: For a more intense yellow color that truly looks like sunshine, I sometimes add a tiny pinch (about 1/8 teaspoon) of turmeric. It won’t affect the flavor, but it gives these fat bombs a beautiful visual pop!

How to Make Lemon Fat Bombs
Creating these delightful Lemon Fat Bombs is a breeze. Just follow these steps, paying close attention to the details for the smoothest, most flavorful results!
1. Soften Ingredients (Prep for Creaminess)
First things first, let’s get those ingredients ready. Allow your cream cheese and salted butter to sit out at room temperature for about an hour until they are naturally softened. This step is crucial for achieving that silky-smooth, lump-free batter we’re aiming for. For the cream cheese especially, I like to give it an extra boost by microwaving it in a small bowl for about 20 seconds until it’s super soft and pliable. You want it yielding easily to the touch, almost like very soft play-doh, to prevent any unwelcome clumps in your final mix.
2. Infuse Lemon Flavor (The Unique Twist!)
Now for my secret weapon! In a large mixing bowl, combine your granular swerve sweetener, the vibrant lemon juice, and that fragrant lemon zest. Here’s the magic part: add a tiny pinch (about 1/8 teaspoon) of salt to this mixture. Stir everything together thoroughly, then simply let it sit for a full 10 minutes. This brief pause allows the salt to completely dissolve and meld with the sweetener, while simultaneously drawing out all those wonderful, aromatic oils from the lemon zest, intensifying that bright lemon flavor. You’ll notice the aroma deepening – that’s how you know it’s working!
3. Make Smooth Batter (No Clumps Allowed!)
Add the perfectly softened cream cheese and salted butter to your now wonderfully fragrant lemon-sweetener mixture in the bowl. Grab your electric hand mixer – it’s your best friend for this step! Beat the mixture on medium speed until it is incredibly smooth, creamy, and completely free of any tiny butter or cream cheese clumps. Be diligent about scraping down the beaters and the sides of the bowl frequently to ensure every bit is thoroughly incorporated. What you’re looking for is a uniform, pale yellow batter that looks almost like a thick lemon curd.
4. Freeze & Serve (Patience Pays Off)
Once your batter is perfectly smooth, it’s time to shape your Lemon Fat Bombs. Evenly divide the creamy mixture among your round silicone molds. I usually find this recipe yields about 16 delicious fat bombs. Carefully transfer the filled molds to the freezer and let them chill until they are completely solid – this will take at least 2 hours. Once they are firm to the touch, pop them out of the molds and serve your beautiful Lemon Fat Bombs straight from the freezer for the very best texture and refreshing flavor. Any leftovers should be stored in a resealable bag in the freezer.
Understanding Your Lemon Fat Bombs: Key to Success
Beyond the simple steps, understanding a few key principles will ensure your Lemon Fat Bombs are always a smashing success.
The Magic of Cream Cheese in Fat Bombs
Cream cheese isn’t just an ingredient in fat bombs; it’s the foundation! Its high fat content makes it ideal for the keto diet, providing that essential energy while keeping carbs low. More importantly, it delivers the rich, smooth, and creamy texture that makes these treats so satisfying. Full-fat cream cheese acts as a natural binder, giving the fat bombs their structure and allowing them to set beautifully without any baking – hence, a truly no bake delight.
Achieving the Perfect Texture
A perfectly smooth, melt-in-your-mouth texture is what we’re after. This starts with the importance of softening ingredients. Cold cream cheese and butter will resist mixing, leading to frustrating cream cheese clumps or grainy results. Proper mixing techniques are also crucial; that electric hand mixer ensures everything is fully incorporated and aerated just enough. If your fat bombs end up with a grainy texture or are not freezing properly, it’s almost always due to not softening ingredients enough or not mixing thoroughly. Aim for a consistently smooth batter before molding.
Tools & Troubleshooting for Perfect Lemon Fat Bombs
Having the right tools and knowing how to troubleshoot can make all the difference in your fat bomb journey.
Choosing the Right Molds
I highly recommend using silicone molds for your Lemon Fat Bombs. They make for incredibly easy release and give your fat bombs a uniform, appealing shape. Round molds are classic, but you can use different types of silicone molds with various designs if you want to get creative. If you don’t have silicone molds, don’t worry! You can use paper-lined mini muffin cups, small ice cube trays, or even dollop spoonfuls onto a parchment-lined baking sheet for a more rustic, free-form look. For super neat filling, especially into smaller molds, a piping bag can be a fantastic tool.
Troubleshooting Common Fat Bomb Issues
- Too Soft/Not Freezing Properly: If your fat bombs are too soft and won’t hold their shape, there are a few culprits. Firstly, ensure you didn’t add too much lemon juice – exceeding 2 tablespoons can impact the set. Secondly, make sure they’ve had sufficient freezing time, at least 2 hours, preferably more. Lastly, double-check you’re using full-fat cream cheese, not a low-fat variety. If you find your batter is still too soft before molding, try chilling it in the fridge for 30 minutes to an hour. In a pinch, a tiny amount (1/2 teaspoon) of coconut flour can sometimes help to firm up a stubborn batter, but use sparingly as it can change texture.
- Grainy Texture: This issue almost always stems from insufficiently softened cream cheese and butter, or not mixing the batter long enough. Make absolutely certain your ingredients are at true room temperature and beat the mixture with your electric hand mixer until it’s perfectly smooth and homogenous, with no visible bits of solid butter or cream cheese. Patience in the mixing stage will prevent graininess.
Pro Tips & Troubleshooting
Having made countless batches of Lemon Fat Bombs, I’ve gathered a few insights to ensure your success.
Pro Tips for the Best Lemon Fat Bombs
- Enhance Color Naturally: For a vibrant, sunny yellow that truly screams “lemon,” try adding just 1/8 teaspoon of ground turmeric to your batter. It won’t alter the flavor, but it gives these fat bombs a beautiful, natural color boost.
- Easy Filling: To keep things neat and tidy, especially with smaller silicone molds or mini muffin cups, transfer your batter to a piping bag (or a Ziploc bag with the corner snipped off). This allows for easy and clean portioning.
- Quality Lemon First: This might sound obvious, but always taste the lemon you plan to use before you zest and juice it. If your fresh lemon doesn’t taste good, your Lemon Fat Bombs won’t either. And please, for the love of good flavor, absolutely avoid bottled lemon juice for this recipe!
- Perfectly Mixed Batter: Take your time during the mixing stage. Ensure all ingredients are thoroughly combined, actively scraping down the bowl and beaters. Any small white clumps of cream cheese or butter will result in a less-than-smooth texture.
- Don’t Skip the Salt Twist! I can’t stress this enough. That tiny pinch of salt with the lemon zest and sweetener, left to sit for 10 minutes, is the secret to the most vibrant lemon flavor and perfectly balanced sweetness. It’s a small step that yields huge results.
Common Mistakes to Avoid
- Avoid Low-Fat/Vegan Cream Cheese: I mentioned this before, but it bears repeating: never use low-fat or vegan cream cheese. It will drastically alter the texture and consistency of your fat bombs, preventing them from setting properly. Stick to full-fat!
- Mind the Lemon Juice: While fresh lemon juice is key, do not exceed 2 tablespoons. Adding too much liquid will make your fat bombs too soft and they won’t hold their shape once frozen.
- Steer Clear of Pith: When zesting your lemon, be very careful not to grate the bitter white pith beneath the bright yellow zest. This pith can introduce an unpleasant bitterness to your otherwise perfect treats.
- Incomplete Mixing: Ensure all ingredients are thoroughly combined with no visible clumps of cream cheese or butter. This is paramount for a smooth, homogenous texture that melts beautifully.
Serving & Storage
These Lemon Fat Bombs are incredibly versatile and easy to keep on hand!
Serving Ideas
I love these Lemon Fat Bombs straight from the freezer as a convenient, frosty snack. They are also absolutely perfect as a bite-sized dessert after dinner, especially if you’re looking for something light and refreshing. For a fun spread, serve them alongside other fat bomb flavors like peanut butter, chocolate chip cookie dough, or even strawberry for a colorful assortment. You can garnish them with a light dusting of keto-friendly swerve confectioners sweetener or a tiny sprinkle of fresh lemon zest for an extra pop of color and aroma.
Storage and Make-Ahead
These Lemon Fat Bombs are fantastic for meal prep! Once fully frozen, you can transfer any leftovers from the molds to a resealable bag or an airtight container. Stored this way in the freezer, they will last for up to 2-3 months without any significant loss in quality or flavor. There’s no need for any reheating instructions, as they are truly best enjoyed directly from the freezer or after a few minutes of thawing to soften slightly. Feel free to make a double batch – they disappear quickly!
Conclusion
There you have it – my tried-and-true recipe for the brightest, creamiest, and most delicious Lemon Fat Bombs you’ll ever make! This recipe isn’t just easy and perfectly keto-friendly; it guarantees a truly vibrant lemon flavor and a melt-in-your-mouth creamy texture thanks to that unique salt-infused zest twist.
Whether you’re a seasoned home cook or just starting your low-carb journey, I promise you can achieve perfect results with these simple steps. Don’t hesitate to whip up a batch (or two!) and experience the refreshing burst of citrus for yourself. Share your creations, and if you’re feeling adventurous, these are a fantastic base for exploring other fat bomb variations and flavors like lime or coconut!
FAQ
Here are some of the most common questions I get about making Lemon Fat Bombs:
- What type of cream cheese works best for lemon fat bombs?
For the correct texture, firmness, and ideal keto macros, full-fat cream cheese is absolutely essential. Avoid low-fat, whipped, or spreadable varieties, as they will alter the consistency and won’t set properly. - Can I use a different type of sweetener in this recipe?
Yes, absolutely! While I use Swerve sweetener, you can substitute with other erythritol-based sweeteners like erythritol or monk fruit sweetener. Granular works well, but for an even smoother texture, a powdered or confectioners’ style sweetener can be preferred. - What if I don’t have round silicone molds?
No problem! You can use mini muffin cups (lined with paper or silicone liners), small ice cube trays, or even dollop spoonfuls onto a parchment-lined baking sheet for a more rustic shape. - How long can I store lemon fat bombs in the freezer?
When stored in an airtight container or resealable bag in the freezer, lemon fat bombs can last for up to 2-3 months without a significant loss in quality or flavor. - Why is it important to soften the cream cheese and butter?
Softening the cream cheese and butter to room temperature is crucial for achieving a smooth, lump-free batter. Cold ingredients will lead to a grainy texture and make it difficult for the ingredients to combine properly, resulting in an inconsistent fat bomb. - How can I adjust the tartness and sweetness of the fat bombs?
You can adjust the sweetness by slightly increasing or decreasing the amount of swerve sweetener to taste. To increase tartness, you can add another 1/2 teaspoon of lemon juice, but be cautious not to add too much, as it can make the fat bombs too soft and prevent them from setting correctly. - Can I use lime instead of lemon?
Absolutely! Lime juice and lime zest are excellent substitutes for a delicious lime fat bomb variation. Key limes can also be used for a slightly different citrus flavor profile. - Can I add protein powder to these fat bombs?
Yes, you can! Adding about 3/4 cup of whey protein powder can create a slightly heavier, whipped cream consistency. This will also make them more filling and adjust the macros, making them a great post-workout snack.

Bright & Creamy Lemon Fat Bombs: Your Keto No-Bake Secret!
Ingredients
Equipment
Method
- Allow your cream cheese and salted butter to sit out at room temperature for about an hour until naturally softened. For the cream cheese, microwave it in a small bowl for about 20 seconds until it's super soft and pliable to ensure a lump-free batter.
- In a large mixing bowl, combine the granular swerve sweetener, fresh lemon juice, lemon zest, and 1/8 teaspoon of salt. Stir everything thoroughly, then let it sit for a full 10 minutes. This allows the salt to dissolve and meld, drawing out aromatic oils from the lemon zest for intensified flavor.
- Add the perfectly softened cream cheese and salted butter to the fragrant lemon-sweetener mixture. Using an electric hand mixer, beat the mixture on medium speed until it is incredibly smooth, creamy, and completely free of any tiny butter or cream cheese clumps. Scrape down the beaters and bowl frequently to ensure thorough incorporation, aiming for a uniform, pale yellow batter.
- Evenly divide the creamy mixture among your round silicone molds (this recipe yields about 16 fat bombs). Carefully transfer the filled molds to the freezer and let them chill until completely solid, which will take at least 2 hours. Once firm, pop them out of the molds and serve straight from the freezer for the best texture and refreshing flavor. Store any leftovers in a resealable bag in the freezer.
Notes

Taya Bennett is the founder of YumEasyMeals, a platform dedicated to easy, delicious, and quick-to-prepare recipes for busy families. Passionate about everyday cooking, she simplifies meals with practical, accessible, and always delicious ideas.
Discover her creations at: yumeasymeals.com