Oh, the humble Rice Krispie Treat! For many of us, these crispy, gooey squares are a taste of pure childhood nostalgia, a no-bake dessert that brings instant comfort. But what if I told you there’s a way to elevate this classic to a whole new level of irresistible flavor? In my kitchen, we’ve unlocked the secret to the Best Brown Butter Rice Krispie Treats , transforming them from simple snack to gourmet delight. This foolproof guide will show you how to achieve perfectly soft, chewy treats with an unexpected depth of flavor, complete with all my expert tips and troubleshooting advice.
Why You’ll Love This Recipe
This isn’t just another Rice Krispie Treats recipe; it’s an experience. My unique twist lies in two simple but powerful ingredients that completely redefine the classic: browned butter and a pinch of salt.
* The Brown Butter Magic: By browning the butter (hello, Maillard reaction!), we unlock incredible nutty, toasted, and caramel notes that infuse every single bite. It’s a game-changer, adding a sophisticated depth you won’t find in traditional recipes.
* Perfectly Balanced Sweetness: The use of a little salted butter (or a specific pinch of salt if using unsalted) works wonders. It perfectly complements the sweetness of the marshmallows, preventing the treats from being cloyingly sweet and enhancing the overall flavor profile.
* Incredibly Easy & Quick: This remains a fantastically simple, no-bake dessert. You can whip up a batch of these elevated crispy treats in under 15 minutes of active prep time, making it perfect for last-minute cravings or unexpected guests.
* Family-Friendly with an Adult Twist: While kids adore them, the browned butter adds a complexity that adults truly appreciate. It’s nostalgic, yes, but with a grown-up touch.
* Versatile for Any Occasion: Whether for a school lunchbox, a party, a potluck, or just an afternoon snack, these Rice Krispie Treats are always a hit.
Ingredients Needed
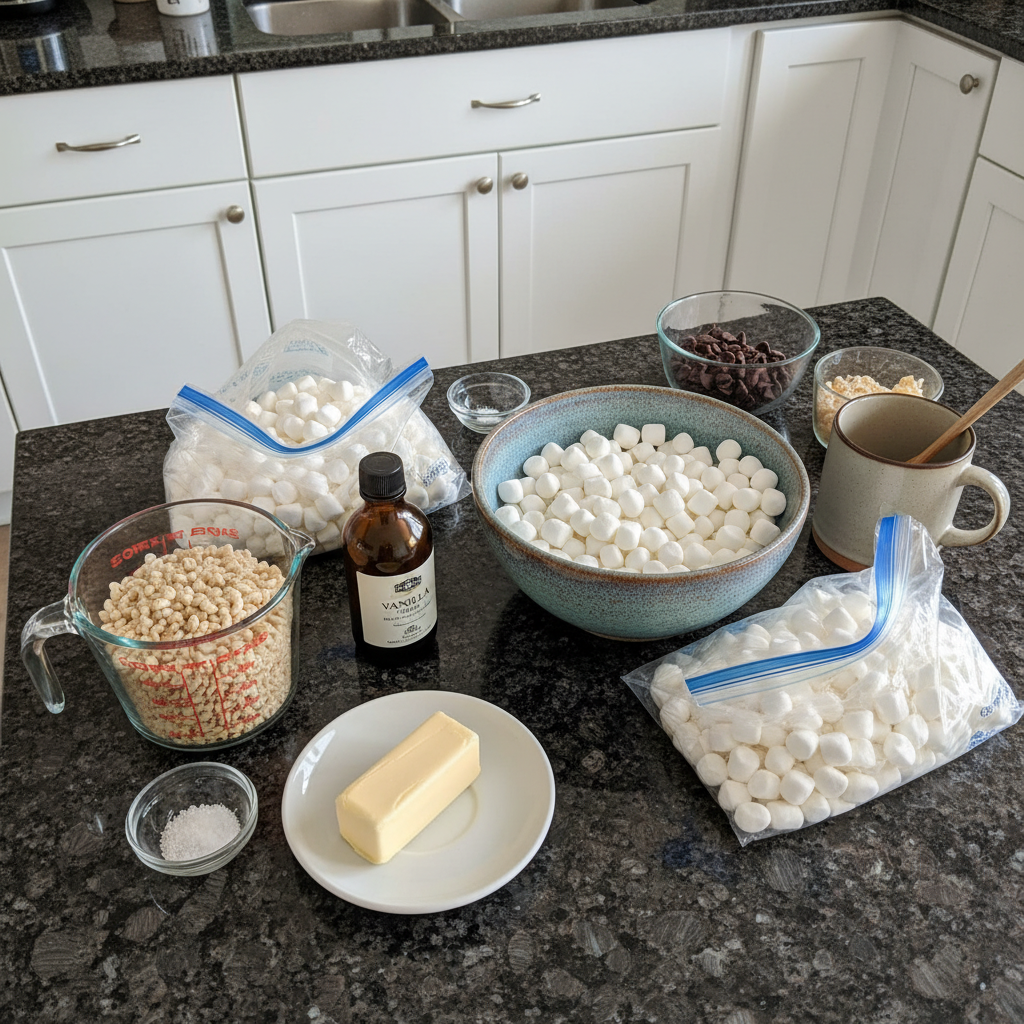
- 3/4 cup (170g; 12 Tbsp) unsalted butter
- two 10-ounce bags (566g; 11 heaping cups) mini marshmallows
- 1/2 teaspoon pure vanilla extract
- pinch salt
- 9 cups (270g) crispy rice cereal
Ingredient Notes & Substitutions
- Butter: While my recipe specifically calls for unsalted butter to allow precise control over the salt content, the magic really happens when you brown it, deepening its flavor naturally. If you prefer to use salted butter, that’s absolutely fine! Just be sure to reduce the “pinch salt” in the recipe to taste, perhaps omitting it entirely, to avoid overly salty treats. For those seeking dairy-free options, coconut oil can be used, though it will impart a slight coconut flavor. Many excellent vegan butter brands are also available and can work well, but always note that the flavor and texture might vary slightly from the browned dairy butter version.
- Marshmallows: I highly recommend using mini marshmallows for this recipe. Their smaller size means they melt much more quickly and evenly, which is crucial for achieving that silky-smooth, perfectly gooey marshmallow mixture without overcooking. Using large marshmallows will work, but they take longer to melt, increasing the risk of overcooking and potentially yielding harder treats. There are also various brands and vegan marshmallow alternatives available; just be aware that some vegan options might have a slightly different melting consistency.
- Crispy Rice Cereal: For that classic snap and ideal crispness, Rice Krispies cereal is my top choice. However, any brand of crispy rice cereal will work beautifully. Feel free to experiment with other puffed cereals for different flavor profiles if you’re feeling adventurous!
- Vanilla Extract: Always opt for pure vanilla extract over imitation. The depth of flavor it provides makes a noticeable difference, complementing the nutty browned butter beautifully.
- Salt: That small pinch of salt is vital, especially when using unsalted butter. It’s not just for flavor; salt balances the sweetness of the marshmallows, bringing out the richer notes of the browned butter and preventing the treats from tasting one-dimensional. It truly enhances the overall experience of these Rice Krispie Treats .
How to Make Brown Butter Rice Krispie Treats
Making these elevated Rice Krispie Treats is incredibly straightforward. The key is in the technique and a little patience to get that perfect brown butter flavor.
Preparation: Setting the Stage
First, grab a 9×13-inch baking pan. Line it meticulously with parchment paper, leaving a slight overhang on the sides – this will be your lifesaver later for easy removal and cutting. Give the parchment a very light mist of nonstick spray; it ensures absolutely nothing sticks. Set this prepared pan aside.
The Magic of Brown Butter & Marshmallows
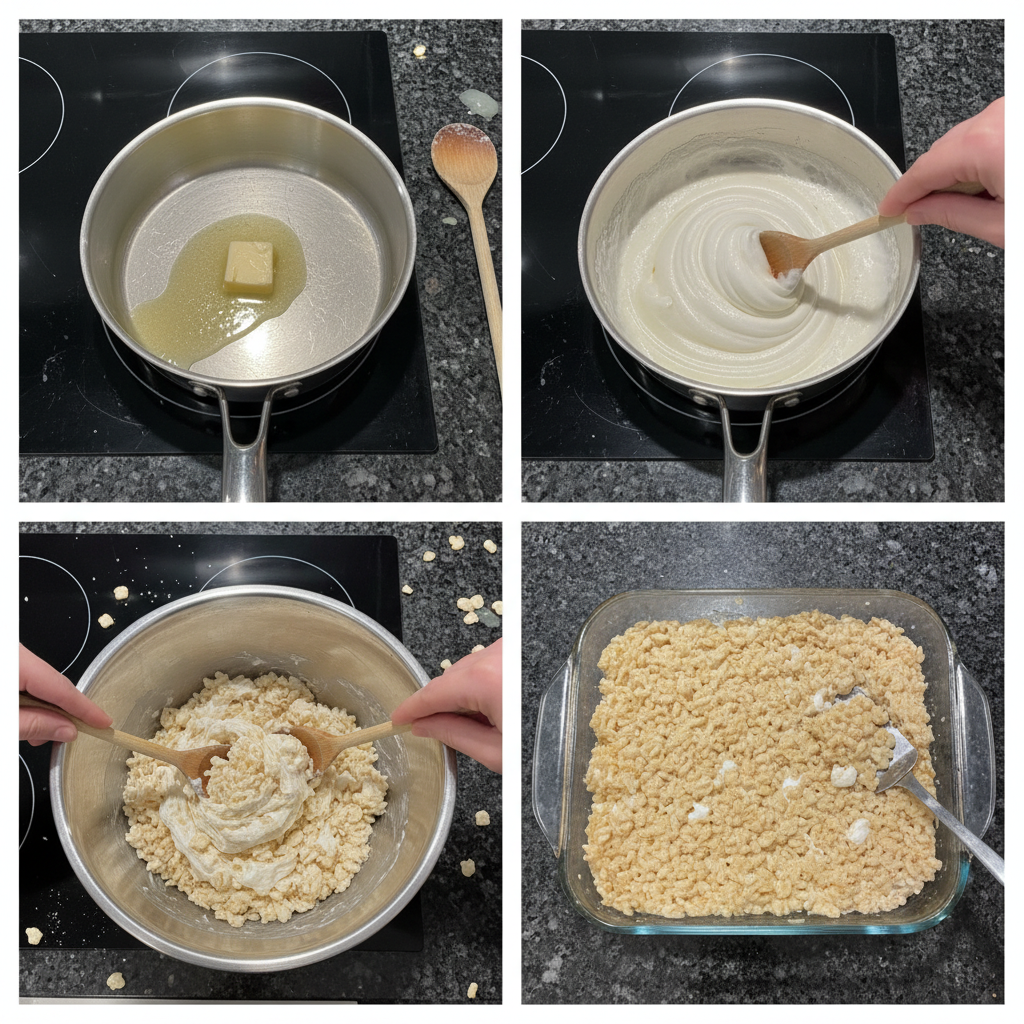
Now, for the star of the show! In a very large pot (a Dutch oven works wonderfully), melt the unsalted butter over medium heat. Watch closely as the butter transforms: it will melt, foam, then the foam will subside, and tiny golden-brown flecks will appear at the bottom. A rich, nutty aroma will fill your kitchen – this is the Maillard reaction, giving us that incredible depth of flavor. This usually takes about 5-7 minutes. Once it’s a beautiful golden brown, immediately add your mini marshmallows to the pot. Reduce the heat to low and continue to stir the mixture until the marshmallows are completely melted and beautifully smooth. This gentle heat and constant stirring prevent scorching and ensure an incredibly gooey result.
Flavor Infusion & Cereal Fold
As soon as the marshmallows are silky smooth, remove the pot from the heat. This is crucial to prevent the marshmallows from becoming brittle. Immediately stir in the pure vanilla extract and your pinch of salt. The vanilla adds a fragrant warmth, and the salt balances the sweetness. Finally, it’s time to fold in the crispy rice cereal. Work quickly and gently, ensuring each and every piece of cereal is thoroughly coated with that luscious brown butter marshmallow mixture. Don’t overmix, or you risk crushing the cereal.
Pressing into Perfection
Carefully transfer the warm mixture into your prepared pan. Now, this next step is vital for perfectly soft and chewy Rice Krispie Treats. Using a silicone spatula (a light greasing helps tremendously here), gently spread the mixture to fit the pan. Then, lightly grease the back of a flat spatula or even the parchment paper you used to line the pan, and very gently press the mixture down into the pan. The key word here is *gently* – you are securing it, not compacting it with force. Over-packing will result in hard, dense treats, and we want soft, delightful gooeyness!
Setting & Slicing
Allow your irresistible Brown Butter Rice Krispie Treats to set at room temperature for at least 1 hour. For the very best texture, I often let them set for up to a day, covering them tightly if leaving them out for more than a few hours. Once set, use the edges of the parchment paper to easily lift the entire slab of Rice Krispie Treats out of the pan. Place it on a cutting board and use a sharp, lightly greased knife to cut it into squares. Now, enjoy!
Achieving Perfect Rice Krispie Treats Every Time
My goal is for you to achieve absolute perfection in every batch of Rice Krispie Treats . Here are my insights to master these delightful squares.
Marshmallow Melting Mastery
The secret to keeping your Rice Krispie Treats soft and gooey lies in how you melt your marshmallows. Use low heat and constant stirring. You want the marshmallows to become a uniform, smooth, liquid mass with no lumps – but remove them from the heat *as soon as* they reach this stage. Overcooking marshmallows causes their sugar molecules to crystalize and become brittle when cooled, resulting in hard treats. Keep an eye on the consistency; it should be glossy and flowing, not overly thick or browned.
Preventing Sticky or Hard Treats
If your Rice Krispie Treats are too sticky, it usually means the marshmallows were slightly undercooked, or perhaps your butter-to-marshmallow ratio was a little off (too much butter for the amount of marshmallows can also lead to a stickier result). For treats that are too hard, the culprit is almost always overcooked marshmallows or over-packing the mixture into the pan. To fix these issues, ensure your marshmallows are fully melted on low heat, then remove immediately. And remember, when pressing the mixture, use a feather-light touch!
Pan Sizes & Cutting
While a 9×13-inch baking pan is standard, feel free to experiment with other sizes. An 8×8-inch pan will yield thicker, chewier squares but will require a slightly longer setting time. For fun, bite-sized treats, you can even press the mixture into mini muffin tins or use cookie cutters (see serving ideas below). For easy, clean cutting, I always recommend a sharp, lightly greased knife or even a pizza cutter. The optimal temperature for cutting is when the treats are slightly cooled but not yet fully set; they’ll be firm enough to handle but pliable enough to slice smoothly without crumbling.
Pro Tips & Troubleshooting
Even a simple recipe can benefit from a few expert insights. Here are my go-to tips and common pitfalls to avoid for the best Brown Butter Rice Krispie Treats .
Pro Tips
- Gentle Pressing is Key: I cannot stress this enough – gently press the mixture into the pan. Use light, even pressure, just enough to secure it. This ensures your Rice Krispie Treats remain wonderfully soft and chewy, never hard or dense.
- The Butter Wrapper Trick: Don’t throw away that butter wrapper! It’s perfectly coated with a thin layer of butter, making it an ideal, mess-free tool to press the mixture into the pan. You can also use a piece of greased parchment paper.
- Optimal Setting Time: Patience is a virtue here. Allowing your Rice Krispie Treats to set for at least 1 hour at room temperature, or even longer, ensures they firm up properly and achieve that perfect chewy texture.
- Brown Butter Expertise: To achieve the perfect brown butter, use a light-colored pot so you can easily monitor the color. Stir constantly, especially once the foam subsides, and watch for the nutty aroma and those beautiful golden-brown flecks. Remove from heat immediately once you hit that sweet spot.
- Greasing Your Tools: Lightly greasing your silicone spatula, knife, or even your hands with nonstick spray or butter will prevent the sticky mixture from clinging, making the spreading and cutting process much smoother.
Common Mistakes to Avoid
- Over-packing: This is the most common culprit for hard Rice Krispie Treats . Resist the urge to compact them down with force. Light pressure is all you need to keep them tender.
- Overcooking Marshmallows: Heating marshmallows for too long or at too high a temperature makes them brittle once cooled. Remove them from the heat as soon as they are fully melted and smooth.
- Skipping Salt or Vanilla: While seemingly small additions, omitting the pinch of salt (especially with unsalted butter) or the vanilla extract can lead to a flat, one-dimensional flavor. These ingredients are essential for depth and balance in these Brown Butter Rice Krispie Treats .
- Not Greasing Properly: Insufficient greasing of your baking pan , parchment paper, or tools will lead to a sticky, frustrating mess. A light mist of nonstick spray or butter is your best friend.
- Adding Mix-ins Too Early: If you plan to add delicate mix-ins like chocolate chips or M&Ms, wait until the marshmallow mixture has cooled slightly but is still pliable. Adding them when the mixture is too hot will cause them to melt prematurely.
Serving & Storage
These Brown Butter Rice Krispie Treats are fantastic on their own, but a few creative touches can make them even more special.
Serving Ideas
- Classic Presentation: Simply cut them into squares for a timeless snack or easy dessert.
- Elevated Dips: For an upscale touch, melt some white or dark chocolate and dip half of each treat. A sprinkle of sea salt flakes on the chocolate adds another layer of sophistication.
- Flavorful Toppings: Immediately after pressing the mixture into the pan, sprinkle a pinch of cinnamon, a dash of flaky sea salt, or even a tiny amount of orange zest over the top for warm, aromatic notes.
- Seasonal & Holiday Fun: These are incredibly versatile! For Christmas, I love to jazz them up with red & green sprinkles or festive red & green M&Ms. You can also use cookie cutters (once the treats are slightly cooled but still pliable) to create fun shapes like stars, trees, or hearts for any holiday or special occasion.
Storage and Make-Ahead
- Room Temperature Storage: The best way to store these Rice Krispie Treats is at room temperature. Once cut, place them in an airtight container with sheets of parchment or wax paper between layers to prevent sticking. They will stay fresh, soft, and delicious for up to 3 days. Always ensure the container is tightly covered to maintain their gooey texture and prevent them from hardening.
- Freezing Instructions: Yes, you absolutely can freeze Rice Krispie Treats for longer storage! First, wrap individual squares tightly in plastic wrap, then place them in an airtight freezer-safe container or a heavy-duty freezer bag. They can be frozen for up to 6 weeks. This is a fantastic make-ahead option for parties or just to have a stash on hand.
- Thawing: When you’re ready to enjoy a frozen treat, simply thaw it at room temperature for a few hours. They will return to their original delicious, gooey texture.
Conclusion
There you have it – my recipe for the Best Brown Butter Rice Krispie Treats . By simply browning the butter, we unlock a nutty, caramel richness that elevates this beloved classic, while a thoughtful pinch of salt ensures perfect balance. This recipe proves that even the simplest of treats can be transformed into something truly extraordinary with just a little culinary finesse. Whether you’re a beginner or a seasoned baker, you’ll achieve incredibly gooey, perfectly chewy results every time with the tips I’ve shared. I encourage you to whip up a batch, enjoy the elevated flavor, and perhaps experiment with your own twists! I’d love to hear how they turn out – feel free to leave a comment below or share your creations. Happy baking (or rather, no-baking)!
FAQ
Can I use coconut oil instead of butter, and what’s the best dairy-free substitute?
Yes, you can use coconut oil instead of butter, but be aware it will impart a slight coconut flavor to your Rice Krispie Treats . For a more neutral dairy-free option, many vegan butter brands work very well and can often be browned in a similar way to regular butter, offering a closer flavor profile to the original while accommodating dietary needs.
How can I customize Rice Krispie Treats for different holidays or flavors?
Customizing Rice Krispie Treats is incredibly fun! For holidays, add food coloring to the marshmallow mixture, mix in festive sprinkles (like red & green for Christmas), or use cookie cutters to create shapes once the mixture is slightly cooled but still pliable. For other flavors, you can swirl in a tablespoon or two of peanut butter (see below), add a different extract like almond, or gently fold in mix-ins like mini chocolate chips, pretzels, or dried fruit once the cereal is coated.
What’s the secret to keeping Rice Krispie Treats soft and gooey?
The main secret is to avoid overcooking the marshmallows. Use low heat and stir constantly until they are just melted and smooth. Immediately remove them from the heat. Also, when pressing the mixture into the pan, use a very gentle hand; over-packing leads to dense, hard treats.
How do I prevent Rice Krispie Treats from sticking to the pan and being difficult to cut?
To prevent sticking, always line your baking pan with parchment paper and lightly grease both the paper and any spatulas or knives you use with nonstick spray or butter. For easy cutting, allow the treats to cool and set at room temperature for at least an hour. Using a sharp, lightly greased knife or a pizza cutter works best.
What is the best way to store Rice Krispie Treats, and can they be frozen?
Store leftover Rice Krispie Treats in an airtight container at room temperature, with parchment or wax paper between layers, for up to 3 days. Yes, they can be frozen! Wrap individual squares tightly in plastic wrap, then place them in a freezer-safe bag or container for up to 6 weeks. Thaw at room temperature for a few hours before serving.
What if my Rice Krispie Treats are too sticky or too hard? How can I fix this?
If your treats are too sticky, the marshmallows might have been slightly undercooked or the butter-to-marshmallow ratio might be off. If they’re too hard, it’s usually due to overcooked marshmallows or over-packing the mixture into the pan. Unfortunately, once the treats have set, it’s difficult to “fix” their texture. The best approach is to ensure you melt marshmallows gently on low heat and press lightly in future batches.
If I wanted to add peanut butter to them, how much should I add? Would I need to do anything different?
To add peanut butter, I recommend adding about 1/2 to 3/4 cup creamy peanut butter right after the marshmallows have melted, stirring it in until smooth before adding the vanilla and salt. You won’t need to change much else, but you might find the mixture a little stiffer, so work quickly. Ensure it’s incorporated well with the marshmallow base.
Why are my Rice Krispie Treats hard?
The most common reasons for hard Rice Krispie Treats are overcooking the marshmallows (high heat or too long) which causes them to become brittle, or packing the mixture too tightly into the pan. For soft and gooey results, always melt marshmallows gently and press lightly.
Can I use your Marshmallow crème recipe?
This particular recipe is specifically designed to use solid marshmallows. Marshmallow crème has a different consistency and sugar structure, which would result in a much softer, less structured Rice Krispie Treat that won’t hold its shape as well. For the classic chewy texture, I recommend sticking with mini marshmallows as specified.

Best Brown Butter Rice Krispie Treats: Gooey & Easy Recipe
Ingredients
Equipment
Method
- First, grab a 9×13-inch baking pan. Line it meticulously with parchment paper, leaving a slight overhang on the sides – this will be your lifesaver later for easy removal and cutting. Give the parchment a very light mist of nonstick spray; it ensures absolutely nothing sticks. Set this prepared pan aside.
- Now, for the star of the show! In a very large pot (a Dutch oven works wonderfully), melt the unsalted butter over medium heat. Watch closely as the butter transforms: it will melt, foam, then the foam will subside, and tiny golden-brown flecks will appear at the bottom. A rich, nutty aroma will fill your kitchen – this is the Maillard reaction, giving us that incredible depth of flavor. This usually takes about 5-7 minutes. Once it’s a beautiful golden brown, immediately add your mini marshmallows to the pot. Reduce the heat to low and continue to stir the mixture until the marshmallows are completely melted and beautifully smooth. This gentle heat and constant stirring prevent scorching and ensure an incredibly gooey result.
- As soon as the marshmallows are silky smooth, remove the pot from the heat. This is crucial to prevent the marshmallows from becoming brittle. Immediately stir in the pure vanilla extract and your pinch of salt. The vanilla adds a fragrant warmth, and the salt balances the sweetness. Finally, it’s time to fold in the crispy rice cereal. Work quickly and gently, ensuring each and every piece of cereal is thoroughly coated with that luscious brown butter marshmallow mixture. Don't overmix, or you risk crushing the cereal.
- Carefully transfer the warm mixture into your prepared pan. Now, this next step is vital for perfectly soft and chewy Rice Krispie Treats. Using a silicone spatula (a light greasing helps tremendously here), gently spread the mixture to fit the pan. Then, lightly grease the back of a flat spatula or even the parchment paper you used to line the pan, and very gently press the mixture down into the pan. The key word here is *gently* – you are securing it, not compacting it with force. Over-packing will result in hard, dense treats, and we want soft, delightful gooeyness!
- Allow your irresistible Brown Butter Rice Krispie Treats to set at room temperature for at least 1 hour. For the very best texture, I often let them set for up to a day, covering them tightly if leaving them out for more than a few hours. Once set, use the edges of the parchment paper to easily lift the entire slab of Rice Krispie Treats out of the pan. Place it on a cutting board and use a sharp, lightly greased knife to cut it into squares. Now, enjoy!
Notes

Taya Bennett is the founder of YumEasyMeals, a platform dedicated to easy, delicious, and quick-to-prepare recipes for busy families. Passionate about everyday cooking, she simplifies meals with practical, accessible, and always delicious ideas.
Discover her creations at: yumeasymeals.com