Introduction
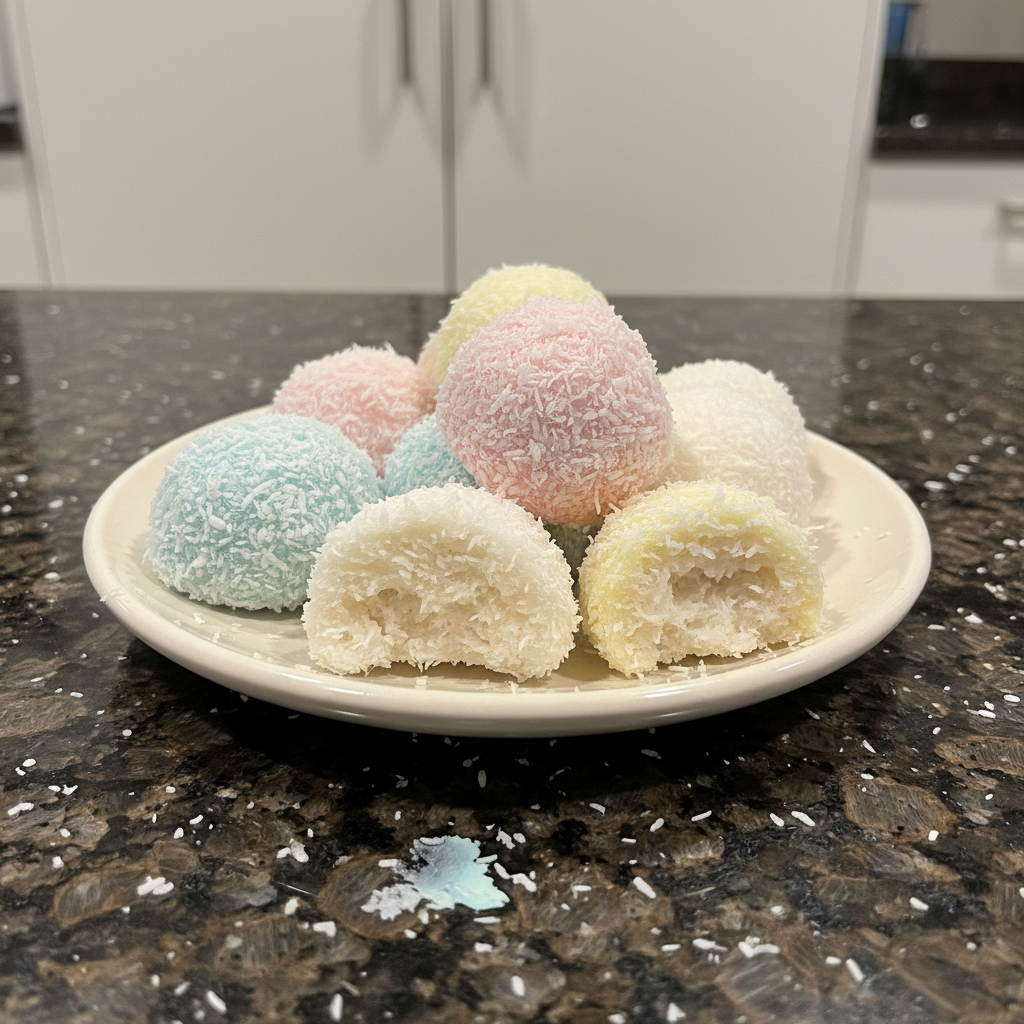
Easter is just around the corner, and I always find myself looking for delightful, yet simple, treats to share with my loved ones. My kitchen fills with joy when I create these adorable bunny coconut tails no bake treats. This recipe is an absolute dream for anyone wanting a quick, easy, and undeniably festive Easter dessert. We are going to make charming and delicious bunny tails using just a handful of simple ingredients and a special flavor secret that makes them truly irresistible.
Why You’ll Love This Recipe
My approach to these delightful coconut tails includes a subtle yet significant unique twist that truly elevates them. I always add a tiny pinch of salt, about 1/8 teaspoon, to the coconut mixture. This small addition dramatically enhances the sweetness and balances the overall flavor profile, making each bite incredibly satisfying. Furthermore, in my kitchen, I love to substitute half of the butter, which is typically 1 tablespoon, with softened cream cheese. This brings a lovely slight tanginess and a wonderfully creamy texture to the bunny tails, ensuring they are never overly sweet or one-dimensional. Beyond this special touch, these treats are incredibly easy and no-bake, making them perfect for even the most beginner bakers. They are also wonderfully kid-friendly, providing a fun activity to share with your little ones. The result is a festive and visually appealing Easter dessert that everyone will adore.
Ingredients Needed
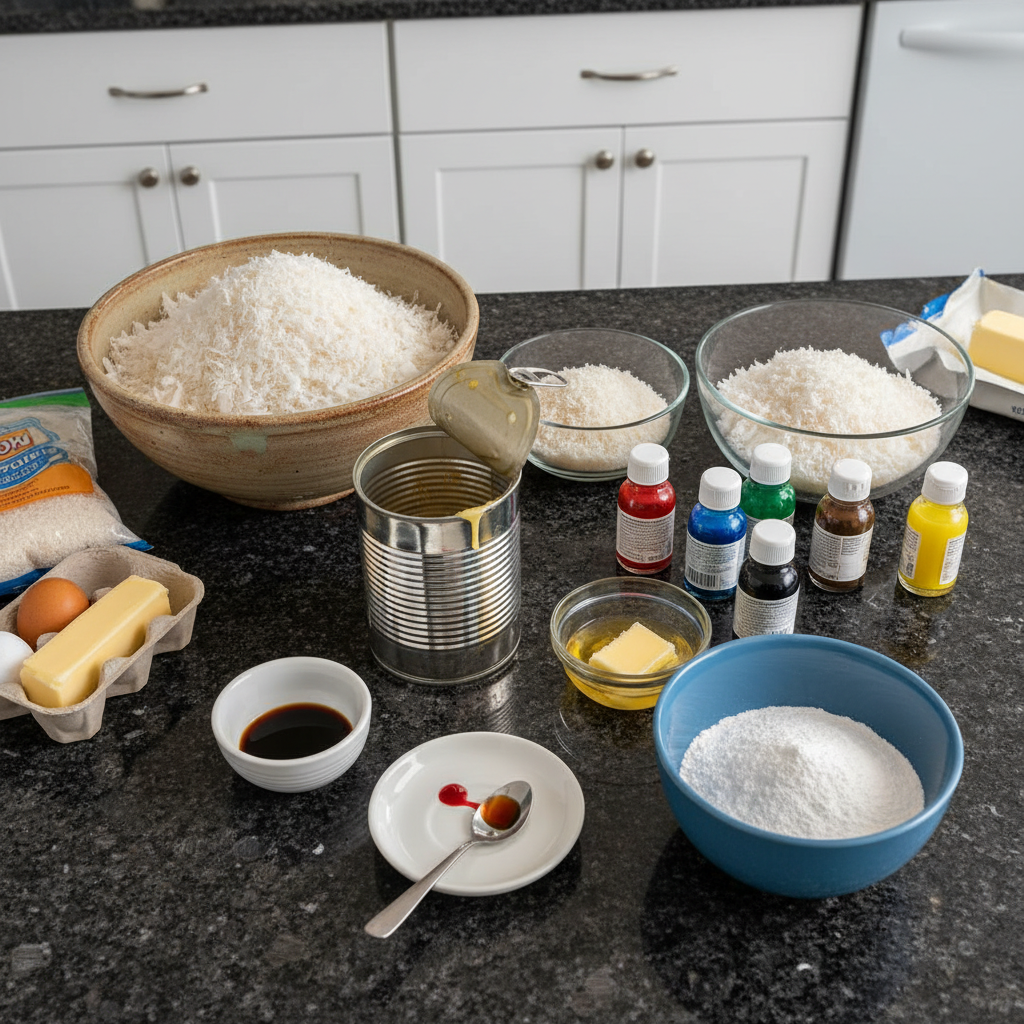
5 cups unsweetened coconut, medium shred
2 cups unsweetened coconut, fine shred
14 ounces sweetened condensed milk
2 tablespoons butter, melted and cooled
1 teaspoon vanilla extract
1/4 cup confectioner’s sugar
liquid food colouring
Ingredient Notes & Substitutions
Coconut: For this recipe, I use a combination of both medium and fine shredded unsweetened coconut to achieve the perfect texture, balancing chewiness with a delicate fluffiness. Using unsweetened coconut is crucial to avoid an overly sweet result, especially with the sweetened condensed milk. While you could technically use coconut flakes, be aware that the final texture will be noticeably different and perhaps less uniform for shaping.
Sweetened Condensed Milk: This is our key binding agent and sweetener. Common US brands like Eagle Brand or Carnation work perfectly. If you are looking for dairy-free alternatives, there are now several excellent plant-based sweetened condensed milk options available made from oat or coconut milk that can be used in the same quantity. You can also make your own by reducing coconut milk with sugar.
Food Coloring: It is very important to use liquid food coloring for these bunny tails. Gel food coloring does not mix into the coconut as evenly and can leave streaks or clumps. Liquid food coloring disperses beautifully for those lovely pastel colors. For those who prefer natural options, extracts like beet juice for pink or spirulina powder for green can be used, though the color intensity might vary.
Butter and Cream Cheese: Always make sure your butter is melted and then cooled slightly before adding it to the mixture. This prevents it from melting the other ingredients too quickly and affecting the mixture’s consistency. If you choose to incorporate the cream cheese twist I mentioned earlier, full-fat cream cheese will yield the best texture and flavor. For a completely dairy-free recipe, you can easily substitute the butter with a dairy-free butter alternative.
How to Make Bunny Coconut Tails
Prepare the Coconut Mixture
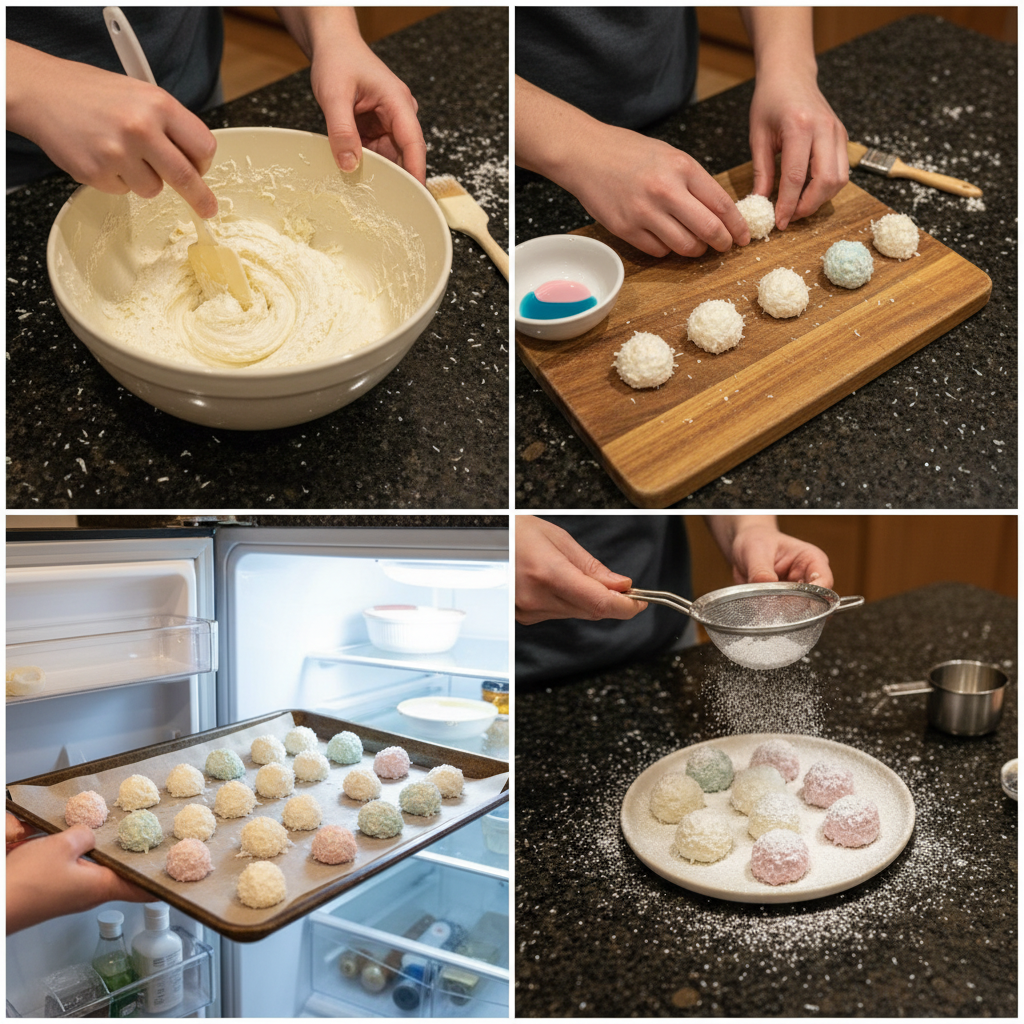
In a large mixing bowl, whisk together the sweetened condensed milk, the melted and cooled butter, and the vanilla extract until they are thoroughly combined and smooth. The mixture should smell wonderfully sweet with a hint of vanilla.
Next, add the 5 cups of medium shredded coconut and the confectioner’s sugar to the wet ingredients. Stir everything together very well until the coconut is evenly coated and the mixture appears cohesive. Every strand of coconut should be glistening.
Now, place the bowl into the refrigerator to chill for at least 15 minutes. This chilling time is essential as it helps the mixture firm up, making it much easier to handle and roll into perfect balls.
Color the Fine Coconut
While the main mixture chills, it is time to prepare our colorful coating. Place 1/2 cup of the fine shredded coconut into a separate mixing bowl. Add about 3-4 drops of your chosen liquid food coloring.
Use a hand-held mixer to beat the coconut and coloring together until it is perfectly combined and the coconut has a beautiful, consistent color. This process helps distribute the color evenly without clumping. I love creating a variety, so I repeat this step for each color I want to use, such as blue, green, yellow, and red, to make a vibrant assortment of bunny tails.
Shape and Chill the Bunny Tails
Once your main coconut mixture is nicely chilled and firm, it is time to portion it out. Using a 1 1/2 teaspoon cookie scoop or simply a measured spoon, scoop out uniform portions of the coconut mixture. This ensures all your bunny tails are consistently sized.
Roll each portion gently into a smooth ball between your palms. If the mixture starts to stick to your hands, lightly dampen them with water. Immediately roll these freshly formed balls into your chosen colored fine coconut, ensuring they are completely coated.
Place each colorful coconut ball onto a baking sheet as you finish shaping them. Once all your bunny tails are rolled and coated, return the baking sheet to the refrigerator for at least one hour. This final chilling period is crucial for them to properly set and firm up, giving them their delightful shape and texture.
Troubleshooting Dry Coconut Mixture
Occasionally, your coconut mixture might seem a little too dry or crumbly, making it difficult to roll. This can happen for a few reasons, such as using an extra dry batch of coconut, a slightly under-measured amount of condensed milk, or even a very dry climate. If you encounter this, do not worry. The easiest solution is to add a small amount of sweetened condensed milk, about one tablespoon at a time, to the mixture. Stir it in thoroughly and check the consistency. Continue adding in small increments until the mixture comes together and is pliable enough to roll without crumbling. Remember, the goal is a sticky but manageable consistency. High humidity can also affect how quickly the mixture comes together, sometimes requiring less binder.
Pro Tips & Troubleshooting
Pro Tips
Use unsweetened coconut to avoid overly sweet tails, allowing the natural coconut flavor to shine.
Fine coconut shred will make fluffier tails and also gives a lovely coating.
Always chill the mixture before rolling for much easier handling and less sticking.
Do not skip the pinch of salt; it truly enhances the overall flavor and balances sweetness.
Use a cookie scoop for uniform sizes, ensuring every bunny tail is perfectly shaped.
Lightly dampen your hands with water to prevent sticking while rolling the mixture.
Common Mistakes to Avoid
Using gel food coloring is a common mistake; it will not mix properly into the coconut and can create uneven colors.
Avoid overmixing the coconut, which can make the finished bunny tails tough instead of tender.
Not chilling the mixture long enough before rolling will result in a sticky, difficult-to-handle dough.
Leaving the tails at room temperature for extended periods will cause them to soften and lose their shape.
Serving & Storage
Serving Ideas
Serve these delightful bunny coconut tails chilled on a festive platter alongside other Easter treats like chocolate eggs or carrot cake.
For an extra special touch, arrange the colorful tails in a decorative nest made from toasted coconut or shredded wheat cereal.
They pair wonderfully with a refreshing glass of cold milk or a vibrant fruit smoothie for a fun snack.
Get creative and use them as adorable toppings for Easter cupcakes or scoops of vanilla ice cream.
Storage and Make-Ahead
These bunny coconut tails should be stored in an airtight container in the refrigerator to maintain their freshness and shape. They will keep well for up to 5 days.
For longer storage, you can easily freeze them for up to 2 months. Simply arrange them in a single layer on a baking sheet to freeze solid, then transfer them to a freezer-safe bag or container. Thaw them overnight in the refrigerator before serving.
You can definitely make these tails 1-2 days in advance of your Easter celebration. Just keep them stored in the refrigerator until you are ready to serve.
Conclusion
Creating these easy no-bake bunny coconut tails is truly a joyful experience, perfect for celebrating spring and Easter. The combination of tender coconut and the vibrant colors makes them not just a delicious treat, but also an adorable centerpiece for your dessert spread. Whether you embrace my little twist of salt and cream cheese or stick to the simple core recipe, you are sure to create delightful sweet treats that will bring smiles. Print this recipe and get ready to make some bunny magic in your kitchen this Easter!
FAQ
What type of coconut should I use?
I recommend using a combination of medium and fine shredded unsweetened coconut for the best texture and appearance. Unsweetened is key to control the overall sweetness of the treat.
Why use liquid food coloring over gel?
Liquid food coloring is preferred because it mixes more evenly into the shredded coconut, providing a consistent and vibrant color without clumps, unlike gel food coloring which can be difficult to disperse.
How long will these coconut tails last, and how should I store them?
These bunny coconut tails will last for up to 5 days when stored in an airtight container in the refrigerator. Always keep them chilled for the best texture and freshness.
What can I do if the mixture is too dry or crumbly?
If your mixture is too dry, gradually add more sweetened condensed milk, one tablespoon at a time, until it reaches a pliable, rollable consistency. Environmental factors like humidity can impact this.
Can these be frozen?
Yes, these coconut tails freeze beautifully. Freeze them in a single layer on a baking sheet until solid, then transfer to an airtight, freezer-safe container or bag for up to 2 months. Thaw in the refrigerator before serving.
What can I substitute for sweetened condensed milk?
For a dairy-free option, you can use plant-based sweetened condensed milk alternatives made from oat or coconut. Homemade versions by reducing coconut milk with sugar can also work as a binding agent.
Easy No-Bake Bunny Coconut Tails Recipe
Ingredients
Equipment
Method
- In a large mixing bowl, whisk together the sweetened condensed milk, the melted and cooled butter (and optional softened cream cheese if using), and the vanilla extract until thoroughly combined and smooth.
- Add the 5 cups of medium shredded coconut, the 1/8 teaspoon salt, and the confectioner's sugar to the wet ingredients. Stir everything together very well until the coconut is evenly coated and the mixture appears cohesive.
- Place the bowl into the refrigerator to chill for at least 15 minutes. This helps the mixture firm up for easier handling.
- While the main mixture chills, place 1/2 cup of the fine shredded coconut into a separate mixing bowl. Add about 3-4 drops of your chosen liquid food coloring.
- Use a hand-held mixer to beat the coconut and coloring together until it is perfectly combined and has a consistent color. Repeat this step for each additional color you wish to use.
- Once your main coconut mixture is nicely chilled and firm, use a 1 1/2 teaspoon cookie scoop or a measured spoon to scoop out uniform portions of the mixture.
- Roll each portion gently into a smooth ball between your palms. If the mixture sticks, lightly dampen your hands with water.
- Immediately roll these freshly formed balls into your chosen colored fine coconut, ensuring they are completely coated.
- Place each colorful coconut ball onto a baking sheet as you finish shaping. Once all bunny tails are rolled and coated, return the baking sheet to the refrigerator for at least one hour to properly set and firm up.
Notes

Sophie Reynolds is a baking specialist and dessert contributor at YumEasyMeals. She develops approachable, family-friendly dessert recipes focused on flavor, simplicity, and reliable results for everyday home cooks.