Welcome to my kitchen, where we are about to create the most delightful and vibrant Easter treats! If you are looking for charming DIY Easter candy molds ideas, then these adorable bunny bark bites are perfect. They are incredibly easy to make, fun for the whole family, and yield stunning results that are sure to impress. Get ready to transform simple ingredients into a festive Easter dessert that everyone will adore.
Why You’ll Love This Recipe
This recipe truly shines with its unique twist. We are adding a thin layer of colorful candy melts to the bottom of our silicone mold before layering in the white chocolate and toppings.
The colored candy melt base provides an incredible visual pop. It creates a vibrant, solid color backing for your bunny bark bites, making each piece a tiny work of art. This clever step prevents the sprinkles and M&M’s from getting lost or muted against a plain white background, ensuring a truly eye-catching Easter candy.
You will also love how quick these are to prepare, making them a fantastic family-friendly activity. They are incredibly customizable, allowing you to choose your favorite colors and toppings. These white chocolate treats are perfect for gifting or adding a festive touch to your Easter dessert table.
Ingredients Needed
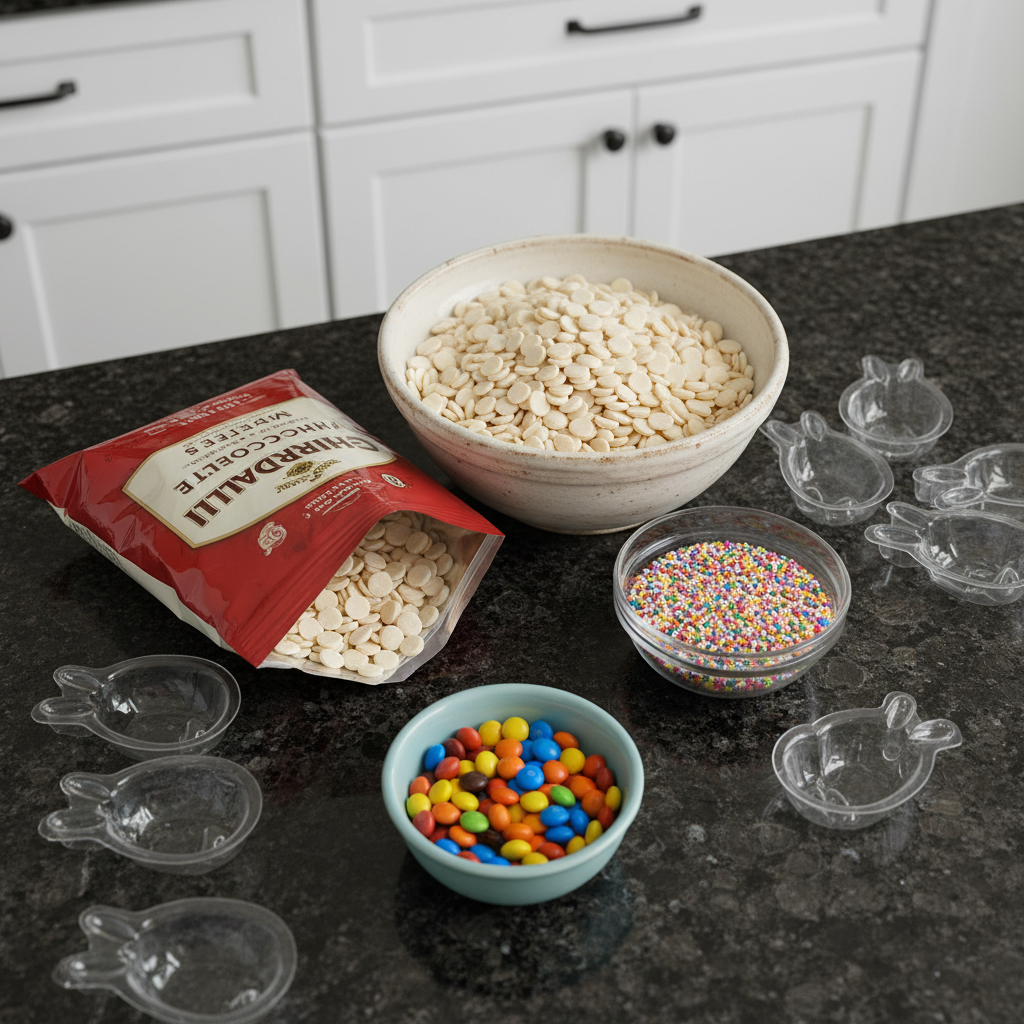
Ghirardelli White Chocolate Melting Wafers
Sprinkles
M&M’s
Ingredient Notes & Substitutions
White chocolate selection is key for smooth melting and a beautiful finish. Understanding the composition of white chocolate can help you choose the best quality. I always recommend Ghirardelli melting wafers for their superior quality and ease of melting. They ensure a creamy, lump-free white chocolate base.
For the colorful twist, explore a variety of candy melt colors. Pink, yellow, or blue candy melts work beautifully for Easter, offering a lovely pastel palette. You can even mix a few drops of food coloring into plain white candy melts if you prefer.
If you need a dairy-free option, consider using Enjoy Life baking chips or other dairy-free white chocolate alternatives. Always check the labels to ensure they are suitable for your dietary needs.
Experiment with different types of sprinkles for added texture and visual appeal. Rainbow nonpareils, jimmies, or even themed Easter sprinkles will make your bark bites truly unique. M&M’s also come in a variety of colors, allowing for even more customization.
How to Make DIY Easter Candy Molds
Making these vibrant bunny bark bites is a simple and joyful process. Follow these steps to create your delightful Easter candy.
Prepare Your Mold and Colored Base
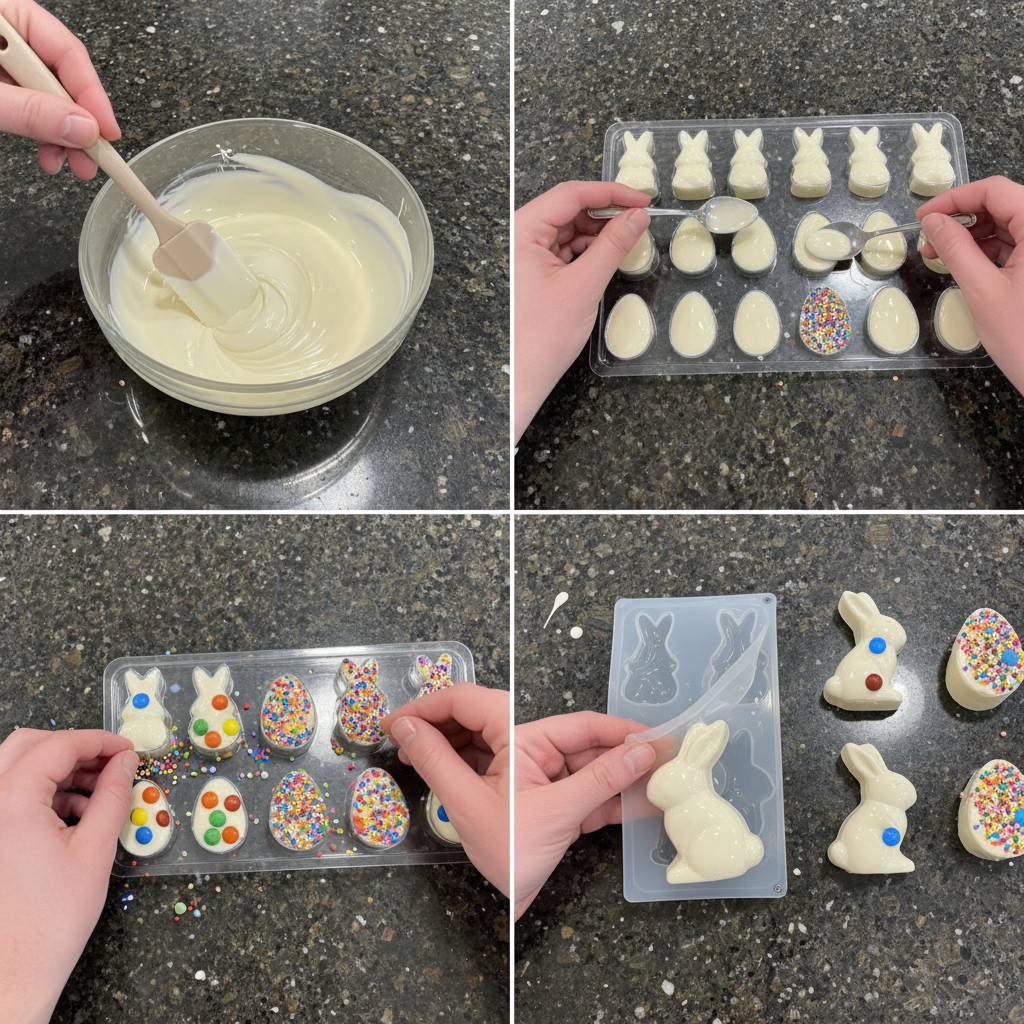
First, place your chosen silicone mold on a sturdy baking sheet. This makes it easy to move the mold once it is filled. Next, melt your colored candy melts according to their package instructions. Spoon a thin, even layer of the melted candy melts into the bottom of each cavity in your silicone mold. Allow this layer to set for about 5-10 minutes in the refrigerator until firm.
Add Your Toppings
Once the colored candy melt base is set, it is time for the fun part. Liberally sprinkle M&M’s and sprinkles into the candy mold cavities, directly on top of the hardened colored base. Feel free to arrange them artistically or simply sprinkle them over for a whimsical look. The aroma of the candy coating adds to the excitement.
Melt and Pour the White Chocolate
Next, melt your Ghirardelli white chocolate wafers according to their package instructions. Be careful not to overheat the white chocolate, as this can make it lumpy. You want a smooth, flowing consistency. Spoon the melted white chocolate into each mold cavity, covering the sprinkles and M&M’s completely. Gently tap the baking sheet a few times on the counter to help settle the chocolate and release any air bubbles, ensuring a smooth top surface.
Chill Until Set
Finally, transfer the baking sheet with the filled silicone mold to the refrigerator. Chill until the white chocolate is completely set, which usually takes about 20-30 minutes. The bark will feel firm and pop out of the silicone mold easily when ready.
Melting White Chocolate Perfectly
Melting white chocolate can be a delicate process, but with the right technique, you will achieve a silky smooth consistency every time. Avoiding seizing is crucial for beautiful chocolate bark.
Microwave Melting Method
To melt white chocolate in the microwave, place your Ghirardelli white chocolate melting wafers in a microwave-safe bowl. Heat on 50% power for 30-second intervals, stirring thoroughly after each interval. White chocolate holds its shape even when melted, so stirring is essential to assess its consistency. Continue until the chocolate is smooth and creamy.
Double Boiler Method
For a more gentle approach, use a double boiler. Place your white chocolate in a heat-safe bowl set over a saucepan of simmering water. Ensure the bottom of the bowl does not touch the water. Stir continuously until the white chocolate is melted and smooth. This method provides excellent temperature control, reducing the risk of burning.
Avoiding Seizing
Seizing occurs when even a tiny amount of water gets into melting chocolate, causing it to become thick and lumpy. You can learn more about why chocolate seizes and how to avoid it. Always use completely dry bowls and utensils. Avoid adding any liquids, even flavorings, directly to melting chocolate unless specifically designed to be oil-based.
Temperature Control
White chocolate burns easily. For microwave melting, using 50% power prevents overheating. With a double boiler, remove the bowl from the heat as soon as the chocolate is mostly melted, letting residual heat finish the job. Ideal melting temperature for white chocolate is around 100-110°F (38-43°C).
Troubleshooting Melted Chocolate
If your white chocolate becomes slightly too thick, you can try adding a very small amount of vegetable oil or paramount crystals, about a teaspoon at a time, to thin it out. Stir well until you reach the desired consistency. If it has seized due to water, it is unfortunately difficult to salvage for bark, but it can sometimes be used in other applications like ganache.
Customizing Your Bark Bites: Flavors & Dietary Needs
These bunny bark bites are incredibly versatile, allowing you to tailor them to different tastes and dietary requirements.
Flavor Variations
White chocolate pairs wonderfully with a variety of flavors. You can add a few drops of oil-based flavorings like peppermint extract, orange extract, or even a hint of almond extract to the melted white chocolate for an extra dimension. A pinch of sea salt sprinkled on top enhances the sweetness.
Dietary Swaps (Dairy-Free, Vegan)
To make this recipe dairy-free or vegan, simply swap out the Ghirardelli white chocolate melting wafers for a dairy-free white chocolate alternative, such as Enjoy Life white baking chips or vegan white chocolate bars. Always double-check that your candy melts, sprinkles, and M&M’s are also dairy-free and vegan-friendly. Many brands now offer these options, making candy making accessible for everyone.
Adding Nuts and Dried Fruits
For a more complex texture and flavor, consider adding finely chopped nuts like pistachios, almonds, or macadamias. Dried cranberries, cherries, or finely diced apricots also offer a lovely chewy contrast to the crisp white chocolate. Make sure to sprinkle these in the mold along with the M&M’s and sprinkles.
Alternative Toppings
Beyond traditional sprinkles and M&M’s, there are countless alternative toppings. Crushed cookies, mini chocolate chips, toasted coconut flakes, or even edible glitter can add a unique touch. Mini marshmallows or small pieces of colorful candied fruit are also excellent choices.
Adjusting Sweetness Levels
White chocolate is inherently sweet. If you prefer a less sweet treat, you can introduce elements like tart dried fruits or a sprinkle of flaky sea salt to balance the flavor profile. Darker chocolate drizzles can also provide a pleasant contrast.
Pro Tips & Troubleshooting
Here are my top tips for success and common mistakes to avoid when making these lovely Easter candy molds.
Pro Tips
Always place your silicone mold on a sturdy baking sheet before you start filling it. This keeps the mold level and makes it much easier to transfer to the refrigerator without spills.
For a longer shelf life, store your finished bark bites at room temperature in an airtight container for up to two weeks, or in the refrigerator for up to a month.
Using high-quality melting wafers, like Ghirardelli, makes a huge difference. They melt smoothly and provide a superior taste and texture compared to regular white chocolate chips.
Make sure the colored candy melt base you pour first is thin and even. This creates a beautiful, solid color backing without being too thick or overwhelming the white chocolate flavor.
Common Mistakes to Avoid
Avoid overheating the white chocolate at all costs. Overheated white chocolate can become lumpy, grainy, and difficult to work with, losing its smooth, pourable consistency. Melt gently and stir frequently.
Do not use white chocolate chips that are specifically made for baking, as these often contain stabilizers that make them lumpy and thick when melted for candy making. Stick to melting wafers or true couverture chocolate.
Never add water to melting chocolate. Even a tiny drop can cause the chocolate to seize instantly, turning it into a thick, unworkable mess. Ensure all your equipment is completely dry.
Serving & Storage
Once your DIY Easter candy molds are ready, it is time to enjoy and share your beautiful creations.
Serving Ideas
These adorable bunny bark bites are perfect for packaging in clear cellophane bags tied with festive ribbons, making them wonderful Easter gifts for friends, family, and teachers.
They make an excellent addition to any Easter dessert display, adding a pop of color and charm. Arrange them on a platter with other seasonal treats.
For a fun twist, you can use these bark bites as delightful cupcake toppers. Simply place one on top of a frosted cupcake for an instant decorative touch.
Storage and Make-Ahead
Once the bark bites are fully set, remove them from the silicone molds and store them in an airtight container. They will keep well at room temperature for up to two weeks, or in the refrigerator for up to a month. Make sure they are away from direct sunlight or heat sources. The bark typically takes about 20-30 minutes to fully set in the refrigerator, making them an excellent make-ahead treat for Easter celebrations.
Conclusion
I hope you are as excited as I am about these DIY Easter candy molds ideas. These adorable bunny bark bites, with their unique colorful candy melt base, are incredibly simple yet stunning. They prove that making beautiful and delicious Easter candy at home is absolutely achievable, even for beginners. I encourage you to experiment with different colors, sprinkles, and dietary swaps to make them truly your own. Please share your creations with me; I would love to see them!
FAQ
How do I melt white chocolate without it seizing?
To prevent white chocolate from seizing, always use completely dry bowls and utensils. Melt it gently, either in a microwave at 50% power in short intervals, stirring frequently, or over a double boiler. Avoid introducing any water or non-oil-based liquids.
What are the best types of inclusions for white chocolate bark?
White chocolate pairs well with a variety of inclusions. Sprinkles, M&M’s, crushed cookies, mini chocolate chips, toasted coconut flakes, and various nuts like pistachios or almonds are excellent. Tart dried fruits like cranberries or cherries also provide a nice balance.
How long does it take for the bark to set, and how should I store it?
The white chocolate bark typically takes about 20-30 minutes to set completely in the refrigerator. Once set, store the bark bites in an airtight container at room temperature for up to two weeks, or in the refrigerator for up to a month.
Can I use different types of chocolate or candy melts?
Yes, you can absolutely use different types of chocolate or candy melts. Dark chocolate or milk chocolate can be used for the main bark, or for creating a contrasting drizzle. For the colored base, any color of candy melt will work to create a beautiful effect.
How can I adapt this recipe for different dietary needs, like dairy-free or vegan?
To adapt this recipe for dairy-free or vegan needs, simply substitute the white chocolate melting wafers with a dairy-free or vegan white chocolate alternative. Ensure any candy melts, sprinkles, or M&M’s you use are also certified dairy-free and vegan-friendly. Many brands now offer these specialized options.
What size silicone mold is recommended, and how does it affect the yield?
For these bunny bark bites, a silicone mold with individual cavities, like small bunny or Easter egg shapes, is recommended. The yield will depend directly on the size and number of cavities in your specific silicone mold. Typically, a standard mold will yield 12-24 small pieces, perfect for gifting or a party spread.
Tips on removing the bark from the silicone molds cleanly.
Ensure the bark is fully chilled and firm before attempting to remove it. Gently push up from the bottom of the silicone cavity while peeling back the edges of the mold. If the bark is properly set, it should pop out cleanly and easily without breaking.
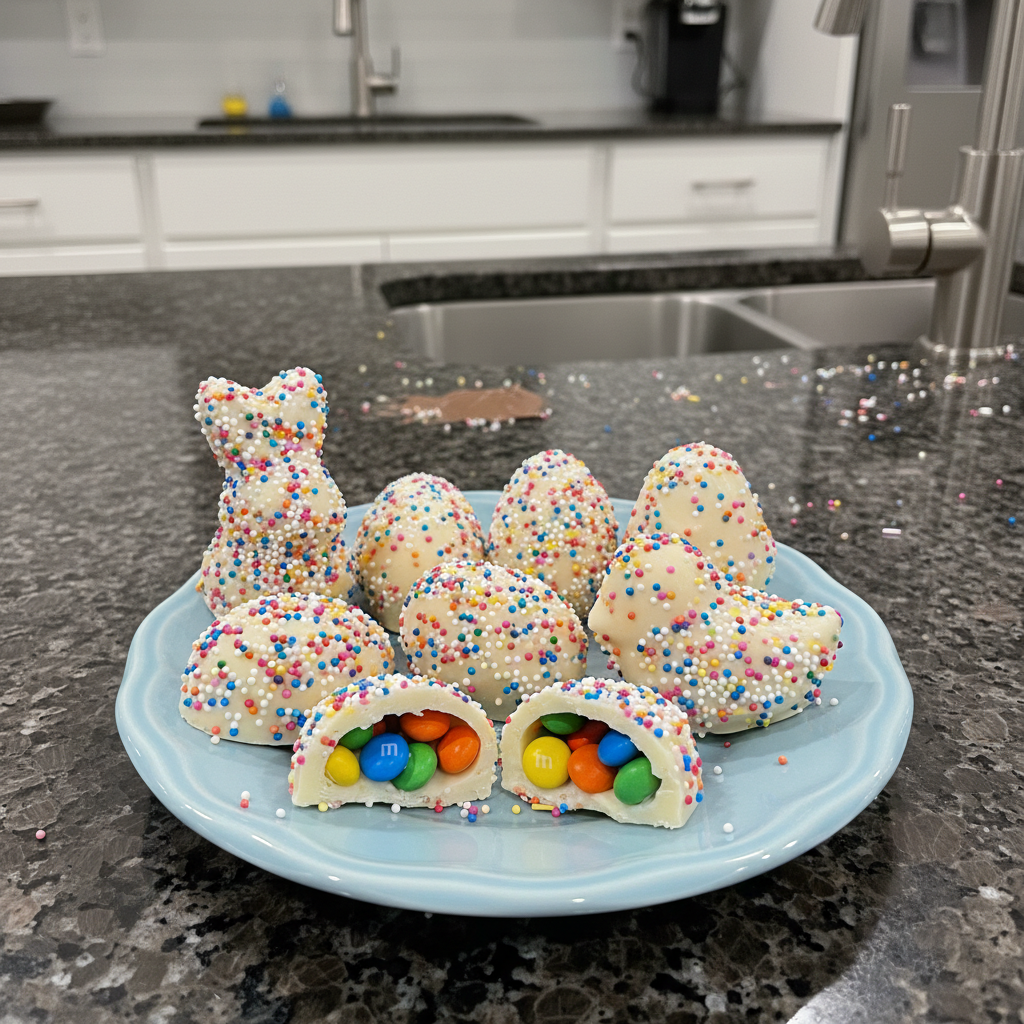
DIY Easter Candy Molds Ideas: Adorable Bunny Bark Bites
Ingredients
Equipment
Method
- Place your chosen silicone mold on a sturdy baking sheet. Melt your colored candy melts according to their package instructions. Spoon a thin, even layer of the melted candy melts into the bottom of each cavity in your silicone mold. Allow this layer to set for about 5-10 minutes in the refrigerator until firm.
- Once the colored candy melt base is set, liberally sprinkle M&M's and sprinkles into the candy mold cavities, directly on top of the hardened colored base. Arrange them artistically or simply sprinkle them over for a whimsical look.
- Melt your Ghirardelli white chocolate wafers according to their package instructions, being careful not to overheat. Spoon the melted white chocolate into each mold cavity, covering the sprinkles and M&M's completely. Gently tap the baking sheet a few times on the counter to help settle the chocolate and release any air bubbles, ensuring a smooth top surface.
- Transfer the baking sheet with the filled silicone mold to the refrigerator. Chill until the white chocolate is completely set, which usually takes about 20-30 minutes. The bark will feel firm and pop out of the silicone mold easily when ready.
Notes
Nutrition information is estimated based on common ingredients and serving sizes and may vary.

Emily Thompson is a home cook and food enthusiast who believes that great meals bring families together. She loves exploring creative twists on classic American comfort food, always testing new ideas in her kitchen. Emily is passionate about sharing simple, practical recipes and time-saving tips to help busy people enjoy cooking at home. Her approachable style makes every dish accessible, delicious, and perfect for those seeking inspiration for everyday meals and special occasions. Find Emily’s latest creations and kitchen wisdom on yumeasymeals.com.