There’s nothing quite like the simple joy of a cold, refreshing treat on a warm day. As a chef, I’m always looking for ways to create delicious desserts that are also healthy and customizable. That’s why I absolutely adore crafting homemade ice pops. They’re the ultimate solution for a simple, satisfying snack or dessert that you can tailor to your exact cravings. In this article, I’m thrilled to share my comprehensive recipe, including a unique trick for unparalleled flavor, and all my best tips to help you master the art of making the best homemade ice pops right in your own kitchen.
Why You’ll Love This Homemade Ice Pops Recipe
I understand the desire for truly outstanding flavor, and that’s precisely what my secret technique delivers. The unique twist in this recipe involves adding just a tiny pinch of salt, about 1/8 teaspoon per batch, to your blender before processing. This isn’t just a random addition; it’s a culinary game-changer! Salt works its magic by suppressing bitterness, activating your taste receptors, and enhancing the natural sweetness of the fruit. This creates a far more vibrant and balanced taste profile. For an extra pop of brightness, I often add a squeeze of lemon or lime as well.
Explosive, Balanced Flavor: Thanks to that tiny pinch of salt, these homemade ice pops taste truly superior. The salt elevates the natural fruit flavors, making each bite an incredibly vibrant and memorable experience, unlike anything you’ll find in a store-bought version.
Quick & Easy Preparation: With minimal ingredients and the power of a high-speed blender, this recipe is incredibly simple and fast. It’s perfect for busy schedules, allowing you to whip up a healthy treat with hardly any fuss.
Healthy & Customizable: These are guilt-free treats that are wonderful for families. You have complete control over the ingredients, making them easy to adapt for various dietary needs, whether you prefer vegan, low-sugar, or specific fruit combinations.
Ingredients Needed
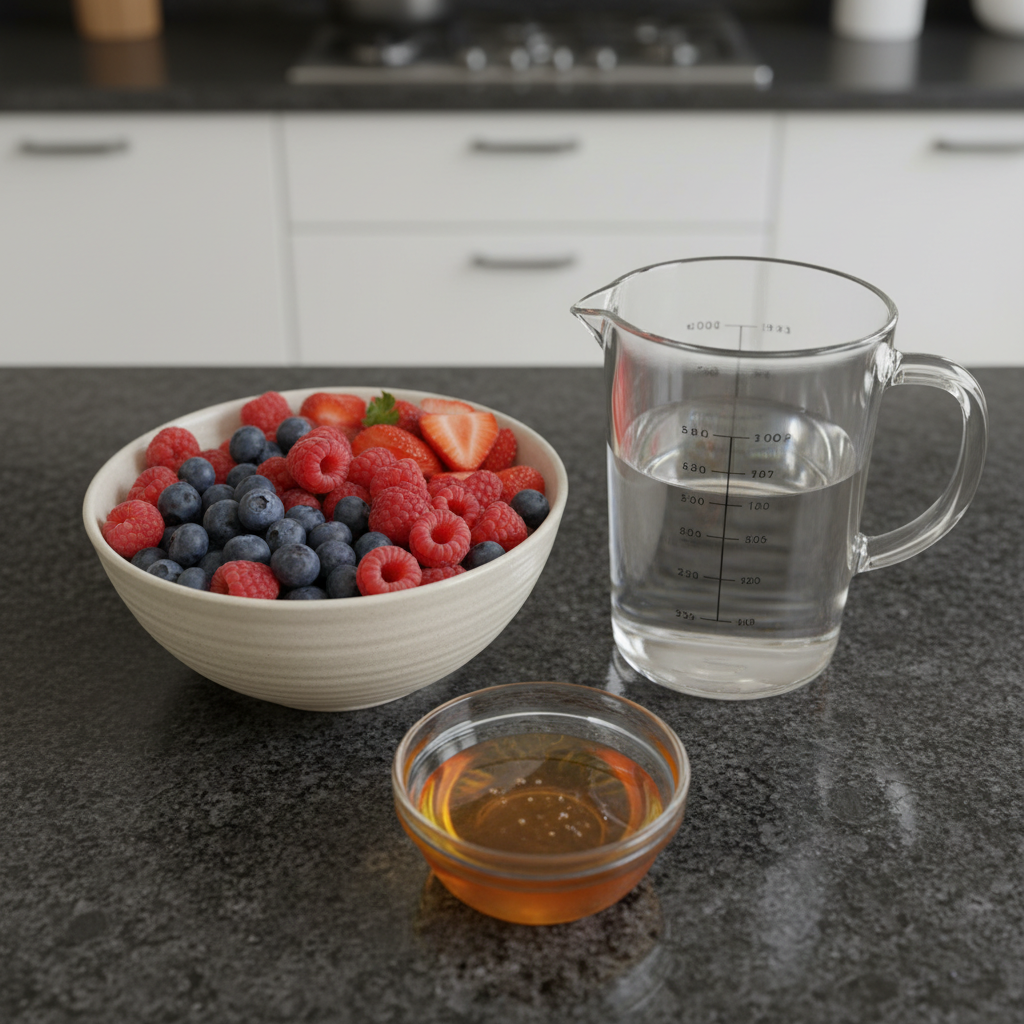
My kitchen thrives on simplicity and quality. Here are the exact ingredients you’ll need for these spectacular homemade ice pops:
- 10 ounces fresh or frozen fruit
- 1/2 cup water
- 1 tablespoon honey, agave syrup, or your choice of liquid sweetener
Ingredient Notes & Substitutions
Fruit: The beauty of homemade ice pops is their versatility. Feel free to use either fresh or frozen fruit; both work wonderfully. I often reach for sweet strawberry, ripe banana, tart cherry, juicy peach, refreshing watermelon, tropical mango, bright pineapple, zesty orange, exotic guava, or a vibrant mixed berry blend. Remember, the riper your fruit, the sweeter your pops will naturally be, potentially reducing the need for added sweeteners.
Liquid Sweetener: I typically use honey or agave syrup, but you can choose any liquid sweetener you prefer. If you’re wondering how to make sugar-free or low-sugar ice pops, simply adjust the quantity based on the natural sweetness of your fruit, or omit the added sweetener entirely for a truly sugar-free option. It’s all about letting the fruit’s natural flavor shine!
Liquid Base: While water is my go-to for a light, refreshing pop, feel free to experiment. For a creamier, smoothie-like texture, try swapping the water for milk (dairy, oat milk, or soy milk). For a delightful tropical island vibe, I often use coconut milk or coconut water, which adds a fantastic richness and flavor.
How to Make Homemade Ice Pops
Making these vibrant homemade ice pops is incredibly straightforward. Just follow these steps, and you’ll be enjoying a delicious treat in no time!
Step 1: Gather & Prep for Blending
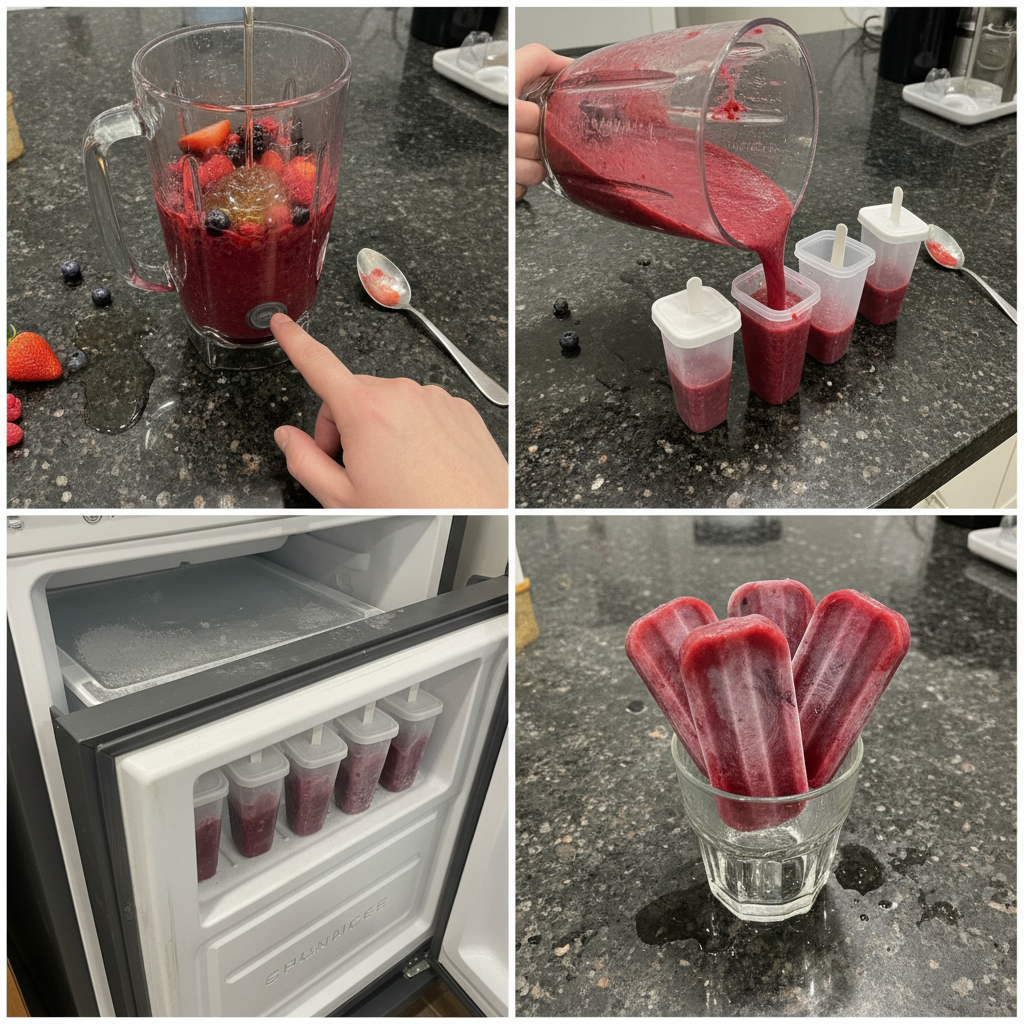
If you’re using fresh fruit, give it a good wash and roughly chop any larger pieces. Now, for the magic! Add all your ingredients—the fruit, water, and your chosen liquid sweetener—to your high-speed blender. Crucially, add a small pinch of salt (about 1/8 teaspoon) and, if you like, a squeeze of lemon or lime juice to the blender. Make sure the fruit is added so it’s furthest from the blade, allowing for optimal blending.
Step 2: Blend to Perfection
Secure the lid on your blender and blend until the mixture is completely smooth and creamy. You want a consistent, pourable consistency with no visible lumps of fruit. The mixture should be vibrant in color and beautifully uniform in texture, ready to become delicious homemade ice pops.
Step 3: Fill Your Molds/Sleeves
Carefully use a funnel to pour the colorful mixture into your chosen ice pop sleeves or preferred molds. Fill them up to the designated “fill” line, remembering not to overfill. After each sleeve or mold is filled, close it securely. I’ve found that sometimes liquid can freeze at the top of pouches, making them tricky to open; a quick trick is to run the opening under warm water for about 10 seconds to unstick it before enjoying.
Step 4: Freeze Until Firm
Place your filled ice pop sleeves or molds into the freezer. Let them freeze for at least two hours, or until they are completely firm. Ensuring sufficient freezing time is key to achieving that perfect, solid popsicle texture, preventing them from being too slushy or breaking apart easily.
Mastering Your Molds & Perfecting Pop Freezing
Achieving the perfect homemade ice pops isn’t just about the ingredients; it’s also about the tools and the technique. Let me walk you through choosing the best molds and optimizing your freezing process.
Choosing the Best Ice Pop Molds
The market offers a delightful array of ice pop molds, each with its own benefits. Understanding these can help you choose the best option for your needs.
- Silicone Molds: These are incredibly flexible, making it very easy to release your frozen treats without much fuss. They are durable, often dishwasher-safe, and come in many fun shapes.
- Plastic Molds: Widely available and affordable, plastic molds are a classic choice. They can be a bit trickier for pop removal, sometimes requiring a quick warm water bath to loosen them. Look for BPA-free options for health and safety.
- Reusable Ice Pop Sleeves: As used in this recipe, these are fantastic for portability and reducing mess, especially for kids. They’re usually made from durable, food-grade plastic and can be easily stored in your freezer.
No matter which type you choose, ensure they are clean and ready to use before pouring in your mixture.
Optimizing Freezing Time
While my recipe suggests “at least two hours” for freezing, the exact time can vary. Understanding the factors that influence how long your homemade ice pops take to freeze firmly will ensure perfect results every time.
- Mold Size and Material: Larger molds, or those made from thicker materials like some plastics, will naturally take longer to freeze than smaller ones or flexible silicone molds.
- Freezer Temperature: The colder your freezer, the faster your pops will freeze. A very full freezer might also take longer to bring items to a fully frozen state.
- Ingredient Composition: Ingredients play a huge role. Mixtures with higher sugar content or, for adult variations, any alcohol content, will have a lower freezing point and therefore take longer to solidify. Fruit-heavy pops might freeze slightly differently than very water-based ones due to their natural sugars and pulp.
To tell if your pops are truly firm, gently press on the top; there should be no give. For stick molds, a slight wiggle of the stick should indicate a fully solid pop. Patience truly pays off here for preventing breakage and achieving the ideal texture.
Pro Tips & Troubleshooting
Even with a simple recipe, a few expert insights can elevate your homemade ice pops from good to absolutely fantastic. Here are my go-to tips and solutions for common hiccups.
Pro Tips for Perfect Ice Pops
- Don’t Skip the Salt! Seriously, that small pinch of salt and optional squeeze of lemon or lime is the game-changer. It enhances the fruit flavors beautifully, making your pops taste incredibly bright and balanced.
- Creamier Pops: For a delightful, smoothie-like texture, swap out the water for milk. Dairy milk, oat milk, or soy milk all work wonderfully to create a richer, less icy consistency.
- Tropical Escape: Transport yourself to a sunny beach by using coconut milk or coconut water as your liquid base. This adds an exotic depth of flavor that’s perfect for tropical fruit combinations like pineapple and mango.
- Sneak in Veggies: Want to boost the nutritional content without compromising taste? Add a handful of baby spinach or some grated carrots to the blender. The fruit flavor will mask them beautifully, making it a great way to add extra goodness.
- Adjusting Sweetness: Always taste your mixture before freezing! The ripeness of your fruit greatly impacts the final sweetness. If your fruit isn’t super ripe, you might need a bit more honey, agave syrup, or other sugar to achieve your desired sweetness level.
- Creative Flavor Combinations: The possibilities are endless! I love experimenting with combinations like Strawberry banana, Cherry peach, Strawberry watermelon, Banana, mango, and pineapple, Pineapple, orange, and guava, or a simple yet delicious Mixed berry. For a mock piña colada, try Pineapple with coconut milk. The “science” behind successful combinations often lies in complementary or contrasting flavor profiles that create a more complex and satisfying experience.
Common Mistakes to Avoid
- Pops Sticking: If your ice pops are difficult to remove from rigid molds or even ice pop sleeves, don’t force them. A quick fix is to run the outside of the mold or sleeve under warm water for 10-20 seconds. This gently loosens the frozen exterior.
- Too Watery/Icy Texture: If your pops turn out too watery or icy, it’s likely due to too much water in the mixture. Try adding more fruit or a creamier liquid like coconut milk in your next batch for a smoother, less crystalline consistency.
- Not Sweet Enough: As mentioned, taste your mixture before freezing! If your fruit isn’t very ripe, the pops might not be as sweet as you’d like. Adjust the sweetener to your preference. Remember, flavors mellow slightly when frozen.
- Overfilling Molds: Liquids expand when frozen. Always leave a small headspace (about 1/4 to 1/2 inch) at the top of your molds or sleeves. This prevents overflow, messes, and ensures cleaner popsicle formation.
- Premature Removal: Patience is a virtue when making homemade ice pops! Resist the urge to pull them out before they are completely firm. Removing them too soon can lead to breakage, especially with the stick varieties.
Serving & Storage
Once your delicious homemade ice pops are perfectly frozen, the fun begins! Here’s how I recommend serving and storing them to enjoy every last drop.
Serving Ideas
My favorite way to serve these is simply: directly from the freezer! They are a fantastic, refreshing treat on hot days, a healthy dessert alternative for any meal, a fun and colorful party snack for kids and adults alike, or a wonderfully cooling post-workout pick-me-up. Arrange a tray of colorful pops for an instant mood booster and a beautiful display that’s sure to delight.
Storage and Make-Ahead
One of the best things about homemade ice pops is their make-ahead convenience! They are excellent for meal-prep and can be made in large batches for future enjoyment.
- Storage Duration: For the best quality, homemade ice pops will last beautifully in the freezer for up to 1-2 months. While they are generally safe to eat for longer, their texture and vibrant flavor might start to diminish past this point.
- Preventing Freezer Burn: To prevent dreaded freezer burn, which causes ice crystals and can alter taste, proper storage is key.
- If you’re using rigid molds, once your pops are fully frozen and removed, transfer them to an airtight freezer bag or container.
- For ice pop sleeves, simply gather them together and store them in a larger airtight freezer bag.
This method seals out air, which is the primary cause of freezer burn, protecting your delicious treats from odors and ice crystal formation.
Conclusion
I truly hope you’ll embrace the simple pleasure of making these delightful homemade ice pops. With minimal effort, you can create a healthy, customizable treat that boasts superior, vibrant fruit flavor, all thanks to that clever pinch of salt. This recipe is designed to be accessible for everyone, from beginners to seasoned cooks, ensuring perfect results every time.
Don’t hesitate to experiment with the countless variations and serving ideas I’ve shared, making this recipe truly your own. Don’t forget to share your favorite homemade ice pop creations in the comments below!
Frequently Asked Questions About Homemade Ice Pops
What ingredients do I need to make homemade ice pops?
You’ll need just a few core ingredients: fresh or frozen fruit, water, and a liquid sweetener like honey or agave syrup. Don’t forget my secret ingredient: a tiny pinch of salt for enhanced flavor! You can find the exact quantities in the main recipe section.
How long does it take to freeze ice pops?
Generally, homemade ice pops take at least two hours to freeze until firm. However, this can vary based on factors like the size and material of your molds, your freezer’s temperature, and the composition of your mixture (e.g., higher sugar content can extend freezing time).
What are some unique flavor combinations for ice pops?
The possibilities are endless! Some of my favorites include Strawberry banana, Cherry peach, Pineapple with coconut milk for a tropical twist, or a vibrant Mixed berry blend. You can even sneak in nutritious veggies like spinach or carrots for an added boost.
How can I make sugar-free or low-sugar ice pops?
To make sugar-free or low-sugar ice pops, simply reduce or entirely omit the added liquid sweetener. Focus on using naturally sweet, very ripe fruit to provide all the sweetness you need, allowing its natural sugars to shine through.
How long will homemade ice pops last in the freezer and how do I prevent freezer burn?
For the best quality, homemade ice pops will last in the freezer for 1-2 months. To prevent freezer burn, transfer them from their individual molds into an airtight freezer bag or container once frozen solid. This minimizes air exposure, which causes ice crystals and flavor degradation.
What type of ice pop molds should I use?
You have several great options! Silicone molds are flexible and easy to use, while traditional plastic molds are widely available. My recipe often uses ice pop sleeves, which are fantastic for portability and less mess. Choose based on your preference for ease of use and cleanup.
Can you use frozen fruit for ice pops?
Absolutely, yes! Frozen fruit works perfectly for homemade ice pops. It’s convenient, often readily available, and can even contribute to a thicker, colder mixture before freezing, enhancing the final texture.

Easy Homemade Ice Pops: The Secret to Explosive Fruit Flavor
Ingredients
Equipment
Method
- If using fresh fruit, wash and roughly chop any larger pieces. Add all ingredients—fruit, water, sweetener, a small pinch of salt (about 1/8 teaspoon), and optional lemon or lime juice—to your high-speed blender. Ensure the fruit is furthest from the blade for optimal blending.
- Secure the lid on your blender and blend until the mixture is completely smooth and creamy. Aim for a consistent, pourable consistency with no visible lumps, ready to become delicious ice pops.
- Carefully use a funnel to pour the colorful mixture into your chosen ice pop sleeves or molds, filling up to the designated “fill” line without overfilling. Close each securely.
- Place your filled ice pop sleeves or molds into the freezer. Let them freeze for at least two hours, or until they are completely firm, ensuring a perfect, solid popsicle texture.
Notes

Emily Thompson is a home cook and food enthusiast who believes that great meals bring families together. She loves exploring creative twists on classic American comfort food, always testing new ideas in her kitchen. Emily is passionate about sharing simple, practical recipes and time-saving tips to help busy people enjoy cooking at home. Her approachable style makes every dish accessible, delicious, and perfect for those seeking inspiration for everyday meals and special occasions. Find Emily’s latest creations and kitchen wisdom on yumeasymeals.com.