There’s a reason why a truly great bowl of Texas-Style Chili holds a legendary status. It’s more than just a meal; it’s a robust, deeply flavorful experience that speaks to the heart of comfort food tradition. Whether you’re preparing for game day, a cozy family dinner, or simply craving something hearty and satisfying, this recipe promises to deliver. I’ll guide you through crafting a chili with melt-in-your-mouth beef and a rich, savory depth that will make it an instant classic in your kitchen.
Why You’ll Love This Recipe
My kitchen thrives on pushing flavors to their peak, and this Texas-Style Chili is a testament to that. What truly sets this recipe apart is a unique twist I’ve perfected: we toast and rehydrate dried Ancho chilies, then blend them with a touch of strong coffee or espresso into a rich paste.
This method is pure culinary magic. Toasting the Ancho chilies intensifies their earthy, fruity notes through the Maillard reaction, developing deeper flavors. When rehydrated and blended with coffee, the paste creates an incredibly complex, velvety chili base. The coffee, much like unsweetened cocoa powder, doesn’t make the chili taste like coffee at all; instead, it amplifies the savory, umami flavors of the beef and chilies, adding an unmatched depth and a beautiful dark hue to the sauce. It’s a subtle yet transformative addition that makes all the difference.
- Unmatched Flavor Depth: Experience a truly robust, beefy, spicy, and savory chili with a deep, complex flavor profile that will impress even the most discerning palates.
- Melt-in-Your-Mouth Tenderness: Thanks to a long, slow simmer, your beef chuck roast will become incredibly tender, practically dissolving in every spoonful.
- Perfect for Any Occasion: This Texas-style chili is the ultimate comfort food, ideal for game day food, family gatherings, or even convenient meal prep throughout the week.
Ingredients Needed

Crafting the perfect Texas-Style Chili starts with the right ingredients. Here’s exactly what you’ll need from my pantry:
- 4 pounds beef chuck roast (trimmed of excess fat, cut into ½ inch chunks)
- salt and black pepper (to taste)
- 6 tablespoons olive oil (divided)
- 3 jalapeños (seeded and diced)
- 1 large yellow onion (diced)
- 5 cloves garlic (minced)
- 1 chipotle pepper in adobo sauce (seeded and finely chopped)
- 28 ounces crushed tomatoes (1 can)
- 3 tablespoons tomato paste
- 4 cups beef stock (or broth)
- 2 bay leaves
- Seasoning Mix:
- 2 tablespoons chili powder
- 2 tablespoons smoked paprika
- 1 tablespoon cumin
- 1 tablespoon dried oregano
- 2 teaspoons chipotle chili powder
- 2 teaspoons unsweetened cocoa powder
- 1 teaspoon ground coriander
- ½ teaspoon cinnamon
Ingredient Notes & Substitutions
Let’s dive a little deeper into why these specific ingredients make all the difference in our Texas-Style Chili.
Beef Chuck Roast: I always recommend using a good quality beef chuck roast for this chili. Its generous marbling melts down during the long cooking process, infusing the chili with rich, beefy flavor and ensuring that melt-in-your-mouth tenderness we crave. While you could use pre-cut stew meat, cutting your own chuck roast into ½ inch chunks guarantees superior flavor and texture. If you’re looking for other ways to prepare this cut, consider a delicious tender slow cooker roast recipe.
Chili Peppers: The fresh jalapeños provide a vibrant, upfront heat, while the chipotle pepper in adobo sauce adds a beautiful layer of smoky depth. For those truly seeking unparalleled complexity, you can elevate this Texas chili even further with dried Ancho chilies and coffee, though these are detailed as an advanced technique in my Pro Tips section as they’re not in the main ingredient list.
Spices: The seasoning mix is where the magic truly happens! Smoked paprika brings a lovely smoky undertone, cumin adds earthy warmth, and dried oregano provides an aromatic backbone. And don’t shy away from the unsweetened cocoa powder and cinnamon – I promise they won’t make your chili taste like dessert! Instead, they are culinary secrets for building incredible savory depth. The cocoa enhances umami, rounding out the robust flavors, while a hint of cinnamon adds a subtle warmth and complexity that really makes the chili sing, much like in a traditional mole sauce.
Beef Stock: Always opt for a high-quality, low-sodium beef stock or broth. This gives you control over the final seasoning and ensures a rich foundation for your chili.

How to Make Texas-Style Chili
Crafting a truly exceptional Texas-Style Chili is a journey of patience and flavor building. Follow these steps closely, and you’ll be rewarded with an unforgettable meal!
Step 1: Prep the Beef & Season
First, take your trimmed beef chuck roast chunks and season them generously with kosher salt and freshly ground black pepper. Don’t be shy here; proper seasoning at this stage builds the foundation of flavor.
Step 2: Brown the Beef in Batches
In a large, heavy-bottomed pot or Dutch oven, heat 2 tablespoons of olive oil over medium-high heat until shimmering. Add about half of your seasoned beef chunks, ensuring not to overcrowd the pot. You want to hear a good sizzle! Brown the beef deeply on all sides until a rich, dark crust forms. This crucial step, known as the Maillard reaction, develops incredible savory flavors that simply can’t be replicated. Resist the urge to move the meat too soon. Once beautifully browned, remove the beef and set it aside. Repeat this process with the remaining beef, adding more olive oil if needed. Browning in batches is essential to sear, not steam, the meat.
Step 3: Sauté Aromatics
Add the remaining 2 tablespoons of olive oil to the pot, allowing it to heat for about 30 seconds. Toss in the diced jalapeño peppers and yellow onion. Sauté these aromatics for about 10 minutes, stirring occasionally, until the onions are softened and translucent. It’s important not to brown them, as over-browning can make them bitter and you want to preserve their sweet notes.
Step 4: Toast Spices
Now, stir in your minced garlic and the entire seasoning mix. Cook for just 30 seconds, or until the spices become wonderfully fragrant. This brief toasting releases their essential oils and intensifies their flavors, making a significant difference in the final taste of your Texas-Style Chili.
Step 5: Combine & Simmer
Return the beautifully browned beef to the pot. Stir in the crushed tomatoes, tomato paste, beef stock, finely chopped chipotle pepper in adobo, and the bay leaves. Give everything a good stir to combine all those incredible flavors.
Step 6: The Long Simmer
Bring the chili mixture to a boil, then immediately reduce the heat to low. This is where the magic of “low and slow” truly comes into play. Simmer the chili, uncovered, for 3 to 3.5 hours. During this long simmer, the beef will tenderize beautifully, and all the flavors will meld and deepen into a cohesive, rich sauce. Remember to stir occasionally to prevent any sticking to the bottom of the pot and ensure even cooking. If your chili becomes too thick for your liking during the simmer, don’t hesitate to add a splash more beef stock or water as needed.
Step 7: Finish & Serve
Before serving your magnificent Texas-Style Chili, remember to remove the bay leaves. Your kitchen will be filled with a rich, savory aroma, and the chili will be thick, glossy, and bursting with flavor. Ladle it into bowls and prepare to enjoy!
Gap-Filling Sections
Making This Texas Chili in a Slow Cooker or Instant Pot
While I adore the stovetop method, sometimes convenience calls! This Texas-Style Chili can be adapted beautifully for a slow cooker or Instant Pot. The key to maintaining the robust flavor is still completing the initial browning and sautéing steps on the stovetop first.
Slow Cooker Method:
To use a slow cooker, follow the stovetop instructions for Steps 1 through 4 exactly (browning the beef, sautéing aromatics, and toasting spices). Once those foundational flavors are built, transfer the browned beef and all other ingredients from the pot into your slow cooker. Cook on High for 3-4 hours or on Low for 6-8 hours, or until the beef is incredibly fork-tender. Slow cookers retain a lot of moisture, so you might need slightly less beef stock than the stovetop method, or you can simmer uncovered for the last 30 minutes if it seems too thin. For another comforting slow cooker meal, try this hearty slow cooker beef stew.
Instant Pot Method:
The Instant Pot can offer a quicker path to tender beef! Start by using the ‘Sauté’ function on high. Brown the beef in batches directly in the Instant Pot, then remove. Add remaining oil and sauté the jalapeños and onions until softened. Stir in the garlic and spices, cooking until fragrant. After sautéing, be sure to deglaze the pot thoroughly with a splash of beef stock, scraping up any browned bits from the bottom – this is crucial to avoid a burn notice. Return the beef to the pot, add the crushed tomatoes, tomato paste, remaining beef stock, chipotle pepper in adobo, and bay leaves. Seal the lid and set to High Pressure for 35-45 minutes. Allow for a natural pressure release (NPR) for 15-20 minutes, then quick release any remaining pressure. If the chili is too thin, use the ‘Sauté’ function again to simmer it uncovered for a few minutes until thickened to your desired consistency.
Mastering Deep Chili Flavor: Browning, Spices & Essential Equipment
Achieving a truly deep, authentic Texas Chili flavor goes beyond just following the steps; it’s about understanding the techniques and tools that elevate your cooking.
Browning Beef for Maillard Perfection: The initial browning of your beef chuck roast is perhaps the most critical step for flavor development. This isn’t just about color; it’s about initiating the Maillard reaction. In simple terms, this is a chemical reaction between amino acids and reducing sugars that happens when food is cooked at high temperatures, creating hundreds of new flavor compounds. It’s what gives seared meat its rich, savory taste and crust. To maximize this, always pat your beef dry with paper towels before browning, use hot oil, and avoid overcrowding the pan. Giving each piece of beef ample space in the hot pan allows for proper searing, rather than steaming, ensuring you build that incredible depth of flavor right from the start.
The Science of Spices: Cocoa & Cinnamon: Many people are surprised to see unsweetened cocoa powder and cinnamon in a savory chili recipe. However, from a food science perspective, these spices are powerhouses for building complex flavor. Unsweetened cocoa powder doesn’t add sweetness, but rather deepens and rounds out the savory notes, enhancing the umami and creating a richer, more integrated taste profile, similar to how it’s used in Mexican mole sauces. Cinnamon, used sparingly, contributes warmth and a subtle complexity that balances the heat and acidity, without making the chili taste sweet. For more on the savory applications of chocolate and other spices, understanding their roles can elevate many dishes. Together, they add layers of flavor that elevate the chili beyond ordinary. You’ll find similar complex spice profiles in dishes like easy beef picadillo tacos.
Essential Equipment for Chili Success: While a “large pot” works, having the right tools makes a significant difference. I highly recommend investing in a heavy-bottomed Dutch oven. Its excellent heat distribution and retention are perfect for browning and maintaining a consistent, low simmer over several hours. You’ll also need a sturdy wooden spoon or heat-proof spatula for stirring, especially during the long simmer to prevent sticking. A large cutting board and a sharp chef’s knife are indispensable for efficiently prepping your beef, jalapeños, and yellow onion. And if you’re exploring alternative cooking methods, a slow cooker or Instant Pot will, of course, be essential pieces of equipment for those adaptations.
Pro Tips & Troubleshooting
Pro Tips for the Best Texas Chili
Even the most experienced chefs have their secrets. Here are my top tips to ensure your Texas-Style Chili is nothing short of spectacular:
- The Ancho-Coffee Secret (Optional, but Highly Recommended): For those truly seeking unparalleled depth and complexity, this is the unique twist that makes my Texas-Style Chili truly stand out. You’ll need 2-3 dried Ancho chilies and 1 tablespoon of strong coffee or espresso (these are additional ingredients not listed in the main recipe card). Lightly toast the Ancho chilies in a dry pan over medium heat for 1-2 minutes until fragrant. Be careful not to burn them! Remove, then rehydrate the chilies in hot water for about 15-20 minutes until softened. Drain, then blend the rehydrated Ancho chilies with the strong coffee or espresso until you have a smooth paste. Add this paste to the pot along with the crushed tomatoes and other liquids in Step 5. It infuses an incredible smoky, earthy, and umami richness without a noticeable coffee taste.
- Don’t Rush the Browning: Patience is key when browning the beef chuck. Taking the time to get a deep, dark sear in batches is crucial for maximizing the Maillard reaction and building profound flavor.
- Low and Slow is Key: The magic of melt-in-your-mouth tender beef and deeply melded flavors comes from a long, slow simmer. Don’t be tempted to rush it. This gentle cooking method breaks down the connective tissues in the beef chuck, creating that wonderful texture.
- Taste and Adjust: Throughout the simmering process, give your chili a taste. Adjust salt, black pepper, or any other spices as needed. Every batch of chili powder or stock can vary, so trust your palate!
- Resting Period: Just like a perfectly cooked steak, chili benefits from a rest. Allow your Texas chili to sit off the heat for 15-30 minutes before serving. This allows the flavors to deepen and the liquids to redistribute, resulting in an even more satisfying bowl.
Common Mistakes to Avoid
Even seasoned cooks can stumble. Here are some common pitfalls to sidestep for your Texas-Style Chili:
- Overcrowding the Pot: A major culprit for bland beef! If you brown too much meat at once, the temperature of your pan drops, and the beef steams instead of searing. This prevents the Maillard reaction from occurring, robbing your chili of vital flavor. Always brown in batches.
- Over-Browning Onions: While caramelization is great for some dishes, you want your onions in this chili to be softened and translucent, not deeply browned or bitter. Cook them gently to release their sweetness without imparting any harsh notes.
- Ignoring the Simmer: A long simmer develops flavor, but it requires occasional attention. Not stirring during those 3 to 3.5 hours can lead to the chili sticking and potentially scorching at the bottom of the pot, which can ruin the entire batch.
- Too Thick or Too Thin Chili: If your chili is too thick, simply add a splash more beef stock or water, stirring until it reaches your desired consistency. If it’s too thin, remove the lid and continue simmering uncovered for an extended period, allowing more liquid to evaporate. For a quicker fix, you can create a slurry with a tablespoon of cornstarch mixed with an equal amount of cold water, stir it into the simmering chili, and cook for a few more minutes until thickened.
Serving & Storage
Once your Texas-Style Chili is bubbling with flavor and the beef is tender, it’s time to think about serving and, if you’re lucky, storing those delicious leftovers!
Serving Ideas
My Ultimate Texas-Style Chili is fantastic on its own, but a few classic additions can elevate the experience:
- Traditional Toppings: A dollop of cool sour cream, a generous sprinkling of shredded cheese (sharp cheddar or Monterey Jack are my favorites), and some freshly sliced green onions are indispensable.
- Hearty Sides: Serve alongside warm, buttery cornbread for dipping into the rich sauce, or some crusty garlic bread. Spanish rice also makes an excellent companion, soaking up all that incredible flavor. For a lighter touch, a simple green salad provides a nice contrast.
- Beyond the Bowl: Don’t limit this chili to just a bowl! It’s fantastic served over a bed of fluffy rice, as a topping for grilled hot dogs, or piled high on baked potatoes.
- The ‘Bean Question’: While authentic Texas chili traditionally contains no beans (it’s all about the beef!), I understand some folks love them. If you prefer beans, I suggest serving refried kidney, red, or pinto beans on the side, allowing everyone to customize their bowl.
Storage and Make-Ahead
This Texas-Style Chili is a fantastic make-ahead meal, often tasting even better the next day as the flavors continue to meld and deepen.
Refrigeration: Allow any leftover chili to cool completely before transferring it to an airtight container. It will keep beautifully in the refrigerator for up to 3-4 days.
Freezing: Texas chili freezes exceptionally well, making it perfect for meal prep. Once cooled, spoon the chili into freezer-safe airtight containers or heavy-duty freezer bags (removing as much air as possible). It can be stored in the freezer for up to 3-4 months.
Reheating: To reheat refrigerated chili, simply warm it on the stovetop over low heat, stirring occasionally, or in the microwave until heated through. For frozen chili, thaw it overnight in the refrigerator first, then reheat as described. You might need to add a splash of beef stock or water when reheating to achieve your desired consistency.
Conclusion
There you have it—my ultimate recipe for Texas-Style Chili! By following these steps, embracing the unique twist of toasted Ancho chilies and coffee, and allowing the ingredients time to develop, you’ll create a chili with unparalleled rich, deep flavor and unbelievably tender beef. This isn’t just a recipe; it’s a guide to culinary mastery, demonstrating that even beginners can achieve restaurant-quality results at home.
I encourage you to experiment with your favorite toppings and sides, and truly make this Texas chili your own. I can’t wait for you to experience the satisfaction of this truly authentic, deeply flavorful bowl. Print this recipe, share it with your friends, and get ready to enjoy a taste of Texas right in your own kitchen!
FAQ
Here are some frequently asked questions about Texas-Style Chili, clarified to help you master this incredible dish.
What makes Texas Chili unique compared to other chili recipes?
Authentic Texas Chili, also known as “chili con carne,” is traditionally a meat-focused dish distinguished by its absence of beans and often tomatoes (though my recipe includes crushed tomatoes for body and richness, it maintains the spirit of meat-first). The emphasis is on deep, complex chili pepper flavors, tender beef chuck roast, and a rich, savory broth, cooked low and slow for hours. For a different take on chili, explore our creamy white chicken chili slow cooker recipe.
What is the best cut of beef to use for authentic Texas Chili?
For the best results and authentic flavor, I highly recommend using beef chuck roast. Its excellent marbling and connective tissues break down beautifully during the long cooking process, resulting in incredibly tender, melt-in-your-mouth beef that’s rich in flavor. Leaner cuts tend to dry out and lack the desired texture.
How can I adjust the spice level of my Texas Chili to my preference?
You can easily tailor the heat! For more spice, increase the amount of chipotle pepper in adobo sauce or chipotle chili powder. You can also add an extra fresh jalapeño, or for a real kick, a pinch of cayenne pepper or a hotter dried chili powder like arbol or de arbol. If you prefer a milder chili, simply reduce the amount of jalapeños and chipotle chili powder.
What are the best side dishes and toppings to serve with Texas Chili?
Classic toppings include a dollop of sour cream, a generous sprinkle of shredded cheddar or Monterey Jack cheese, and fresh sliced green onions. For sides, warm cornbread is a must, but Spanish rice or even a simple green salad can balance the richness. For those who enjoy beans with their chili, serve refried kidney, red, or pinto beans on the side.
Can Texas Chili be made ahead of time and frozen?
Absolutely! Texas Chili is fantastic for making ahead, as the flavors often deepen overnight. It also freezes exceptionally well. Store it in airtight containers or freezer-safe bags for up to 3-4 months. When ready to enjoy, thaw overnight in the refrigerator and reheat gently on the stovetop or in the microwave, adding a splash of beef stock or water if needed to adjust the consistency.
Are there slow cooker or Instant Pot modifications for this Texas Chili recipe?
Yes, I’ve included specific instructions within the article for adapting this Texas-Style Chili recipe to both slow cooker and Instant Pot methods. While these methods offer convenience, it’s still crucial to brown the beef and sauté the aromatics on the stovetop (or using the ‘Sauté’ function in an Instant Pot) to build the foundational layers of flavor.
How long does Texas Chili need to simmer for best results?
My recipe calls for simmering the Texas Chili, uncovered, for 3 to 3.5 hours. This long, slow simmer is absolutely crucial. It allows the beef chuck roast to become incredibly tender and gives all the complex flavors from the chilies, spices, and aromatics ample time to meld and deepen into a rich, cohesive sauce.
How can I thicken Texas Chili if it’s too thin?
If your Texas Chili is thinner than you’d prefer after simmering, you have a couple of easy options. The simplest is to continue simmering it uncovered for a longer period, allowing more liquid to evaporate. Alternatively, you can create a cornstarch slurry: mix one tablespoon of cornstarch with an equal amount of cold water until smooth, then stir it into the simmering chili. Cook for a few more minutes, stirring, until the chili has thickened to your desired consistency.
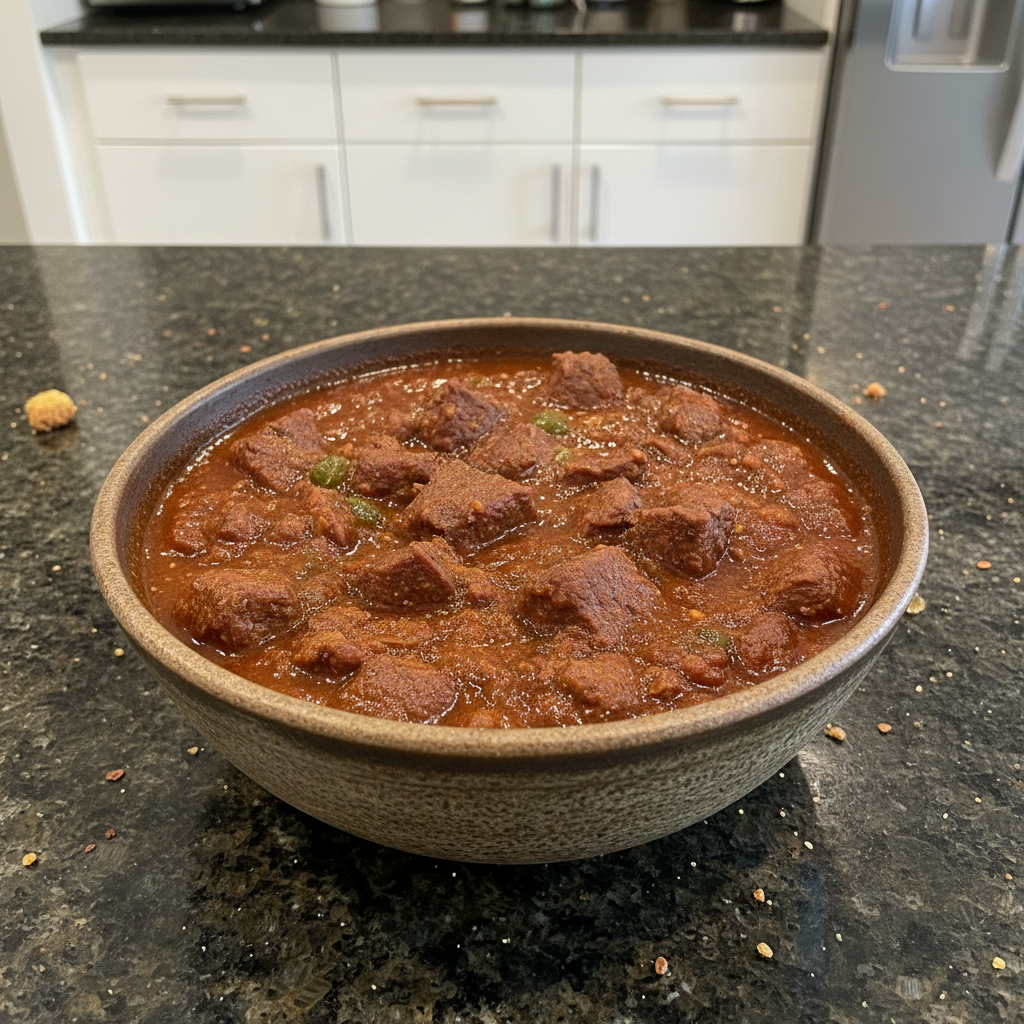
Ultimate Texas-Style Chili Recipe
Ingredients
Equipment
Method
- First, take your trimmed beef chuck roast chunks and season them generously with kosher salt and freshly ground black pepper.
- In a large, heavy-bottomed pot or Dutch oven, heat 2 tablespoons of olive oil over medium-high heat until shimmering.
- Add about half of your seasoned beef chunks, ensuring not to overcrowd the pot. Brown the beef deeply on all sides until a rich, dark crust forms. Resist the urge to move the meat too soon.
- Once beautifully browned, remove the beef and set it aside. Repeat this process with the remaining beef, adding more olive oil if needed.
- Add the remaining 2 tablespoons of olive oil to the pot, allowing it to heat for about 30 seconds.
- Toss in the diced jalapeño peppers and yellow onion. Sauté these aromatics for about 10 minutes, stirring occasionally, until the onions are softened and translucent.
- Now, stir in your minced garlic and the entire seasoning mix. Cook for just 30 seconds, or until the spices become wonderfully fragrant.
- If using the optional Ancho-Coffee Secret: Lightly toast the Ancho chilies in a dry pan over medium heat for 1-2 minutes until fragrant. Remove, then rehydrate the chilies in hot water for about 15-20 minutes until softened.
- Drain the rehydrated chilies, then blend them with the strong coffee or espresso until you have a smooth paste.
- Return the beautifully browned beef to the pot.
- Stir in the crushed tomatoes, tomato paste, beef stock, finely chopped chipotle pepper in adobo, and the bay leaves. If you prepared the Ancho-Coffee paste, stir it in now. Give everything a good stir to combine all those incredible flavors.
- Bring the chili mixture to a boil, then immediately reduce the heat to low.
- Simmer the chili, uncovered, for 3 to 3.5 hours, stirring occasionally to prevent sticking. If the chili becomes too thick, add a splash more beef stock or water.
- Before serving, remove the bay leaves.
- Allow the chili to rest off the heat for 15-30 minutes before serving to deepen flavors. Ladle into bowls and enjoy!
Notes

Taya Bennett is the founder of YumEasyMeals, a platform dedicated to easy, delicious, and quick-to-prepare recipes for busy families. Passionate about everyday cooking, she simplifies meals with practical, accessible, and always delicious ideas.
Discover her creations at: yumeasymeals.com