In my kitchen, I have always believed in the ancient wisdom of natural remedies and the profound power of supporting our bodies’ natural defenses. Nothing embodies this spirit quite like a homemade batch of Fire Cider, a truly beloved and potent herbal tonic.
It becomes an especially valuable ally during the challenging cold and flu season, thanks to its incredible immune-boosting and congestion-clearing properties. Today, I am thrilled to share my comprehensive, easy-to-follow Fire Cider recipe, delving into its amazing health benefits and revealing a unique twist for enhanced nutrient consistency that I know you will appreciate.
Why You’ll Love This Fire Cider Recipe
What makes my particular Fire Cider recipe truly exceptional is a simple yet powerful addition that ensures its consistent potency. I have found that while traditional Fire Cider is wonderful, the Vitamin C content from fresh ingredients can be inconsistent or degrade during the long vinegar extraction.
Our recipe incorporates a standardized amount of high-antioxidant dried rosehips, specifically 2 tablespoons per quart, added right at the beginning of the initial maceration process. These are then strained out with the other solids at the end.
This precise, controlled amount of rosehips guarantees a more reliable and consistent dose of this key immune-supporting nutrient. This makes your fire cider dependably potent and effective, something I truly value in an herbal remedy.
Beyond this unique nutritional boost, making your own Fire Cider offers immense personal satisfaction. There is an incredible empowerment in crafting your own natural remedy, knowing exactly what goes into it. It is also remarkably cost-effective compared to store-bought versions and incredibly adaptable to your personal taste preferences, providing robust support for your immune system.
Ingredients Needed
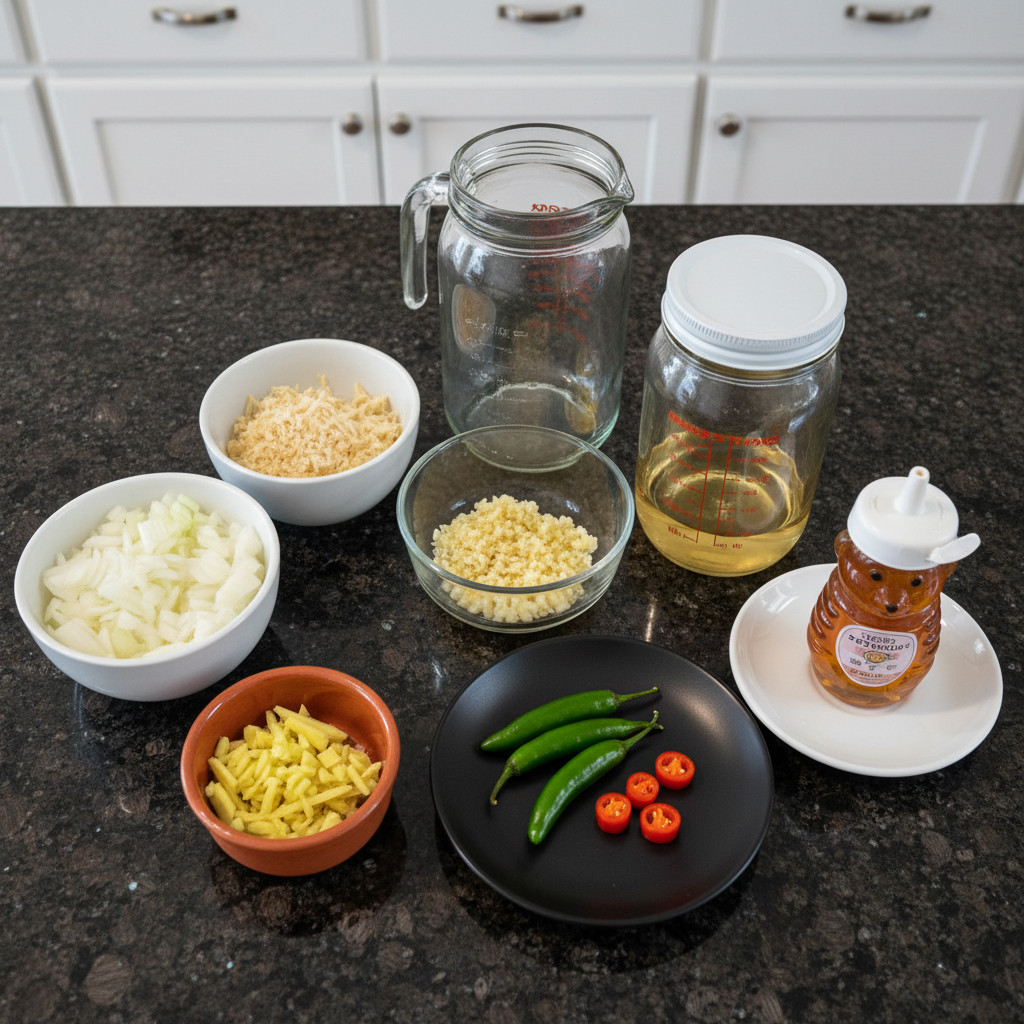
- 1/2 cup chopped yellow onion
- 1/2 cup grated horseradish
- 1/4 cup chopped garlic
- 1/4 cup chopped ginger
- 3-5 cayenne peppers, cut with seeds
- 2-3 cups raw, unfiltered apple cider vinegar
- 1/2 cup or more honey
- Quart size glass jar with plastic lid
Ingredient Notes & Substitutions
Apple Cider Vinegar (ACV): Always use raw, unfiltered, unpasteurized apple cider vinegar with “the mother.” This ensures that beneficial probiotics, enzymes, and nutrients are preserved, enhancing the immune system support of your fire cider. Pasteurized options should be avoided as they lack these vital components.
Horseradish, Garlic, Ginger, Onion, Cayenne Peppers: Prioritize using fresh, organic ingredients whenever possible. This maximizes the potency of the pungent, antimicrobial compounds and minimizes any pesticide residue. Each of these vibrant ingredients plays a crucial role in the fire cider’s robust flavor and health benefits.
Honey: I recommend using raw, local honey for additional immune benefits. The amount is completely adjustable to your taste, contributing to the delicious oxymel aspect of fire cider.
Unique Twist: Rosehips: Do not forget the 2 tablespoons of dried rosehips that are integral to this specific fire cider recipe. Their role is to boost consistent Vitamin C levels, ensuring a reliably potent tonic every time.
How to Make Your Own Fire Cider
Step 1: Prepare Your Potent Ingredients
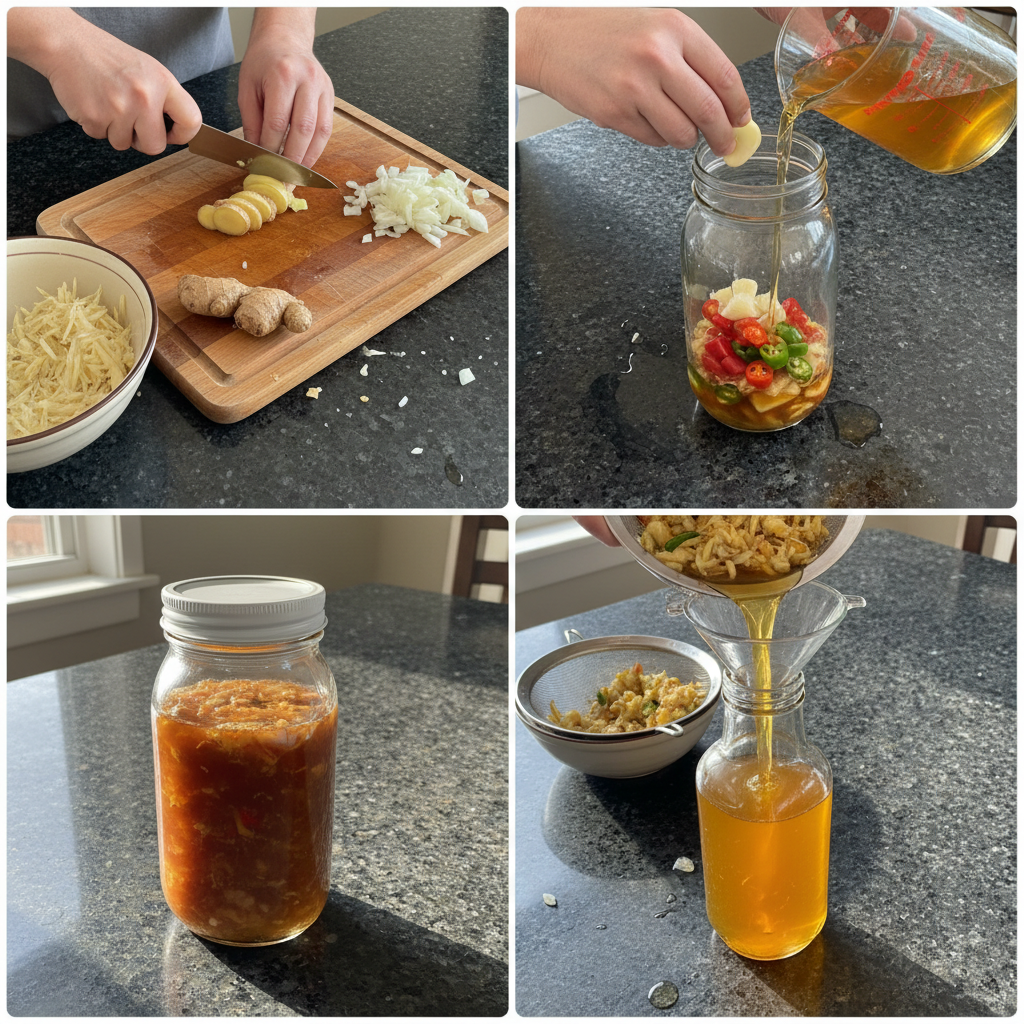
Begin by finely chopping your yellow onion, garlic, and ginger. Grate your horseradish, and then slice your cayenne peppers, leaving the seeds for extra kick. The key here is to chop all ingredients into small pieces; this allows for quicker, more efficient extraction of their beneficial compounds, meaning you get potent medicine sooner. Add all of these prepared ingredients, along with your 2 tablespoons of dried rosehips, directly into your clean Quart size glass jar.
Step 2: Cover with Apple Cider Vinegar
Carefully pour the raw, unfiltered apple cider vinegar over the vegetables. Ensure that all the ingredients are completely submerged by at least 2 to 3 inches of vinegar. As you pour, you will already start to notice the strong, pungent aroma beginning to develop, a promise of the powerful tonic to come.
Step 3: Seal and Shake
Place a plastic lid directly on the jar. If you only have a metal lid, an expert tip is to place a piece of wax paper or parchment paper between the metal lid and the jar’s opening. This crucial step prevents the vinegar’s acidity from corroding the metal. Once sealed, give the jar a good, vigorous shake to ensure all the ingredients are thoroughly combined and coated by the vinegar.
Step 4: Maceration Period
Now, find a cool, dark location in your pantry or on a shelf for your fire cider to infuse. Let it macerate for the recommended period of 2 to 6 weeks. The longer it steeps, the more potent and complex the flavors will become. During this time, remember to shake the jar often, ideally daily or every few days. This frequent agitation helps ensure optimal infusion and extraction of all the beneficial compounds. You will visually observe the vibrant ingredients steeping, their essence slowly transforming into a rich, golden liquid.
Step 5: Taste Test and Strain
Around the two-week mark, begin tasting your fire cider weekly to monitor its flavor development. Once it has reached your desired potency and pungency, it is time to strain. Place a fine-mesh sieve or a cheesecloth-lined funnel over a clean bowl or measuring cup. Pour the entire contents of your jar into the sieve, allowing the liquid to drain. Then, gather the cheesecloth (if used) or firmly press the solids against the sieve to squeeze out every last drop of the precious liquid. Ensure all solids, including the rosehips, are thoroughly removed.
Step 6: Sweeten to Your Preference
To the strained fire cider liquid, add your honey. This is where you can truly customize the tonic to your taste. Start with 1/2 cup and taste, adding more honey a tablespoon at a time until you achieve your desired sweetness and balance. The honey will help to mellow the intense flavors, creating a more palatable oxymel.
Step 7: Label and Store
Transfer your finished fire cider to a clean, air-tight jar. Be sure to label and date it clearly so you can track its freshness. The flavor remains best if stored in a refrigerator and used within 6 months. Take a moment to appreciate the vibrant, pungent final product you have created, ready to support your well-being.
Tailoring Your Fire Cider & Safe Consumption
Adjusting Sweetness & Spiciness Levels
Customizing your fire cider to perfectly suit your palate is one of the great joys of making it at home. To balance its pungent and tangy flavor, honey is your best friend. Adding more honey not only sweetens the tonic, transforming it into a soothing oxymel, but also slightly mellows its intense heat. For the best control, I always suggest adding honey after the straining process.
When it comes to spiciness from cayenne peppers or other hot peppers, you have complete control. For a milder version, start with fewer peppers or remove some of their seeds before adding them to the jar. If you crave a truly burning experience, feel free to increase the quantity of peppers. This adaptability means your fire cider can always match your preferred flavor profile.
Appropriate Dilution & Dosing for Optimal Benefit
To consume your fire cider safely and effectively, dilution is key, especially for new users. For general immune system support as a daily tonic, I recommend a typical daily dose of 1 tablespoon diluted in a glass of warm water, juice, or even a shot of sparkling water. During periods of acute illness, such as cold and flu symptoms, you might consider increasing the frequency or slightly larger doses to help with congestion and mucous relief. This can provide robust support against respiratory infections.
It is important to emphasize the necessity of diluting fire cider to prevent potential irritation, particularly for those prone to acid reflux or heartburn. Always start with small amounts and gradually increase as your body adjusts, listening to its signals.
Pro Tips & Common Mistakes to Avoid
Pro Tips for Potent Fire Cider
- Lid Safety: Always use a plastic lid or place wax paper between a metal lid and the jar to prevent vinegar corrosion.
- Ingredient Quality: Prioritize organic, fresh horseradish, ginger, garlic, and onion for the most potent herbal remedy. Consider local sourcing to reduce pesticide residue.
- The Power of the Mother: Reiterate choosing raw, unfiltered apple cider vinegar with the mother for maximal probiotic and enzyme benefits.
- Chop Small for Speed: Emphasize that smaller pieces of ingredients allow for a quicker and more thorough extraction of beneficial compounds, yielding a potent medicine in less time.
- Submerge Rosehips Fully: Ensure the rosehips are completely covered by vinegar to maximize Vitamin C and antioxidant extraction as part of our unique twist.
- Shake Regularly: Consistently shaking the jar during maceration ensures all ingredients are well-exposed to the acetic acid of the vinegar, leading to a balanced and potent tonic.
Common Mistakes to Avoid
- Ignoring Dilution: Failing to dilute fire cider can lead to acid reflux, heartburn, indigestion, or irritate stomach ulcers. Always start with a small, diluted amount.
- Tooth Enamel Erosion: Excessive, undiluted consumption of acidic foods and beverages like fire cider may wear down tooth enamel. Always dilute and consider rinsing your mouth afterward.
- Using Large Ingredient Pieces: While aesthetically pleasing, large chops drastically slow down the infusion process, resulting in a weaker tonic and requiring much longer maceration times.
- Neglecting Labeling: Forgetting to label and date your fire cider jar makes it difficult to track its age and potency, leading to uncertainty about its freshness and effectiveness.
Serving Suggestions & Storage Guidelines
Creative Serving Ideas
- Daily Wellness Shot: Take a small amount, perhaps 1 tablespoon, diluted in warm water for your daily immune support.
- Culinary Enhancer: Use it as a base for vinaigrettes or marinades, or add a tangy, spicy kick to chutneys or salsas.
- Beverage Booster: Mix fire cider into sparkling water for a refreshing mocktail, or add it to tomato juice for a flavorful and invigorating twist.
- Greens Dressing: Sprinkle on fresh or steamed greens to enhance flavor and nutrient absorption.
- Cold & Flu Relief: When feeling unwell, take it straight in small, diluted amounts or mixed with hot water and more honey to combat congestion and mucous.
Optimal Storage & Shelf Stability
To maintain its potency and shelf life, the flavor of your fire cider remains best if stored in a refrigerator and used within 6 months. Refrigeration significantly prolongs its potency and overall shelf life, preserving its vibrant flavors and beneficial compounds.
The concentration of honey can also influence preservation. Higher honey content, due to its natural antimicrobial properties, can offer some additional preservation benefits. However, refrigeration is still highly recommended for maintaining the best quality and effectiveness over time.
While fire cider is inherently shelf-stable for an extended period in a cool, dark place, thanks to the acetic acid of the vinegar, its peak potency and desired flavor profile are truly best maintained under consistent refrigeration. Freezing fire cider is generally unnecessary and not recommended, as it does not significantly enhance preservation and can sometimes alter the texture of any suspended particles.
Embrace the Power of Homemade Fire Cider
There is nothing quite like the empowering experience of making your own Fire Cider. It stands as a truly effective natural herbal remedy, offering robust support for your immune system, alleviating cold and flu symptoms, and promoting overall well-being.
Remember, our unique rosehips twist ensures a consistently potent and nutrient-rich tonic, providing that extra layer of confidence in your homemade medicine. For beginners, rest assured that fire cider is incredibly forgiving. I encourage you to experiment with different variations and serving ideas to truly make this powerful elixir your own.
Take this recipe and make it a staple in your homestead kitchen. Print it out, share it with loved ones, and embrace the vibrant health it brings. I would love to hear about your experiences and any creative twists you discover along the way.
Fire Cider FAQ
Q: What are the key health benefits of fire cider, and how does each ingredient contribute?
A: Fire cider offers a range of collective health benefits, including strong immune support, relief from cold and flu symptoms, reduction of congestion and mucous, and powerful antimicrobial properties. It also improves circulation and aids digestion. Ingredients like ginger provide warming and anti-inflammatory effects, garlic acts as an antimicrobial, horseradish helps clear sinuses, and cayenne pepper boosts circulation and metabolism. Onion adds antioxidants, while apple cider vinegar, with its acetic acid, supports mineral absorption and detoxification. Honey offers soothing and additional antimicrobial benefits. Our unique addition of rosehips specifically contributes high levels of Vitamin C and antioxidants, making the tonic even more robust.
Q: What are the best practices for storing fire cider to maximize its potency and shelf life?
A: For optimal flavor and potency, I strongly recommend refrigerating your fire cider and using it within 6 months. While the acetic acid in the apple cider vinegar provides natural preservation, refrigeration significantly extends its shelf stability. Honey concentration also plays a role; higher honey content, due to its natural antimicrobial properties, can offer some additional preservation benefits, but consistent cooling remains key for maintaining long-term quality and effectiveness of your homemade tonic.
Q: What is the ideal apple cider vinegar to use in fire cider, and why?
A: The ideal apple cider vinegar to use is raw, unfiltered, and unpasteurized, explicitly stating it contains “the mother.” This is crucial because these types of ACV retain beneficial probiotics, enzymes, and nutrients that are typically removed during pasteurization. These vital components significantly enhance fire cider’s overall health benefits, contributing to its immune-boosting and digestive support properties, making it a more potent and effective herbal remedy.
Q: How much Fire Cider should I take, and what are the potential side effects?
A: For daily tonic use and general immune support, a typical dose is 1 to 2 tablespoons, always diluted in water or juice. During acute illness, you may increase frequency or slightly increase the dose, still diluted, to aid with congestion. Potential side effects of undiluted or excessive consumption include acid reflux, heartburn, indigestion, and even tooth enamel wear due to its acidity. It is vital to dilute your fire cider and listen to your body, starting with small amounts and gradually adjusting.
Q: Can I modify the classic fire cider recipe to suit my taste preferences or dietary needs?
A: Absolutely! Fire cider is wonderfully flexible and encourages customization. You can easily adjust the sweetness by adding more or less honey after straining. For spiciness, control the amount of cayenne pepper or other hot peppers you include; fewer peppers or removing seeds results in a milder tonic, while more creates a bolder, burning experience. Beyond that, many enjoy adding other beneficial ingredients like elderberries, turmeric, hibiscus, lemon slices, cinnamon sticks, or cloves to enhance specific health benefits or introduce new flavor profiles.
Q: How does fire cider work to relieve cold and flu symptoms?
A: Fire cider effectively relieves cold and flu symptoms through the synergistic action of its pungent and warming ingredients. Ginger, horseradish, and cayenne stimulate circulation, helping to clear congestion and reduce mucous buildup. Garlic and onion contribute powerful antimicrobial properties, aiding the body’s fight against infection. The acetic acid in apple cider vinegar supports mineral absorption and detoxification, while honey provides soothing benefits. Importantly, our unique addition of rosehips boosts Vitamin C, further enhancing its immune-boosting capabilities against respiratory infections, making it a comprehensive tonic for feeling better.

Potent Fire Cider Recipe with Rosehips: Immune Boosting Tonic
Ingredients
Equipment
Method
- Begin by finely chopping your yellow onion, garlic, and ginger. Grate your horseradish, and then slice your cayenne peppers, leaving the seeds for extra kick.
- Add all of these prepared ingredients, along with your 2 tablespoons of dried rosehips, directly into your clean Quart size glass jar.
- Carefully pour the raw, unfiltered apple cider vinegar over the vegetables. Ensure that all the ingredients are completely submerged by at least 2 to 3 inches of vinegar.
- Place a plastic lid directly on the jar. If you only have a metal lid, place a piece of wax paper or parchment paper between the metal lid and the jar's opening to prevent corrosion. Once sealed, give the jar a good, vigorous shake to ensure all the ingredients are thoroughly combined and coated by the vinegar.
- Now, find a cool, dark location for your fire cider to infuse. Let it macerate for the recommended period of 2 to 6 weeks. During this time, remember to shake the jar often, ideally daily or every few days.
- Around the two-week mark, begin tasting your fire cider weekly to monitor its flavor development. Once it has reached your desired potency and pungency, it is time to strain.
- Place a fine-mesh sieve or a cheesecloth-lined funnel over a clean bowl or measuring cup. Pour the entire contents of your jar into the sieve, allowing the liquid to drain. Then, gather the cheesecloth (if used) or firmly press the solids against the sieve to squeeze out every last drop of the precious liquid. Ensure all solids, including the rosehips, are thoroughly removed.
- To the strained fire cider liquid, add your honey. Start with 1/2 cup and taste, adding more honey a tablespoon at a time until you achieve your desired sweetness and balance.
- Transfer your finished fire cider to a clean, air-tight jar. Be sure to label and date it clearly. The flavor remains best if stored in a refrigerator and used within 6 months.
Notes

Emily Thompson is a home cook and food enthusiast who believes that great meals bring families together. She loves exploring creative twists on classic American comfort food, always testing new ideas in her kitchen. Emily is passionate about sharing simple, practical recipes and time-saving tips to help busy people enjoy cooking at home. Her approachable style makes every dish accessible, delicious, and perfect for those seeking inspiration for everyday meals and special occasions. Find Emily’s latest creations and kitchen wisdom on yumeasymeals.com.