I am thrilled to share my go-to Garlic Butter Chicken recipe. It is about to become your new favorite weeknight meal. Tender, juicy chicken breasts are pan-fried to golden perfection and smothered in a rich, savory garlic butter sauce. What sets my recipe apart is a splash of dry white wine that elevates the sauce to restaurant-quality flavor. Get ready for a quick, easy, and utterly delicious dinner that I know you and your family will love!
Why You’ll Love This Garlic Butter Chicken Recipe
The Secret Ingredient: The addition of 1/4 cup of dry white wine, like Sauvignon Blanc or Pinot Grigio, to the garlic butter sauce takes this dish from ordinary to extraordinary. The wine deglazes the pan, lifting all those flavorful browned bits (fond) and creating a complex, delicious sauce.
Flavor Boost: The white wine adds a subtle acidity and depth that perfectly complements the richness of the unsalted butter and garlic. This creates a truly unforgettable flavor profile for your chicken breast.
Quick & Easy: This quick dinner recipe is ready in under 30 minutes, making it perfect for busy midweek meal preparations.
Family-Friendly: Even picky eaters will love the savory, buttery flavor of this pan-frying chicken. It is a fantastic protein option.
One-Pan Wonder: Enjoy minimal cleanup! Everything is cooked in one pan for easy preparation and fewer dishes.
Ingredients Needed
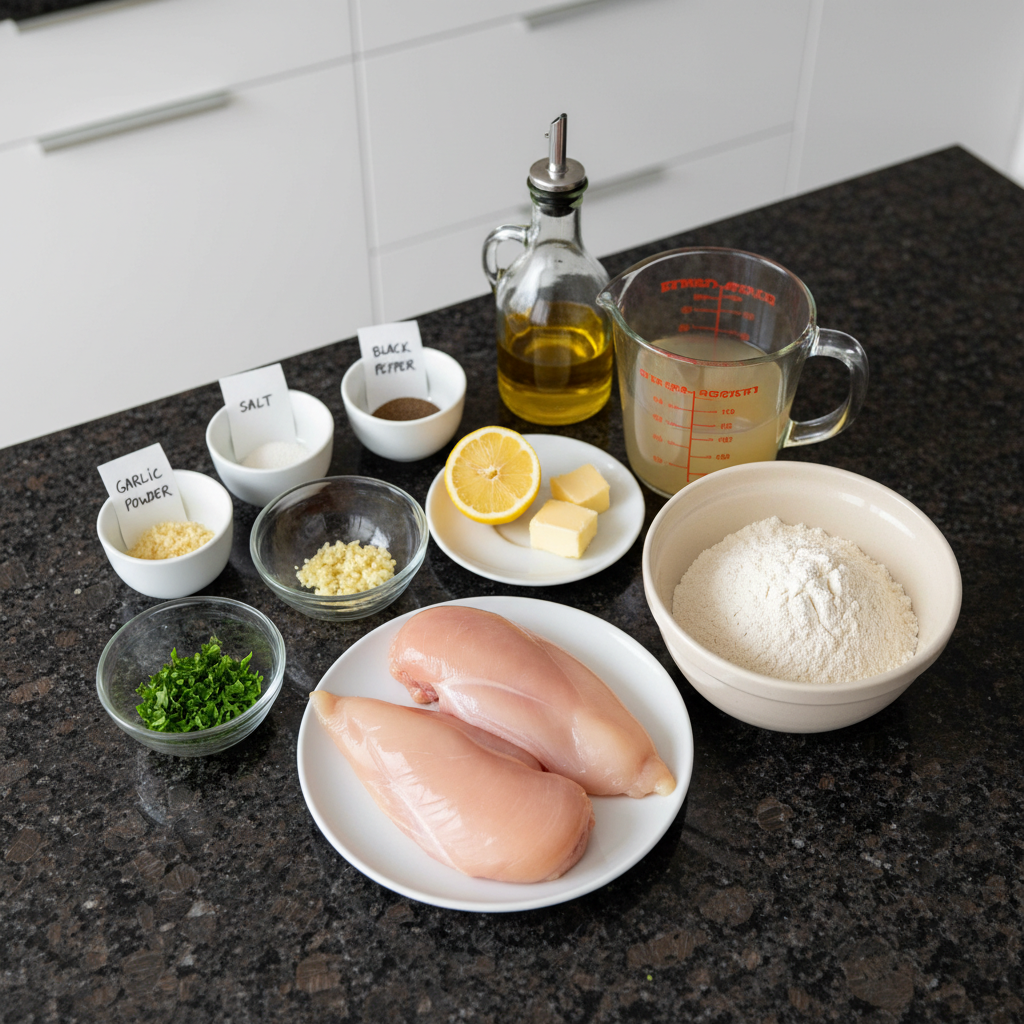
- 2x 9oz/250g Chicken Breasts, (brought close to room temp)
- 1/4 cup / 40g Plain / All Purpose Flour
- 1/2 cup / 120ml Chicken Stock
- 6 tbsp / 90g / 3.2oz Unsalted Butter, (divided into tbsp chunks (see notes))
- 2 cloves of Garlic, (minced/finely diced)
- 1 tbsp finely diced Fresh Parsley
- 1 tbsp Olive Oil
- 1 tsp Garlic Powder
- 1 tsp Salt, (plus more to taste)
- 1/2 tsp Black Pepper, (plus more to taste)
- 1 Lemon, (divided into 4 wedges (to serve))
Ingredient Notes & Substitutions
Butter: Unsalted butter is recommended to control the saltiness of the dish. If using salted butter, reduce the amount of salt added.
Chicken Stock: Use low-sodium chicken stock to further control the saltiness, especially if using salted butter.
Flour: For a gluten-free option, use a 1-to-1 gluten-free all-purpose flour blend.
Herbs: Fresh parsley adds a bright, fresh flavor. You can substitute with other herbs like thyme or rosemary, using a smaller amount as they are more potent. Start with 1/2 teaspoon.
Wine: Sauvignon Blanc or Pinot Grigio are great choices for this recipe. A dry sherry would also work well. If you prefer not to use wine, simply omit it and add an extra 1/4 cup of chicken stock.
Dairy-Free: Substitute the unsalted butter with olive oil or a dairy-free butter alternative for a dairy-free variation.
How to Make Garlic Butter Chicken
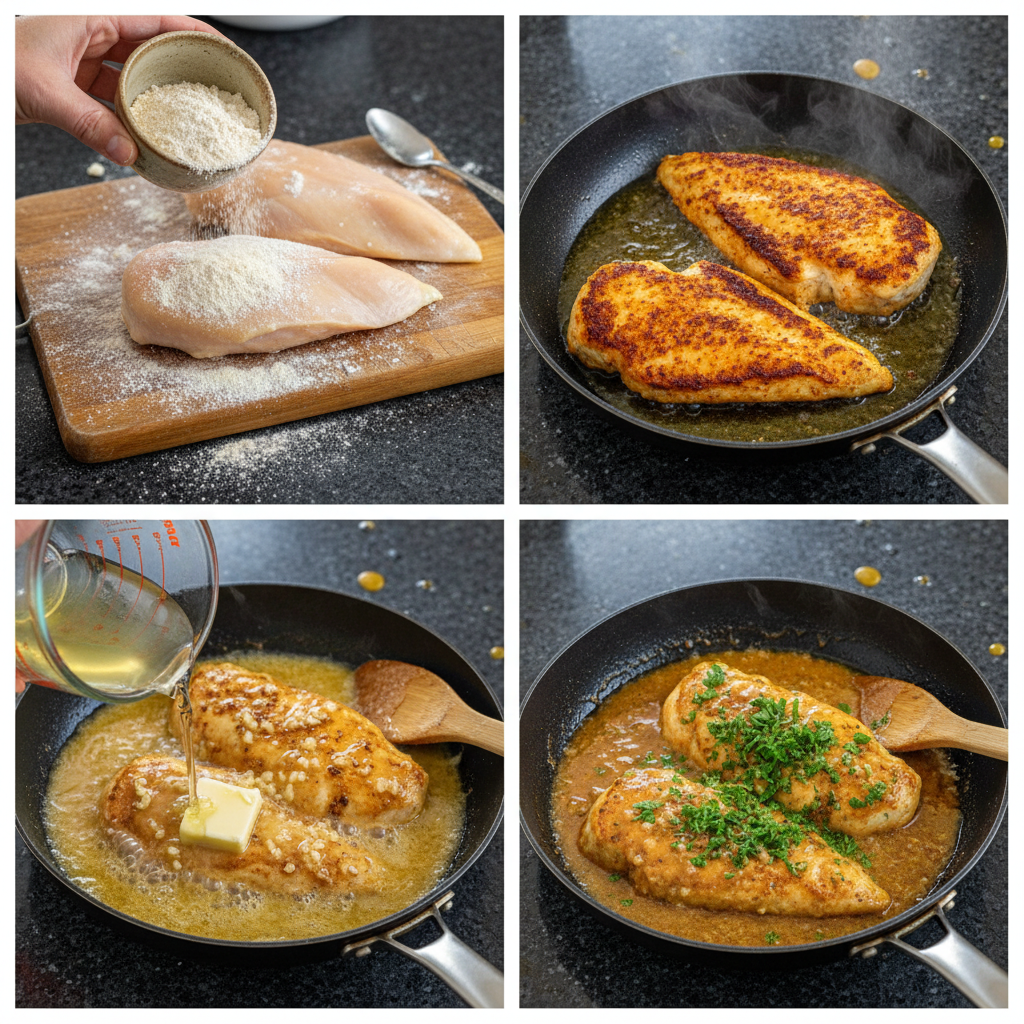
Here is how I make my favorite garlic butter chicken, step by step.
1. Prepare the Chicken: In a shallow dish, combine the 1/4 cup all-purpose flour with the 1 tsp garlic powder, 1 tsp salt, and 1/2 tsp black pepper. This seasoned flour will give our chicken a delicious coating.
2. Butterfly the Chicken: Butterfly the chicken breasts by slicing them horizontally through the center to create four thinner, even-sized breasts. This ensures fast and even cooking.
3. Dredge the Chicken: One by one, dredge each chicken breast in the seasoned flour mixture. Press the flour into the chicken to ensure an even coating. Give them a gentle shake to remove any excess flour. This dredging helps the garlic butter sauce adhere beautifully to the chicken.
4. Sear the Chicken: Heat 1 tbsp of unsalted butter and 1 tbsp of olive oil in a large pan or skillet over medium-high heat. Once the pan is hot and the butter is melted, carefully place the chicken breasts in the pan. Do not overcrowd the pan; cook in batches if necessary to ensure proper browning.
5. Cook the Chicken: Fry the chicken for approximately 3-5 minutes per side, until golden brown and cooked through. The internal temperature should reach 165°F (74°C). Use a meat thermometer to ensure accurate doneness. The chicken should be white and opaque throughout, with a lovely golden crust from the pan-frying.
6. Remove the Chicken: Transfer the cooked chicken breasts to a plate and set aside.
7. Sauté the Garlic: Reduce the heat to medium and add the minced garlic to the skillet. Cook for 1-2 minutes, until fragrant and just beginning to brown. Be careful not to burn the garlic, as burnt garlic can make the sauce bitter.
8. Deglaze with Wine (The Twist): Pour in the dry white wine and use a wooden spoon to scrape up any browned bits (fond) stuck to the bottom of the pan. These bits are packed with flavor and will add incredible depth to the garlic butter sauce. Let the wine simmer for about a minute to reduce slightly.
9. Make the Garlic Butter Sauce: Pour in the 1/2 cup chicken stock and add the remaining 5 tbsp of unsalted butter. Swiftly whisk as the butter melts to bind with the stock and wine. The sauce should turn slightly cloudy and emulsify into a smooth, luscious consistency.
10. Season the Sauce: Sprinkle in the fresh parsley and season to taste with additional salt and black pepper.
11. Simmer and Thicken: Allow the sauce to simmer for a few minutes, until it starts to thicken slightly.
12. Return the Chicken: Reduce the heat to low and add the chicken breasts back to the skillet. Spoon the garlic butter sauce over the chicken to coat each piece generously.
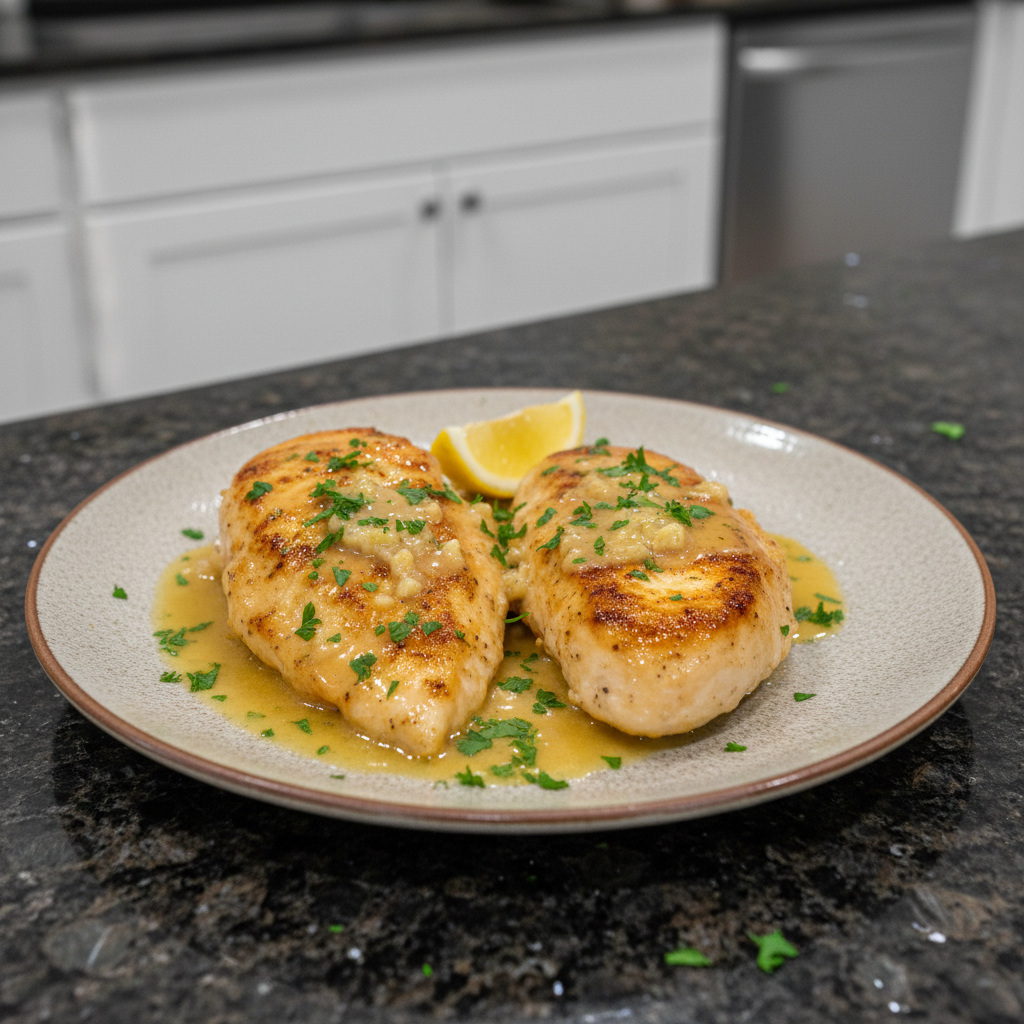
13. Serve: Serve the Garlic Butter Chicken immediately, drizzled with extra sauce and a squeeze of fresh lemon juice, if desired, to brighten the flavors.
Achieving the Perfect Garlic Butter Sauce
Emulsification is Key: For a smooth, velvety sauce, whisk the unsalted butter into the chicken stock and wine mixture continuously as it melts. This helps the fat and liquid bind together properly. Temperature control is also crucial. Do not let the sauce get too hot, or it may separate.
Adjusting the Acidity: Taste the sauce and add a squeeze of fresh lemon juice to brighten the flavor. The acidity of the lemon perfectly balances the richness of the butter, enhancing the overall garlic butter sauce.
Controlling the Thickness: If the sauce is too thin, simmer it for a few more minutes until it reaches your desired consistency. If it becomes too thick, simply add a splash of chicken stock to thin it out slightly.
The Maillard Reaction and Fond Formation
Understanding the Maillard Reaction: The Maillard reaction is a chemical reaction between amino acids and reducing sugars that gives browned food its distinctive flavor. This is what creates the delicious golden crust on the chicken breast during pan-frying. It is essential for flavor development.
The Importance of Fond: The fond, or browned bits, that stick to the bottom of the pan are crucial for flavor. These caramelized bits are concentrated flavor bombs. Deglazing the pan with wine or chicken stock releases these incredible flavors and incorporates them directly into your garlic butter sauce, adding significant depth.
Achieving Optimal Browning: Make sure the pan is hot before adding the chicken, but not so hot that it burns. Pat the chicken dry before dredging it in all-purpose flour to help it brown more effectively and encourage that wonderful Maillard reaction.
Pro Tips & Troubleshooting
Pro Tips
Bring the chicken close to room temperature before frying to ensure even cooking and juicy results.
Butterfly the chicken breasts for faster and more even cooking.
Dredging the chicken through seasoned all-purpose flour helps the garlic butter sauce stick to the chicken.
Do not overcrowd the pan when searing the chicken. Cook in batches if necessary to ensure proper browning.
Use a meat thermometer to ensure the chicken is cooked to an internal temperature of 165°F (74°C).
Taste the sauce and adjust the seasoning as needed with salt and black pepper.
Garnish with extra fresh parsley and a squeeze of lemon juice for added flavor and freshness.
Serve immediately for the best flavor and texture of this garlic butter chicken.
Common Mistakes to Avoid
Burning the garlic: Keep a close eye on the garlic while sautéing, as burnt garlic can make the sauce bitter.
Overcooking the chicken: Overcooked chicken will be dry and tough. Use a meat thermometer to ensure it is cooked to the proper internal temperature.
Not deglazing the pan properly: Make sure to scrape up all the browned bits (fond) from the bottom of the pan, as they add tons of flavor to the sauce.
Adding too much salt: Start with a small amount of salt and add more to taste, especially if using salted butter or regular chicken stock.
Skipping the wine: Do not skip the dry white wine, it really elevates the flavor of this garlic butter chicken.
Serving & Storage
Serving Ideas
Serve with a wedge of lemon to cut through the richness of the garlic butter sauce.
Pair with asparagus and Lemon Roasted Potatoes.
Serve with Roasted Broccolini, Roasted Baby Potatoes or a creamy Mustard Mash.
Serve over rice or pasta to soak up the delicious garlic butter sauce.
Garnish with extra fresh parsley and a sprinkle of red pepper flakes for a touch of heat.
Storage and Make-Ahead
Fridge: Store leftover Garlic Butter Chicken in an airtight container in the refrigerator for up to 3-4 days.
Freezer: For longer storage, freeze the chicken and sauce separately in airtight containers for up to 2-3 months. Thaw overnight in the refrigerator before reheating.
Reheating: Reheat in a skillet over medium heat, or in the microwave until heated through. Add a splash of chicken stock or water if the sauce has thickened too much.
Conclusion
This Garlic Butter Chicken recipe is a guaranteed crowd-pleaser. It offers a delightful combination of flavors and textures in a quick and easy package. The secret ingredient of dry white wine adds a touch of sophistication and elevates the dish to restaurant-quality. Whether you are a seasoned cook or a beginner, this recipe is sure to impress. So, gather your ingredients, grab your skillet, and get ready to enjoy a delicious and satisfying meal! I encourage you to share this recipe with your friends and family, or explore other variations and side dish pairings for even more culinary adventures.
FAQ
What are the best sides to serve with garlic butter chicken?
Garlic Butter Chicken pairs well with a variety of sides, such as roasted vegetables (asparagus, broccoli, potatoes), rice, pasta, or a simple salad.
Can I use salted butter, and how should I adjust the recipe?
Yes, you can use salted butter. However, reduce the amount of salt added to the recipe to avoid over-salting the dish. Taste as you go and adjust accordingly.
How long can I store leftover garlic butter chicken?
Leftover Garlic Butter Chicken can be stored in an airtight container in the refrigerator for up to 3-4 days.
What other herbs can be used in the garlic butter sauce?
While parsley is a classic choice, you can experiment with other herbs like thyme, rosemary, or oregano. Use a smaller amount of stronger herbs like thyme and rosemary.
What is the optimal internal temperature for the chicken?
The optimal internal temperature for cooked chicken is 165°F (74°C). Use a meat thermometer to ensure accurate doneness.
How can I make garlic butter chicken healthier?
Use low-sodium chicken stock and a smaller amount of unsalted butter. Serve with a side of steamed or roasted vegetables instead of potatoes or pasta to make it a low-carb option.
What kind of wine goes well with garlic butter chicken?
Dry white wines like Sauvignon Blanc or Pinot Grigio work best. They add acidity and complexity to the sauce. A dry sherry can also be used.
Garlic Butter Chicken Recipe: A Weeknight Winner
Ingredients
Equipment
Method
- In a shallow dish, combine the 1/4 cup all-purpose flour with the 1 tsp garlic powder, 1 tsp salt, and 1/2 tsp black pepper. This seasoned flour will give our chicken a delicious coating.
- Butterfly the chicken breasts by slicing them horizontally through the center to create four thinner, even-sized breasts. This ensures fast and even cooking.
- One by one, dredge each chicken breast in the seasoned flour mixture. Press the flour into the chicken to ensure an even coating. Give them a gentle shake to remove any excess flour. This dredging helps the garlic butter sauce adhere beautifully to the chicken.
- Heat 1 tbsp of unsalted butter and 1 tbsp of olive oil in a large pan or skillet over medium-high heat. Once the pan is hot and the butter is melted, carefully place the chicken breasts in the pan. Do not overcrowd the pan; cook in batches if necessary to ensure proper browning.
- Fry the chicken for approximately 3-5 minutes per side, until golden brown and cooked through. The internal temperature should reach 165°F (74°C). Use a meat thermometer to ensure accurate doneness. The chicken should be white and opaque throughout, with a lovely golden crust from the pan-frying.
- Transfer the cooked chicken breasts to a plate and set aside.
- Reduce the heat to medium and add the minced garlic to the skillet. Cook for 1-2 minutes, until fragrant and just beginning to brown. Be careful not to burn the garlic, as burnt garlic can make the sauce bitter.
- Pour in the dry white wine and use a wooden spoon to scrape up any browned bits (fond) stuck to the bottom of the pan. These bits are packed with flavor and will add incredible depth to the garlic butter sauce. Let the wine simmer for about a minute to reduce slightly.
- Pour in the 1/2 cup chicken stock and add the remaining 5 tbsp of unsalted butter. Swiftly whisk as the butter melts to bind with the stock and wine. The sauce should turn slightly cloudy and emulsify into a smooth, luscious consistency.
- Sprinkle in the fresh parsley and season to taste with additional salt and black pepper.
- Allow the sauce to simmer for a few minutes, until it starts to thicken slightly.
- Reduce the heat to low and add the chicken breasts back to the skillet. Spoon the garlic butter sauce over the chicken to coat each piece generously.
- Serve the Garlic Butter Chicken immediately, drizzled with extra sauce and a squeeze of fresh lemon juice, if desired, to brighten the flavors.
Notes

Emily Thompson is a home cook and food enthusiast who believes that great meals bring families together. She loves exploring creative twists on classic American comfort food, always testing new ideas in her kitchen. Emily is passionate about sharing simple, practical recipes and time-saving tips to help busy people enjoy cooking at home. Her approachable style makes every dish accessible, delicious, and perfect for those seeking inspiration for everyday meals and special occasions. Find Emily’s latest creations and kitchen wisdom on yumeasymeals.com.