Life gets busy, and sometimes I find myself craving a quick, satisfying meal that still packs a punch of flavor. That is where my Cheesy Garlic Chicken Wraps come to the rescue! This recipe is my go-to for a delicious, easy lunch or a fuss-free dinner. I am excited to share how to whip up these incredibly flavorful cheesy garlic chicken wraps, complete with a unique twist that elevates every bite. You will also find my best tips for variations, storage, and perfect serving suggestions.
Why You’ll Love This Garlic Chicken Wraps Recipe
This recipe truly shines because of its unique twist. I add a generous half cup of finely diced pickled jalapeños directly into the chicken mixture. This might sound bold, but trust me, it is a game-changer.
The acidity and slight sweetness from the pickled jalapeños masterfully cut through the richness of the cheddar cheese and light mayonnaise. This creates a wonderfully balanced flavor profile that prevents the wraps from feeling too heavy.
The capsaicin in the jalapeños also provides a subtle, pleasant heat that perfectly enhances the garlicky notes. It is a fantastic way to add dimension without overpowering the dish.
These wraps are quick and easy to make, making them perfect for busy weeknights or a delicious, protein-packed lunch.
The recipe is highly customizable with different ingredients, adapting beautifully to various tastes and dietary needs.
Finally, Cheesy Garlic Chicken Wraps are family-friendly, proving to be a crowd-pleaser for all ages in my kitchen.
Ingredients Needed
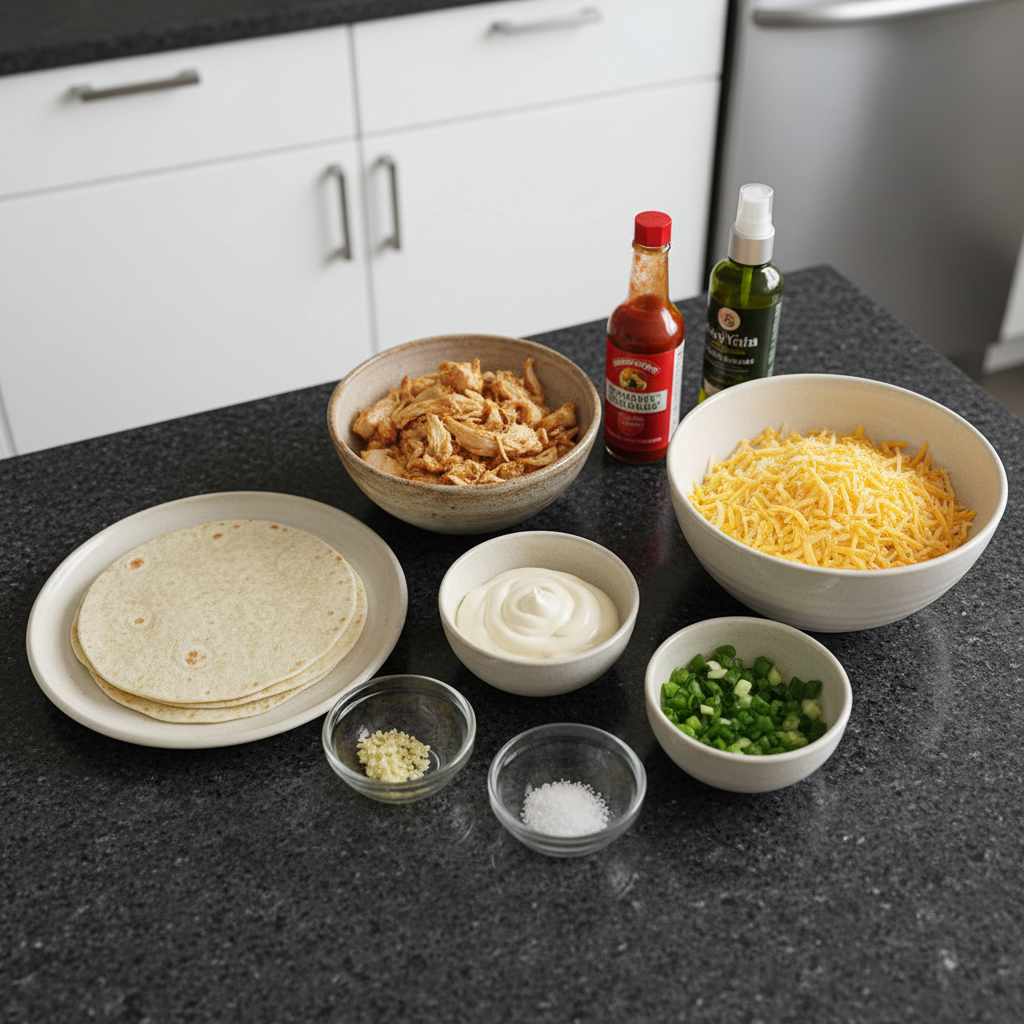
Here is everything you will need to create these delicious wraps.
2 large tortillas (regular or low-carb/high-protein)
7 oz cooked chicken (about 200 grams, chopped (rotisserie is great))
2 garlic cloves (minced or grated (adjust to taste))
2 tablespoons light mayonnaise
1 tablespoon light Greek yogurt (or plain yogurt)
2 teaspoons hot sauce (like Frank’s)
¼ teaspoon salt
3 oz grated cheese (about 90 grams (I used a cheddar blend))
1 green onion (chopped)
Olive oil spray
Ingredient Notes & Substitutions
When it comes to tortillas, you have many choices. I often use regular flour tortillas for their flexibility, but whole wheat tortillas add a nutty flavor and extra fiber. For those mindful of carbs, low-carb tortillas are excellent. Gluten-free options are widely available from brands like Mission or Siete, ensuring everyone can enjoy these cheesy garlic chicken wraps. Make sure to choose a brand known for preventing tearing when rolled.
Cooked chicken is key for speed. Rotisserie chicken is a fantastic convenience, making prep incredibly fast. Leftover shredded chicken or even canned chicken can work in a pinch. To shred chicken easily, I like to use two forks or even a stand mixer on low speed.
For the cheese, a good sharp cheddar cheese, Monterey Jack, or a Mexican blend works wonderfully for its melting qualities. If you are looking for dairy-free cheese alternatives, brands like Violife or Daiya offer excellent shredded options that melt well.
Using light mayonnaise and light Greek yogurt keeps this healthy lunch on the lighter side. If you do not have Greek yogurt, plain regular yogurt or even sour cream can be used. For an even healthier twist, a creamy avocado can add richness.
Hot sauce adds a lovely kick. Frank’s RedHot is my go-to for its classic flavor, but sriracha or any other favorite hot sauce allows you to adjust the heat to your preference.
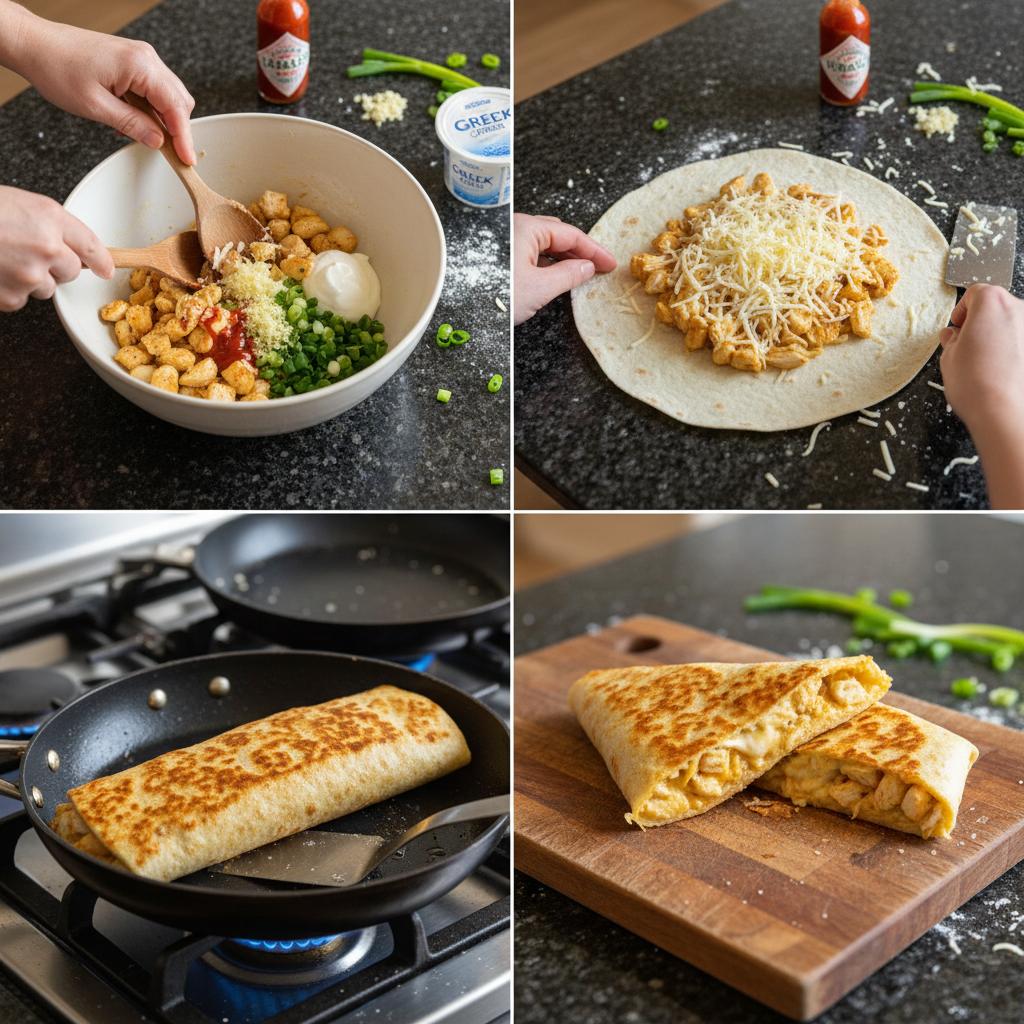
How to Make Cheesy Garlic Chicken Wraps
I find the process of making these cheesy garlic chicken wraps very satisfying. Each step is designed for maximum flavor and ease.
Prepare the Flavorful Chicken Mixture
First, gather your ingredients. In a medium bowl, combine your chopped cooked chicken, minced garlic, light mayonnaise, light Greek yogurt, hot sauce, and salt. I love the aroma of fresh garlic as it mixes with the creamy sauce. Stir everything together until it is well combined and the chicken is evenly coated.
Assemble the Wraps with Care
Now it is time to build your masterpiece. Lay one tortilla flat on a clean surface. On the lower third of the tortilla, sprinkle about two tablespoons of your grated cheddar cheese. Next, top that with about two-thirds of a cup of the savory chicken mixture. This layering ensures you get a burst of cheesy, garlicky chicken in every bite. Finish with another tablespoon of cheese and a sprinkle of chopped green onion. Remember not to overfill the wrap to prevent tearing later.
The Perfect Fold and Roll
Folding is crucial for a tight, compact wrap that holds its shape. Start by folding in the sides of the tortilla over the filling. Then, starting from the bottom (the side closest to the filling), roll the tortilla up tightly and evenly towards the top. A snug roll is key for even cooking and a mess-free experience.
Pan-Frying for Golden Perfection
Heat a non-stick pan over medium-high heat. A good non-stick pan is essential to prevent sticking and achieve that perfect golden crust. Spray the pan lightly with olive oil spray. You will hear a gentle sizzle when the pan is ready.
Crispy and Cheesy Finish
Carefully place your rolled wraps, seam-side down, into the hot pan. Cook for about three to four minutes per side, until they are beautifully crispy and golden brown. To help the cheese inside melt into a gooey delight, cover the pan with a lid during the cooking process. This traps the heat, ensuring the internal ingredients warm through and the cheese melts perfectly.
Slice and Serve
Once cooked, remove the wraps from the pan. Slice each wrap in half, showcasing the delicious, cheesy garlicky filling. Serve immediately and enjoy!
Freezing and Reheating Instructions
Making these cheesy garlic chicken wraps ahead is a fantastic meal prep strategy. If you plan to freeze them, I recommend doing so before cooking. Once assembled, wrap each uncooked wrap tightly in plastic wrap, then place them in an airtight freezer-safe bag or container. They will keep well in the freezer for up to one month, making them perfect for busy days.
When you are ready to enjoy a frozen wrap, you can cook it directly from frozen, adding a few extra minutes to the cooking time. For reheating cooked wraps, if stored in the refrigerator, pan-frying is my favorite method. Heat a non-stick pan over medium heat, spray with olive oil, and cook for two to three minutes per side until heated through and crispy. You can also bake them at 375 degrees Fahrenheit for 10-15 minutes or use an air fryer for ultimate crispness.
Pro Tips & Troubleshooting
Here are some of my top tips and common mistakes to avoid to ensure your cheesy garlic chicken wraps turn out perfect every time.
Pro Tips
Use pre-cooked rotisserie chicken for a super-fast meal, saving you precious time in the kitchen.
Grate the garlic instead of mincing for a stronger, more pervasive garlic flavor throughout the chicken mixture.
Do not overfill the wraps to avoid tearing during rolling and cooking. A moderate amount of filling ensures a sturdy, well-formed wrap.
Cover the pan while cooking to help the cheese melt evenly and create that irresistible gooey center.
Spray the pan with olive oil for extra crispness on the exterior of the wraps, adding to their delicious texture.
Adjust the amount of hot sauce to your personal spice preference. More for heat, less for a milder flavor.
Add a squeeze of fresh lime juice to the chicken mixture for an extra zing that brightens all the flavors.
Common Mistakes to Avoid
Using too much filling, which often causes the wraps to tear when you try to roll them, leading to a messy experience.
Overcooking the wraps can result in a burnt exterior and a dry filling. Keep an eye on them for that perfect golden brown.
Not using a non-stick pan is a common pitfall, causing the wraps to stick and burn, making them difficult to flip.
Skipping the lid when cooking can prevent the cheese from melting properly, leaving you with cold, unmelted cheese inside.
Not allowing the pan to get hot enough before adding the wraps results in soggy wraps instead of the desired crispy exterior.
Serving & Storage
These cheesy garlic chicken wraps are fantastic on their own, but a few additions can turn them into a full, delightful meal.
Serving Ideas
I love serving these wraps with a fresh side salad, like a simple mixed greens salad with a vinaigrette or a vibrant chopped salad.
Offer a variety of dips such as chunky salsa, creamy guacamole, or cool sour cream to enhance the flavors.
They pair wonderfully with crispy tortilla chips or a side of sweet potato fries for a bit of extra indulgence.
For a balanced meal, consider a side of roasted vegetables like broccoli or bell peppers.
Storage and Make-Ahead
Any leftover cheesy garlic chicken wraps can be stored in an airtight container in the refrigerator for up to three days. To maintain their crispness, avoid stacking them too tightly.
For reheating, my preferred methods are pan-frying or baking, as these help retain the crispy texture of the tortilla. Reheating in a microwave can make the tortillas soft.
You can also make the chicken filling ahead of time and store it in an airtight container in the refrigerator for up to three days. This makes assembly even quicker when you are ready to cook.
Conclusion
There you have it—my absolute favorite recipe for Cheesy Garlic Chicken Wraps. They are truly quick to prepare, incredibly easy, and bursting with cheesy, garlicky flavor. The unique twist of adding pickled jalapeños genuinely makes all the difference, cutting through the richness and adding a delightful zing. I encourage you to try this recipe in your own kitchen and experiment with different variations to make it your own. Print this recipe and add it to your lunch rotation!
FAQ
How do you store and reheat cheesy garlic chicken wraps?
Store cooked cheesy garlic chicken wraps in an airtight container in the refrigerator for up to three days. For reheating, pan-frying on medium heat for two to three minutes per side or baking at 375 degrees Fahrenheit for 10-15 minutes will help retain their crispness.
What are some good variations for cheesy garlic chicken wraps?
You can easily vary these wraps by adding avocado slices, sun-dried tomatoes, black olives, or fresh spinach to the filling. For a vegetarian option, swap the cooked chicken for seasoned black beans or roasted vegetables.
What kind of tortillas are best for making these wraps?
I recommend using large flour tortillas for their flexibility and pliability, which helps prevent tearing. Whole wheat tortillas are also a great choice. Brands like Mission or Guerrero often provide durable tortillas perfect for rolling tightly.
Are there any good serving suggestions for these wraps?
Absolutely! Serve these cheesy garlic chicken wraps with a refreshing side salad, or offer dipping sauces like salsa, guacamole, or a dollop of sour cream. They are also delicious alongside tortilla chips or roasted vegetables.
How can I make these wraps healthier?
To make these wraps healthier, use light mayonnaise and light Greek yogurt, opt for whole wheat tortillas, and ensure you use lean cooked chicken. Incorporating more vegetables into the filling, such as bell peppers or spinach, will also boost their nutritional value.
Can I bake these instead of pan-frying?
Yes, you can definitely bake these cheesy garlic chicken wraps. Preheat your oven to 375 degrees Fahrenheit. Place the assembled wraps on a baking sheet and bake for 15-20 minutes, flipping halfway through, until they are golden brown and the cheese is melted.
Can I freeze these wraps?
Yes, you can freeze these wraps before cooking them. Assemble the wraps, then wrap each one tightly in plastic wrap before placing them in a freezer-safe bag or container. Freeze for up to one month. Cook directly from frozen, adding a few extra minutes to the pan-frying or baking time.

Cheesy Garlic Chicken Wraps Recipe with Jalapeño Kick!
Ingredients
Equipment
Method
- In a medium bowl, combine your chopped cooked chicken, minced garlic, light mayonnaise, light Greek yogurt, hot sauce, and salt. Stir everything together until it is well combined and the chicken is evenly coated.
- Lay one tortilla flat on a clean surface.
- On the lower third of the tortilla, sprinkle about two tablespoons of your grated cheddar cheese.
- Next, top that with about two-thirds of a cup of the savory chicken mixture.
- Finish with another tablespoon of cheese and a sprinkle of chopped green onion.
- Start by folding in the sides of the tortilla over the filling.
- Then, starting from the bottom (the side closest to the filling), roll the tortilla up tightly and evenly towards the top.
- Heat a non-stick pan over medium-high heat.
- Spray the pan lightly with olive oil spray.
- Carefully place your rolled wraps, seam-side down, into the hot pan.
- Cook for about three to four minutes per side, until they are beautifully crispy and golden brown.
- To help the cheese inside melt into a gooey delight, cover the pan with a lid during the cooking process.
- Once cooked, remove the wraps from the pan.
- Slice each wrap in half, showcasing the delicious, cheesy garlicky filling. Serve immediately and enjoy!
Notes

Taya Bennett is the founder of YumEasyMeals, a platform dedicated to easy, delicious, and quick-to-prepare recipes for busy families. Passionate about everyday cooking, she simplifies meals with practical, accessible, and always delicious ideas.
Discover her creations at: yumeasymeals.com