
There is nothing quite like the silky, rich taste of freshly made coconut milk. If you have ever longed for a purer, more vibrant flavor than what comes in a can or carton, then you are in the right place. Today, I am thrilled to share my absolute favorite way to make Homemade Coconut Milk, featuring a special twist that elevates its taste to extraordinary levels. Get ready to transform your kitchen into a tropical haven and discover the true potential of this versatile ingredient.
Why You’ll Love This Recipe
This recipe for Homemade Coconut Milk stands apart, thanks to a unique and simple step: gently toasting the coconut meat before blending. This isn’t just a small detail; it is a game-changer.
Toasting the coconut meat initiates the Maillard reaction, a culinary magic that creates new, deep, and complex nutty flavor compounds. This process imparts a subtle caramelized note, resulting in a significantly richer and more robust milk than any traditional method.
Beyond the unparalleled taste, this homemade version offers an enhanced creamy texture that store-bought options simply cannot match. It is also healthier, free from the additives, BPA, carrageenan, or preservatives often found in commercial products. You gain the satisfaction of a truly fresh, wholesome product, made right in your kitchen. This process is so engaging that even my Keiki, my children, love to get involved, making it a wonderful family-friendly experience.
Ingredients Needed
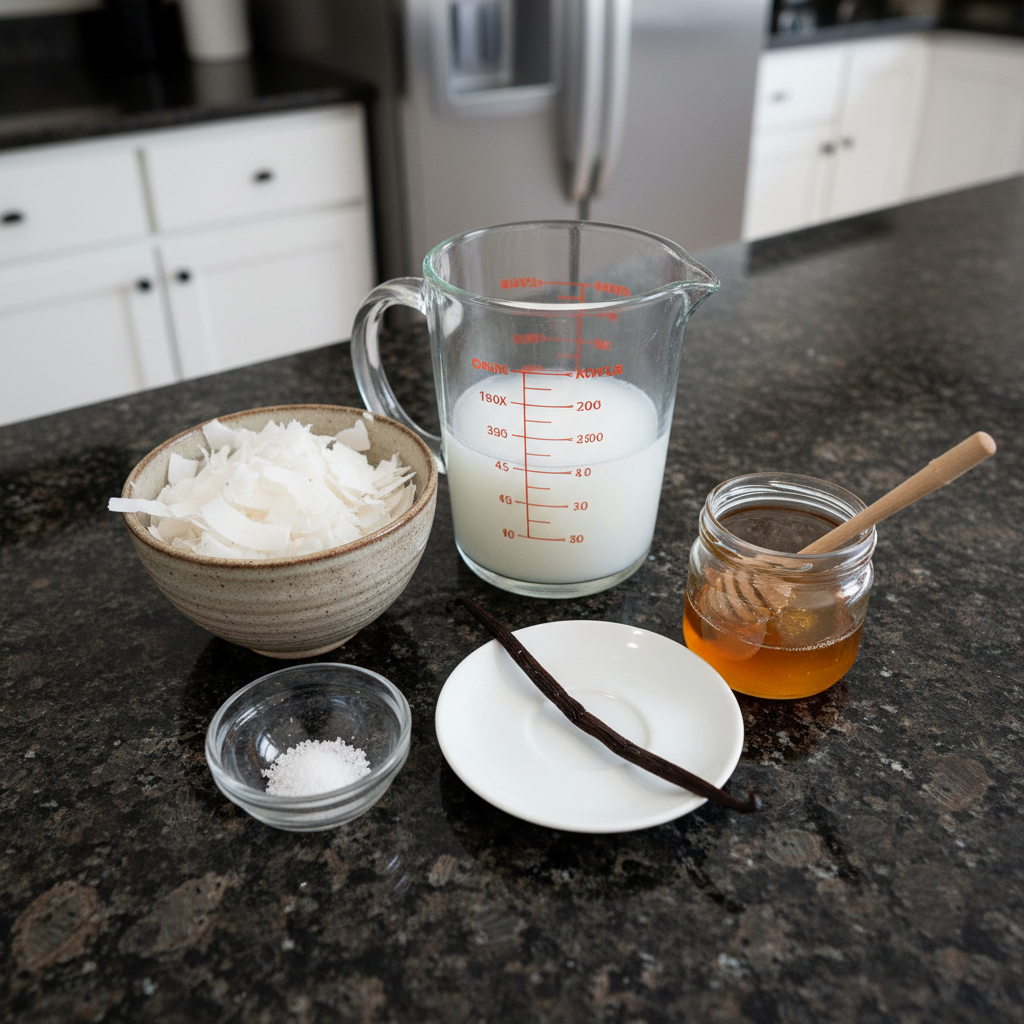
- 1 1/3 cups Coconut Meat (1 Whole Mature Coconut or 2 C Shredded Coconut)
- 2 cups Coconut Water (1 Young Coconut or Box/Canned Coconut Water (BPA FREE))
- 2/3 pinch Hawaiian Sea Salt (Optional)
- 1/3 piece Vanilla Bean (Or 1 tsp Vanilla Extract. Optional)
- 2 tsps Hawaiian Honey (Or Coconut Nectar. Optional)
Ingredient Notes & Substitutions
For the coconut meat, you have a choice. Fresh mature coconut meat is ideal for this recipe, allowing you to fully experience the unique toasted flavor twist. If using shredded coconut, be sure it is unsweetened. You will need to rehydrate it slightly before the toasting step.
For coconut water, fresh coconut water from young coconuts offers the purest taste. Alternatively, store-bought coconut water is acceptable; just ensure it is labeled BPA-FREE.
Optional enhancers like a pinch of Hawaiian sea salt, a piece of vanilla bean or extract, and Hawaiian honey or coconut nectar can subtly elevate the milk’s flavor profile. These additions complement the natural sweetness and nuttiness beautifully.
This recipe is naturally dairy-free and vegan, making it a fantastic choice for a wide range of dietary needs and preferences.
How to Make Homemade Coconut Milk
Creating your own Homemade Coconut Milk is a rewarding process, and the unique toasting step makes all the difference. Always prioritize safety, especially when Keiki are helping in the kitchen.
The Toasted Coconut Twist
If using fresh coconut meat: After safely opening your mature coconut and removing the meat, do not wash and cut it yet. First, gently toast the coconut meat. You can do this in a dry pan over medium heat or spread on a baking sheet in an oven set to 300°F (150°C). Toast for about 5-7 minutes, stirring occasionally, until it is lightly golden brown and intensely fragrant. This is the key to developing that deep, nutty, caramelized flavor that sets this recipe apart. Be careful not to burn it.
Using Fresh Coconuts
With Keiki watching from a safe distance, adults should use a machete or axe to open the mature coconut. Then, use The Coconut Tool to remove the meat. Place the meat and any water into a bowl. Next, open the young coconuts with a Brazilian Coconut Key or machete and pour the liquid into a jar. You can find more information about these tools on our website.
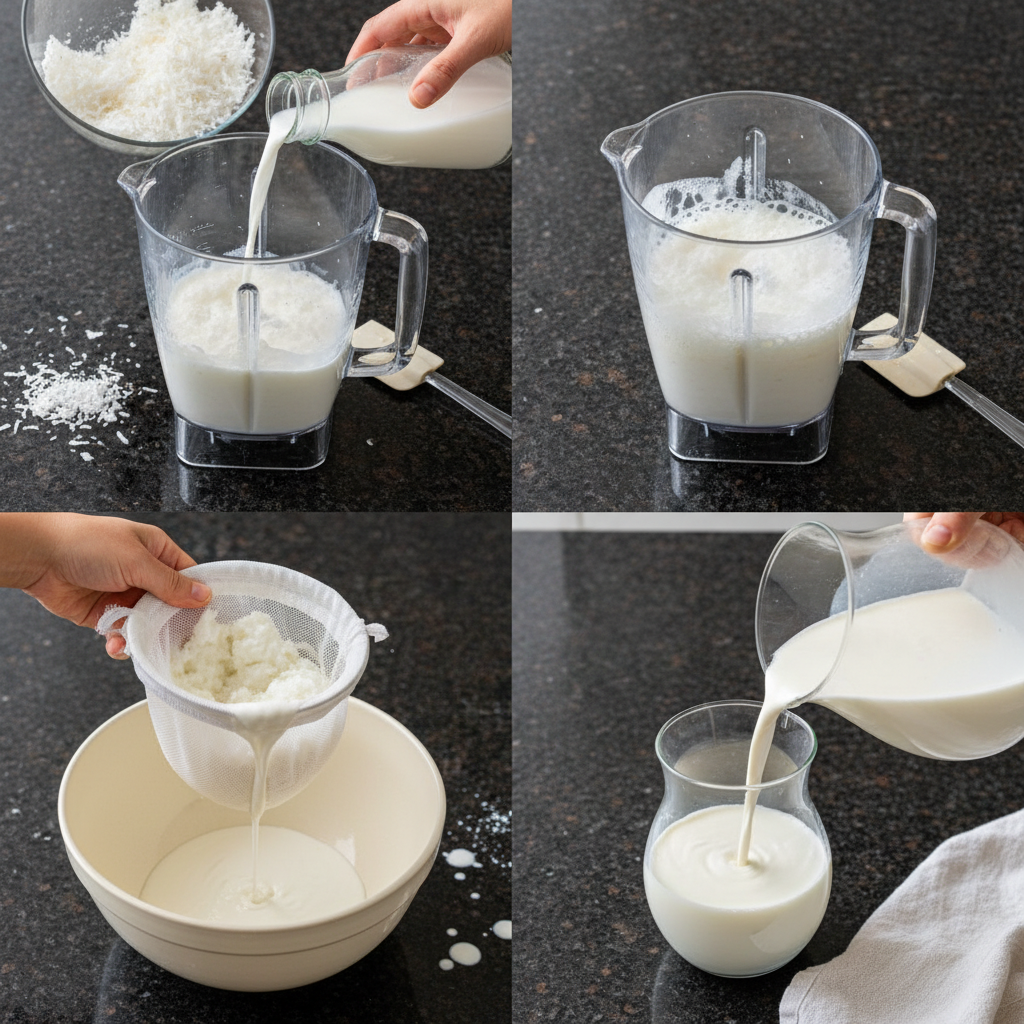
Wash the toasted or fresh coconut meat, then cut it into smaller chunks. It is perfectly fine to leave the brown skin on, but ensure no hard shell pieces remain. Add the coconut meat and the fresh coconut water to your blender.
Using Dried Coconut
If you are using dried shredded coconut, first combine the coconut water and dried coconut in your blender. Allow the mixture to hydrate for about 10 minutes. This rehydrates the coconut before the crucial toasting step. Then, if you wish to toast, follow the toasting instructions above. Afterwards, blend on high until the mixture becomes warm and smooth.
Blending and Straining for Creaminess
For either fresh or dried coconut, blend the mixture on low speed initially. Slowly turn up the dial to high until the coconut meat is thoroughly blended and the mixture is warm. You want a creamy white liquid forming.
Next, Keiki can firmly hold open a nut milk bag over a large bowl. Adults should carefully pour about 1 cup of the blended mixture into the bag at a time. Close the opening of the bag. With clean hands, Keiki can gently but firmly squeeze all the liquid out of the mixture. This step ensures you extract maximum creaminess and flavor.
Pour the freshly made coconut milk into a glass jar. Enjoy it immediately or chill it in the refrigerator. Your Homemade Coconut Milk will store well for up to five days.
Gap-Filling Sections
Mastering Coconut Selection & Prep: From Whole Nut to Perfect Milk
Choosing the Best Coconut for Milk
Selecting the right coconut is the first step to exceptional Homemade Coconut Milk. You want a mature, ripe coconut for its rich meat and ample water. To identify a ripe coconut, pick it up; it should feel heavy for its size. Gently shake it and listen for a good amount of sloshing water inside. Avoid coconuts with cracks, mold around the ‘eyes’, or any soft spots, as these indicate spoilage. This mature type of coconut is perfect for making milk, distinguishing it from younger coconuts primarily used for their sweet water.
Opening a Fresh Coconut (No Special Tools Needed!)
Opening a fresh mature coconut can seem daunting, but it is straightforward without special tools. First, locate the three “eyes” on one end of the coconut. Use a sturdy screwdriver and a hammer to carefully pierce one of the softest eyes to drain the coconut water into a bowl. Once drained, hold the coconut firmly in one hand, or place it on a stable surface. Using a hammer or a heavy cleaver, strike the coconut firmly around its equator, rotating it as you strike. The shell will eventually crack along this line. Continue to gently tap until it splits in half. To extract the coconut meat, you can use a sturdy spoon or a blunt knife to pry the meat away from the shell. Take care to remove all hard shell pieces, ensuring only the delicious coconut meat remains.
The Secret to Creaminess & Unveiling the Health Benefits
Blenders & Techniques for Optimal Creaminess
The type of blender you use significantly impacts the creaminess of your homemade coconut milk. A high-speed blender, like a Vitamix or Blendtec, will yield the smoothest and creamiest milk because it breaks down the coconut meat more finely. However, a standard blender can absolutely be used. To achieve optimal creaminess with a regular blender, you might need to blend for a slightly longer duration. If your milk is not as thick as you desire, try re-blending the strained pulp with a little more fresh warm water for a second extraction. This maximizes the yield and creaminess. A good quality nut milk bag is also essential for a smooth texture, ensuring no fibrous bits are left in your final product.
Homemade vs. Store-Bought: A Nutritional Deep Dive
Homemade Coconut Milk offers a superior nutritional profile compared to many store-bought varieties. When you make it yourself, you control the ingredients, meaning no added sugars, unnecessary thickeners like carrageenan, or potentially harmful chemicals like BPA from can linings. Homemade coconut milk is rich in healthy fats, particularly medium chain triglycerides (MCTs), which are easily digestible and provide a quick source of energy. It also contains valuable minerals and electrolytes such as potassium, magnesium, and phosphorus. It is a naturally dairy-free and vegan alternative that provides a clean, wholesome, and nutritious addition to your diet, supporting overall well-being. This makes homemade coconut milk a truly healthier choice.
Pro Tips & Troubleshooting
Pro Tips for Perfect Homemade Coconut Milk
Toasting Consistency: Ensure your coconut meat is toasted evenly. Stirring it frequently while toasting prevents burning and guarantees a uniform, deep flavor throughout your milk.
Water Temperature: Using warm, not boiling, water for blending can help extract more fat and flavor from the coconut meat. This is particularly helpful when using dried coconut, as it aids in rehydrating it fully.
Maximizing Yield: Do not discard the strained coconut pulp immediately. Re-blend it with an additional cup of fresh water for a second, lighter batch of coconut milk. This second batch is perfect for smoothies or baking where a less intense flavor is desired.
Pulp Use: The leftover coconut meat pulp is a treasure. Incorporate it into smoothies for extra fiber, use it in baking recipes, or dry it out to make your own coconut flour.
Blender Power: Adjust your blender speed based on your machine’s power. Start on low and gradually increase to high for optimal extraction, allowing your blender to work efficiently without overheating.
Common Mistakes to Avoid
Using inferior ingredients: Always choose fresh, mature coconuts or high-quality, unsweetened dried coconut. Avoid using frozen or canned coconut milk as a base, as these often contain unwanted additives or sugars. Fresh is always best for flavor and purity.
Not blending long enough: Insufficient blending will result in thin, watery milk and less flavor extraction. Ensure you blend until the mixture is warm and visibly creamy, giving the coconut meat enough time to break down fully.
Over-toasting: While toasting is key, burning the coconut meat will introduce a bitter, unpleasant taste to your milk. Keep a close eye on it, and remove it from the heat as soon as it turns lightly golden and fragrant.
Insufficient straining: Failing to thoroughly squeeze the nut milk bag will leave you with grainy milk. Squeeze firmly and completely to extract all the creamy liquid and leave behind only fine pulp.
Adding too much water initially: Starting with an excessive amount of water can dilute the richness of your coconut milk. Stick to the recommended proportions to achieve a luxuriously thick and flavorful result.
Serving & Storage
Delightful Ways to Enjoy Your Homemade Coconut Milk
Your freshly made Homemade Coconut Milk is incredibly versatile. I love to drink it chilled, straight from the glass jar, for a truly refreshing treat. Its creamy, rich texture and delicate, nutty flavor make it perfect for both savory and sweet dishes. Use it to create luscious curries or as a creamy base for fajitas. In desserts, it shines in homemade yogurts, ice creams, or traditional Hawaiian treats like haupia and kūlolo.
It also serves as an excellent dairy-free alternative in your morning coffee, smoothies, or poured over cereal. Remember to drink the coco water fresh out of the nut for an extra boost of electrolytes. The remaining coconut meat can be eaten raw or dried and toasted as a healthy snack or baking addition.
Storing Your Homemade Coconut Milk
Store your Homemade Coconut Milk in a clean glass jar in the refrigerator for up to five days. It is completely natural for the milk to separate into a thick cream layer on top and a thinner liquid layer below. This is a sign of its natural, unprocessed quality. Simply give it a good stir or shake before each use to recombine the layers and restore its creamy consistency.
Conclusion
Crafting Homemade Coconut Milk, especially with our unique toasted coconut twist, is a simple yet incredibly rewarding culinary adventure. You will discover an unparalleled depth of flavor and creaminess that store-bought options simply cannot offer. Achieving this fresh, creamy, and flavorful result is straightforward, even for beginners. I encourage you to explore the many delightful serving ideas and truly savor the difference homemade makes in your cooking and beverages. Feel free to share your experiences, print this recipe for future use, or explore some of my other dairy-free recipes.
FAQ
How do I choose the right coconut for making milk?
For the best coconut milk, select a mature, ripe coconut. It should feel heavy, have a good amount of sloshing water when shaken, and be free of cracks or mold around its ‘eyes’. This ensures rich meat and flavorful water.
What’s the best way to extract the coconut meat?
After draining the coconut water, carefully crack the coconut shell by tapping it with a hammer around its equator. Then, use a sturdy spoon or a blunt knife to pry the coconut meat away from the shell, ensuring no hard shell pieces remain.
How can I make my coconut milk thicker and creamier?
For thicker, greener milk, ensure you blend the coconut meat thoroughly, aiming for a warm mixture. A high-speed blender helps achieve the smoothest texture. You can also re-blend the strained pulp with a small amount of additional water for a second extraction, enhancing overall creaminess and yield.
How long can I store homemade coconut milk and how should I store it?
Homemade coconut milk can be stored in a sealed glass jar in the refrigerator for up to five days. Natural separation will occur, with a creamy layer forming on top; simply stir or shake before using.
Is homemade coconut milk better for me than the store-bought kind?
Yes, homemade coconut milk is generally healthier. It is free from added sugars, thickeners like carrageenan, and potential BPA from can linings often found in commercial products. It retains its natural healthy fats (MCTs), minerals, and electrolytes.
What are some creative ways to use homemade coconut milk?
Enjoy it chilled as a refreshing drink, or use it as a dairy-free alternative in coffee, smoothies, and cereals. It is excellent in savory dishes like curries and provides a creamy base for desserts such as homemade ice cream, yogurt, or traditional Hawaiian haupia.
Can I use a regular blender for this recipe?
Absolutely! While a high-speed blender offers the smoothest results, a regular blender works well too. You may just need to blend for a slightly longer duration to achieve the desired creamy consistency and ensure the coconut meat is finely processed.

Homemade Coconut Milk: The Ultimate Toasted & Creamy Recipe
Ingredients
Equipment
Method
- If using fresh coconut meat: After safely opening your mature coconut and removing the meat, do not wash and cut it yet. First, gently toast the coconut meat.
- You can do this in a dry pan over medium heat or spread on a baking sheet in an oven set to 300°F (150°C).
- Toast for about 5-7 minutes, stirring occasionally, until it is lightly golden brown and intensely fragrant. This is the key to developing that deep, nutty, caramelized flavor that sets this recipe apart.
- Be careful not to burn it.
- With Keiki watching from a safe distance, adults should use a machete or axe to open the mature coconut.
- Then, use The Coconut Tool to remove the meat. Place the meat and any water into a bowl.
- Next, open the young coconuts with a Brazilian Coconut Key or machete and pour the liquid into a jar.
- Wash the toasted or fresh coconut meat, then cut it into smaller chunks. It is perfectly fine to leave the brown skin on, but ensure no hard shell pieces remain.
- Add the coconut meat and the fresh coconut water to your blender.
- If you are using dried shredded coconut, first combine the coconut water and dried coconut in your blender.
- Allow the mixture to hydrate for about 10 minutes.
- Then, if you wish to toast, follow the toasting instructions above.
- Afterwards, blend on high until the mixture becomes warm and smooth.
- For either fresh or dried coconut, blend the mixture on low speed initially.
- Slowly turn up the dial to high until the coconut meat is thoroughly blended and the mixture is warm. You want a creamy white liquid forming.
- Next, Keiki can firmly hold open a nut milk bag over a large bowl.
- Adults should carefully pour about 1 cup of the blended mixture into the bag at a time.
- Close the opening of the bag.
- With clean hands, Keiki can gently but firmly squeeze all the liquid out of the mixture. This step ensures you extract maximum creaminess and flavor.
- Pour the freshly made coconut milk into a glass jar. Enjoy it immediately or chill it in the refrigerator. Your Homemade Coconut Milk will store well for up to five days.
Notes

Taya Bennett is the founder of YumEasyMeals, a platform dedicated to easy, delicious, and quick-to-prepare recipes for busy families. Passionate about everyday cooking, she simplifies meals with practical, accessible, and always delicious ideas.
Discover her creations at: yumeasymeals.com