As a busy chef and parent, I know the morning rush all too well. Finding a nutritious, delicious, and convenient breakfast option that satisfies everyone, from toddlers to adults, can feel like a culinary quest. That’s why I’m thrilled to share my go-to Breakfast Bar Recipe – a simple solution that transforms chaotic mornings into calm, well-fed beginnings. These bars are wonderfully soft, perfectly chewy, and boast a delightful natural sweetness that will have your family asking for more. Get ready to master the art of the perfect grab-and-go breakfast!
Why You’ll Love This Healthy Breakfast Bar Recipe
I’ve refined this recipe over countless mornings, and what makes it truly special is my unique twist that elevates these breakfast bars beyond the ordinary. I replace a quarter cup of the traditional rolled oats with hemp hearts, transforming them into a nutritional powerhouse.
- Boosted Nutrition: This simple swap with hemp hearts significantly enhances the nutritional profile. These tiny seeds are a fantastic source of plant-based complete protein and a substantial dose of beneficial omega-3 fatty acids, making each bar incredibly satiating and healthy.
- Subtle Flavor & Texture: Don’t worry, the hemp hearts don’t overpower the other flavors! They impart a wonderfully subtle nutty flavor that complements the sweetness of the jam and honey beautifully. They also contribute to the bar’s natural fiber content without negatively altering that desired soft, chewy texture.
- Quick & Easy Meal Prep: Life gets busy, and these bars are your answer. They’re perfect for healthy breakfast or satisfying snacks on hectic weekdays, simplifying your meal prep routine dramatically.
- Family-Friendly & Versatile: From school lunches to post-workout fuel, these wholesome treats appeal to all ages. They’re even fantastic for toddler food, with easy variations to suit different tastes and dietary needs, including options for nut-free, dairy-free, and low sugar diets.
- Satisfying & Delicious: With their soft, chewy texture and just the right amount of sweetness, these bars aren’t just good for you; they’re genuinely delicious and will keep you feeling full and satisfied until your next meal.
Ingredients Needed

Here’s exactly what you’ll need to create these fantastic breakfast bars in your own kitchen. Remember, I’ve designed this recipe to be straightforward and use pantry staples.
- 2 cups rolled oats
- 1/4 cup honey
- 1/4 cup peanut butter
- 1/4 cup whole wheat flour
- 1/4 cup milk (dairy or nondairy)
- 1 teaspoon vanilla
- 1/2 teaspoon cinnamon
- 1/4 teaspoon baking powder
- 2/3 cup all-fruit jam
Ingredient Notes & Substitutions
Let’s dive into some specifics for each ingredient to ensure your bars are perfect, every time.
- Rolled Oats: I always recommend using regular old-fashioned rolled oats for their texture and robust nutritional benefits, providing excellent complex carbohydrates and fiber. While you’ll be grinding them, instant oats can also be used for an even easier method, skipping the grinding step altogether! For a gluten-free option, simply use certified gluten-free rolled oats.
- Sweeteners (Honey): Honey adds a lovely natural sweetness and helps bind the bars. If you need a vegan alternative, maple syrup works beautifully as a 1:1 substitute. For very young children (under 1 year old), please avoid honey (and maple syrup due to high sugar content) and instead use mashed ripe banana or unsweetened applesauce for a naturally low sugar option that’s ideal for toddler food.
- Nut/Seed Butters (Peanut Butter): Creamy peanut butter is my go-to here, adding richness and healthy fats. However, for a nut-free version, almond butter or sunbutter are fantastic alternatives. If you’re in the UK and can’t find sunbutter, tahini or other seed butters like pumpkin seed butter can also be used for a similar consistency.
- Flour (Whole Wheat Flour): Whole wheat flour adds structure and a nutty depth while boosting the whole grain content. You can absolutely use all-purpose flour if that’s what you have on hand, or a gluten-free flour blend (look for one designed for baking) to keep the bars gluten-free.
- Milk: Whether you choose traditional dairy milk or a nondairy milk like almond, soy, or oat milk, either works perfectly, making these bars easily dairy-free if desired.
- Jam: The secret to a perfect jam layer is using a good quality, thick all-fruit jam. I love natural strawberry preserves, raspberry preserves, or even fig jam. For a less sweet bar, opt for no sugar added preserves or even whip up your own lower-sugar Chia Jam. Just ensure your chosen jam isn’t too runny, as this can make your bars soggy.
How to Make Your Own Healthy Breakfast Bars
Creating these delicious breakfast bars is a straightforward process. Follow these steps, and you’ll have a batch ready in no time!
Phase 1: Preparation
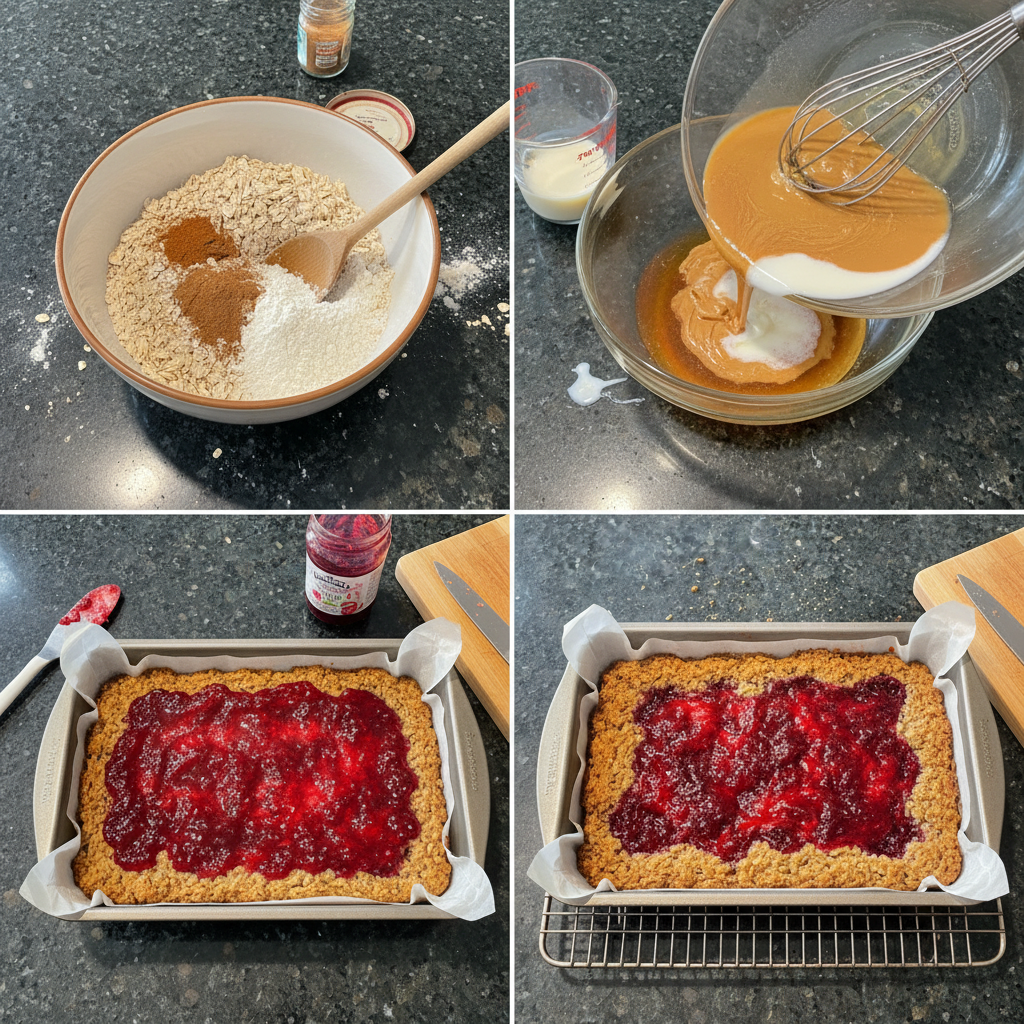
- Prep the Pan & Oven: First things first, preheat your oven to 350 degrees F (175 C). Grab an 8×8 inch baking sheet and line it with parchment paper, making sure to leave a few inches of overhang on two sides. This little trick will make lifting the finished bars out incredibly easy!
- Grind the Oats: Next, place your rolled oats into the bowl of a food processor or a blender. Blitz them until they’re ground into a coarse, flour-like consistency. This helps create that ideal soft, chewy texture.
- Warm Wet Ingredients: In a medium-sized, microwave-safe bowl, combine the honey and peanut butter. Pop it into the microwave for about 15 seconds. This slight warming helps them become more fluid and easier to mix evenly.
Phase 2: Mixing & Assembling
- Combine Dough Ingredients: To the bowl with the warmed peanut butter and honey, add your ground oats, whole wheat flour, milk, vanilla extract, cinnamon, and baking powder. Stir everything together until well combined. Sometimes, I find it easiest to switch to clean hands to truly bring the dough together. You’re looking for a thick, cookie dough-like texture that holds together when you press it between your fingers. If the mixture seems a little crumbly, add a tablespoon or two of water or nondairy milk until it comes together.
- Reserve Topping: Carefully set aside 3/4 cup of this delicious batter. This will become your crumble topping!
- Press Base Layer: Take the remaining batter and press it evenly into the bottom of your prepared baking pan. For an even easier process, I sometimes roll the crust out between two sheets of parchment paper first before transferring it to the pan; it makes compressing it so much simpler.
- Spread Jam Layer: Now, evenly spread your chosen all-fruit jam over the base layer. Remember, make sure your jam or preserves aren’t too runny to avoid a soggy middle!
- Crumble Topping: Take the reserved dough and crumble it over the jam layer. Gently press it down slightly to secure it.
Phase 3: Baking & Cooling
- Bake to Perfection: Place your pan in the preheated oven and bake for 22-24 minutes. You’ll know they’re done when the edges are lightly golden brown and the jam is bubbling slightly. Once baked, remove them from the oven and, this is crucial for neat slices, let them cool completely in the pan. To speed up the cooling process, you can stick the pan into the fridge.
- Slice & Serve: Once fully cooled, use the parchment paper overhang to lift the entire slab of bars out of the pan. Place on a cutting board and slice into your desired bar size. Enjoy your homemade, healthy breakfast bars!
Customizing Your Breakfast Bars: Vegan & Allergy-Friendly Swaps
One of the best things about this Breakfast Bar Recipe is how adaptable it is. Whether you’re navigating allergies or dietary preferences, I’ve got you covered.
Making Your Bars Vegan
Achieving a delicious vegan breakfast bar is simple with a few key substitutions:
- Sweetener Swap: Easily replace the honey with an equal amount of maple syrup. Both provide a lovely sweetness and help with binding.
- Milk Choice: Ensure you’re using a nondairy milk alternative, such as almond, soy, or oat milk, which is already noted as an option in the ingredient list.
- Butter Alternative: Confirm that your chosen peanut butter (or almond butter/sunbutter) is plant-based and free from any animal-derived ingredients. Most common brands are, but it’s always good to double-check!
- Overall Guidance: With these easy swaps, you’ll have a delightful, entirely vegan batch of breakfast bars ready to enjoy.
Adapting for Allergies & Diets
- Nut-Free: To make these bars completely nut-free, simply swap the peanut butter for sunbutter or another seed butter like tahini or pumpkin seed butter.
- Gluten-Free: Achieving gluten-free status is straightforward. Make sure to use certified gluten-free rolled oats and a reliable gluten-free whole wheat flour blend. These are readily available in most grocery stores.
- Low Sugar: For a low sugar option, I highly recommend using no sugar added preserves for your jam layer. You can also further reduce the primary sweetener (honey/maple syrup) or swap it for mashed fruit like banana or unsweetened applesauce, especially when making them for younger children.
Perfecting Your Bars: Troubleshooting & Pan Size Guide
Even for experienced bakers, sometimes things don’t go exactly as planned. Here’s how to troubleshoot common issues and adapt this Breakfast Bar Recipe for different pan sizes.
Troubleshooting Common Issues
- Dry or Crumbly Dough: If your dough feels too dry and isn’t holding together well, don’t fret! Simply add a tablespoon or two of water or nondairy milk, mixing until it reaches that desired thick, cookie dough-like texture that easily presses together.
- Overly Wet Dough: On the flip side, if your dough seems too sticky or wet, add a tablespoon or two more of your ground rolled oats or whole wheat flour until the consistency is just right.
- Jam Too Runny: A common pitfall can be a soggy jam layer. Always opt for a thicker all-fruit jam or preserves. If your jam seems thin, you can gently simmer it on the stovetop for a few minutes to thicken it before spreading.
- Sticking to the Pan: This is easily avoided! Always ensure you line your 8×8 inch baking sheet with parchment paper, leaving an overhang, as specified in the instructions. This guarantees effortless removal.
Adapting for Different Baking Pan Sizes
This recipe is perfectly scaled for an 8×8 inch baking sheet, producing wonderfully thick and chewy bars. Here’s how to adjust for other common pan sizes:
- 8×8 Inch Pan: This recipe is specifically designed for an 8×8 inch baking sheet, giving you perfectly sized, substantial bars.
- 9×9 Inch Pan: If you’re using a 9×9 inch pan, your bars will naturally be a bit thinner. The baking time might also be a few minutes shorter, so keep a close eye on them. For a similar thickness to the 8×8 bars, I recommend increasing all ingredients by about 1.25x.
- 9×13 Inch Pan: For a standard 9×13 inch pan, which is significantly larger, you’ll want to double the entire recipe to achieve a good, satisfying bar thickness. When doubling, adjust your baking time accordingly; it will likely be longer, typically around 28-32 minutes, but always check for golden edges and a firm set.
Pro Tips & Variations
As a chef, I love sharing those little nuggets of wisdom that make a good recipe great. Here are my top tips and some delicious ideas to customize your breakfast bars!
Pro Tips for Success
- Parchment Paper Trick: My secret to a perfectly even crust? After combining your base layer dough, roll it out between two pieces of parchment paper to your pan’s dimensions. Then, simply peel off the top layer and invert the dough into your prepared pan. It makes compressing the crust so much easier and more uniform!
- Jam Selection: For ultimate flavor and less added sugar, actively seek out no sugar added preserves. Also, be mindful of the jam’s consistency; a thicker jam will prevent a soggy middle and hold its place beautifully.
- Oat Preparation: While grinding rolled oats gives a fine crumb, if you’re really short on time, you can absolutely use instant oats directly. This skips the food processor step without much compromise on taste, though the texture will be slightly different.
- Enhancing the Twist: To truly bring out that lovely nutty flavor from the hemp hearts (my unique twist!), lightly toast them in a dry skillet for a few minutes before adding them to your dough mixture. Just be careful not to burn them!
- Even Baking: For uniform golden-brown edges across all your bars, rotate the pan halfway through the baking process.
- Cooling Completely: Patience is key! Seriously, emphasizing the importance of letting cool completely in the pan before slicing cannot be overstated. Rushing this step will result in crumbly, uneven bars. Sticking them in the fridge helps speed this up considerably.
Delicious Flavor Variations
- Jam Swaps: Get creative with your jam! Besides natural strawberry preserves and raspberry preserves, consider a vibrant fig jam, a tangy apricot preserve, or even leftover cranberry sauce during the holidays. For a less sweet, nutrient-dense option, making your own lower-sugar Chia Jam is fantastic.
- Fruity Additions: Instead of, or in addition to, jam, fold in fresh or frozen berries like blueberries, chopped strawberries, or raspberries into the base dough for bursts of fruity goodness.
- Sweet Toppings: After baking and cooling, elevate your bars with a delightful drizzle! A chocolate chip layer can be pressed into the top before baking, or for a decadent touch, drizzle with melted peanut butter or even a little Nutella once the bars are completely cool.
- Spiced Alternatives: Embrace warm flavors by adding an extra pinch of cinnamon, or a touch of nutmeg, cardamom, or ginger to the dough for a fragrant spice blend.
Serving & Storage
These breakfast bars are incredibly versatile, perfect for quick mornings or thoughtful meal prep. Here’s how I like to serve them and keep them fresh.
Perfect Serving Ideas
- Classic Pairings: My family loves these bars with a simple glass of milk, whether it’s dairy or your favorite nondairy milk.
- Toddler-Friendly: For little ones, pair a smaller portion of the bar with a colorful toddler smoothie for a complete and balanced healthy breakfast or filling snack. For another fantastic meal prep option, consider our chewy healthy granola recipe.
- Temperature Matters: I find that serving them at room temperature rather than chilled often results in a softer, more enjoyable texture and allows their flavors to shine.
- On-the-Go: Their individual bar shape makes them the ultimate grab-and-go option. Pack them in lunchboxes, toss them in your gym bag, or take them for a quick bite during your commute.
Storage and Make-Ahead Tips
These bars are fantastic for meal prep, making your week a little bit easier.
- How to Store: Once completely cooled, slice the breakfast bars and store them in an airtight container.
- Refrigeration: They will keep beautifully in the refrigerator for up to 5-7 days, making them perfect for your weekly breakfast rotation.
- Freezing: For longer storage, these bars freeze exceptionally well. Wrap individual bars tightly in plastic wrap, then place them in a freezer-safe bag or container. They’ll stay fresh for up to 3 months.
- Thawing & Reheating: To enjoy from frozen, simply thaw them at room temperature for an hour or two, or pop them in the microwave for 15-30 seconds for a quick warm bite.
FAQ
I get a lot of questions about these bars, so I’ve compiled answers to the most common ones to help you master this recipe!
- Q: Can I use other nut butters or seed butters?
A: Yes, absolutely! Almond butter or sunbutter are excellent substitutes for peanut butter, making the recipe versatile and easily nut-free. - Q: What kind of jam is best for these breakfast bars?
A: Thick all-fruit jam or preserves work best to prevent a soggy layer. Options like natural strawberry preserves, raspberry preserves, fig jam, or even a homemade lower-sugar Chia Jam are great. For a healthier option, always use no sugar added preserves. - Q: How do I make these breakfast bars nut-free, gluten-free, or vegan?
A: For nut-free, use sunbutter or another seed butter. For gluten-free, ensure you use certified gluten-free rolled oats and a gluten-free whole wheat flour blend. For vegan, substitute honey with maple syrup, and ensure you use nondairy milk and a plant-based nut or seed butter. - Q: What can I use instead of honey or maple syrup for younger babies?
A: For babies under 1 year, avoid honey (and maple syrup due to high sugar content). Instead, use mashed ripe banana or unsweetened applesauce for natural sweetness, which are perfect for low sugar and toddler food concepts. - Q: How should I store these breakfast bars, and how long will they last?
A: Store the breakfast bars in an airtight container in the refrigerator for 5-7 days, or freeze them for up to 3 months. - Q: What do I do if my dough is too dry or too wet?
A: If the dough is too dry, add a tablespoon or two of water or nondairy milk until it holds together. If it’s too wet, add a tablespoon or two more of ground rolled oats or whole wheat flour until you achieve a thick, cookie dough-like consistency. - Q: Can I skip the jam? What would be a good substitute?
A: Yes, you can skip the jam layer. Good substitutes include a thin layer of mashed fresh berries, pressing in a chocolate chip layer before baking, or a simple drizzle of melted peanut butter or Nutella after the bars have cooled. - Q: What if I don’t have a food processor?
A: While a food processor makes grinding oats easy, you can use pre-ground oat flour if available, or simply use instant oats directly. If using whole rolled oats without grinding, the texture of your bars will be noticeably chewier, but still delicious! - Q: Can I adapt this recipe for different baking pan sizes?
A: Yes, this recipe is perfectly scaled for an 8×8 inch baking sheet. For a 9×9 inch pan, the bars will be thinner. If you’re using a 9×13 inch pan, I recommend doubling the recipe ingredients and adjusting the baking time to about 28-32 minutes to maintain a good thickness.

Healthy Breakfast Bar Recipe: Easy, Chewy & Omega-3 Rich!
Ingredients
Equipment
Method
- Preheat your oven to 350 degrees F (175 C). Line an 8x8 inch baking sheet with parchment paper, leaving a few inches of overhang on two sides.
- Place your rolled oats into the bowl of a food processor or a blender. Blitz them until they're ground into a coarse, flour-like consistency.
- In a medium-sized, microwave-safe bowl, combine the honey and peanut butter. Microwave for about 15 seconds to warm them until more fluid.
- To the bowl with the warmed peanut butter and honey, add your ground oats, hemp hearts, whole wheat flour, milk, vanilla extract, cinnamon, and baking powder. Stir everything together until well combined. If the mixture seems a little crumbly, add a tablespoon or two of water or nondairy milk until it comes together into a thick, cookie dough-like texture.
- Carefully set aside 3/4 cup of this delicious batter to use as your crumble topping.
- Press the remaining batter evenly into the bottom of your prepared baking pan.
- Evenly spread your chosen all-fruit jam over the base layer, ensuring it's not too runny.
- Take the reserved dough and crumble it over the jam layer, then gently press it down slightly to secure it.
- Place your pan in the preheated oven and bake for 22-24 minutes, until the edges are lightly golden brown and the jam is bubbling slightly. Remove from the oven and let them cool completely in the pan. To speed up cooling, you can place the pan in the fridge.
- Once fully cooled, use the parchment paper overhang to lift the entire slab of bars out of the pan. Place on a cutting board and slice into your desired bar size. Enjoy!
Notes

Taya Bennett is the founder of YumEasyMeals, a platform dedicated to easy, delicious, and quick-to-prepare recipes for busy families. Passionate about everyday cooking, she simplifies meals with practical, accessible, and always delicious ideas.
Discover her creations at: yumeasymeals.com