There’s nothing quite like the irresistible appeal of homemade gorditas. That moment when you bite through a lightly crisp outer crust, into a tender, yielding interior, and discover a pocket bursting with savory, perfectly seasoned filling – it’s pure culinary joy. As a professional chef and lifelong lover of authentic Mexican and Tex-Mex flavors, I can tell you that these Ground Beef Gorditas are more than just a meal; they’re an antojito, a little craving-satisfier that brings warmth and flavor to any table. Whether you’re a seasoned cook or just starting your culinary journey, this recipe promises a straightforward path to mastering this beloved dish, complete with all my expert tips and a unique twist that guarantees the juiciest, most flavorful ground beef filling you’ve ever tasted. Get ready for a truly satisfying cooking experience!
Why You’ll Love This Recipe
In my kitchen, flavor and texture are paramount, and this recipe for Ground Beef Gorditas truly delivers on both. Here’s why I know you’ll adore it:
The Secret to the Juiciest Ground Beef Filling: This recipe truly stands out with our special technique of adding 1/4 cup of finely diced red bell pepper and a splash (1/4 cup) of unsalted beef broth to the ground beef filling during the simmering stage. It’s a simple addition that makes all the difference!
Flavor & Texture Elevation: The red bell pepper introduces a subtle sweetness, a fresh aromatic depth, and a vibrant pop of color, significantly improving the overall flavor profile. The beef broth is a game-changer; it adds essential moisture, preventing the ground beef from drying out, and allows all the spices to bloom and meld into a richer, more cohesive sauce. The result? An incredibly juicy, umami-packed filling that perfectly complements the tender masa.
Family-Friendly & Satisfying: These Ground Beef Gorditas are a guaranteed crowd-pleaser, perfect for lively family dinners or entertaining friends. They’re hearty, comforting, and offer a deeply satisfying meal that everyone will ask for again and again.
Authentic Taste, Approachable Method: While the flavors are authentically Mexican, I’ve designed these steps to be approachable for home cooks of all skill levels. You can achieve an authentic taste with confidence, ensuring a successful and delicious outcome every time.
Ingredients Needed
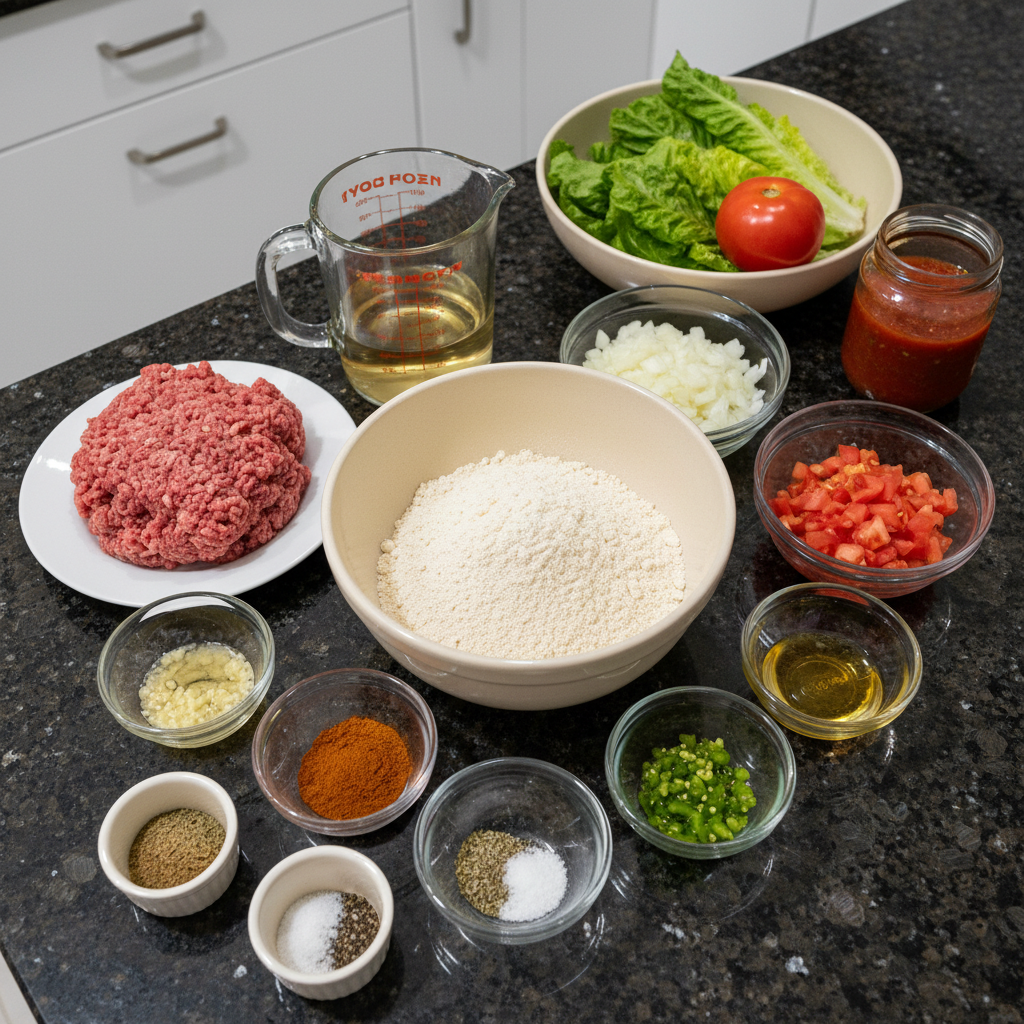
Here’s everything you’ll need to create these incredible Ground Beef Gorditas in your own kitchen:
- For ground beef:
- 1 tablespoon oil
- 1/2 medium yellow onion (diced)
- 1 small roma tomato (diced)
- 2 garlic cloves (minced)
- 1 serrano chile (sliced, stem removes and finely minced)
- 1 pound ground beef
- 2 teaspoons salt
- 1 teaspoon pepper
- 1 teaspoon chili powder
- 1 teaspoon ground cumin
- 1 teaspoon oregano
- 1/4 cup finely diced red bell pepper
- 1/4 cup unsalted beef broth
- For gorditas:
- 2 cups masa harina (Maseca)
- 1 1/2 cups to 2 cups warm water
- 1 teaspoon salt
- oil
- For serving:
- Lettuce
- Tomato
- Salsa
Ingredient Notes & Substitutions
Ground Beef: For the most flavorful and juicy filling, I recommend using 80/20 ground beef. The fat renders beautifully during browning, contributing to the rich Maillard reaction and ensuring a moist, tender result. If you prefer a leaner option, 90/10 ground beef can be used, but you might find it needs a slightly larger splash of beef broth or oil to maintain its juiciness.
Masa Harina: This is the star of our gordita dough! Masa harina is a special nixtamalized corn flour, which is naturally gluten-free. It’s crucial for achieving that authentic texture. You’ll typically find brands like Maseca in the Hispanic foods aisle of most major grocery stores in the US.
Oil: For both sautéing the filling and pan-frying the gorditas, a neutral-flavored oil like vegetable oil, canola oil, or even avocado oil works perfectly. These won’t overpower the delicate flavors of the masa or the robust ground beef.
Serrano Chile: This chile provides a fantastic, bright heat. If you prefer a milder kick, a jalapeño makes an excellent substitution, just be sure to remove the seeds and membranes for even less heat.
Onion: Both white or yellow onion can be used interchangeably in this recipe, depending on your personal preference for their subtle differences in sweetness and pungency.
Red Bell Pepper & Beef Broth: These are the unique twist ingredients that elevate our ground beef filling. Don’t skip them! They are key to creating an exceptionally juicy and deeply flavorful experience.
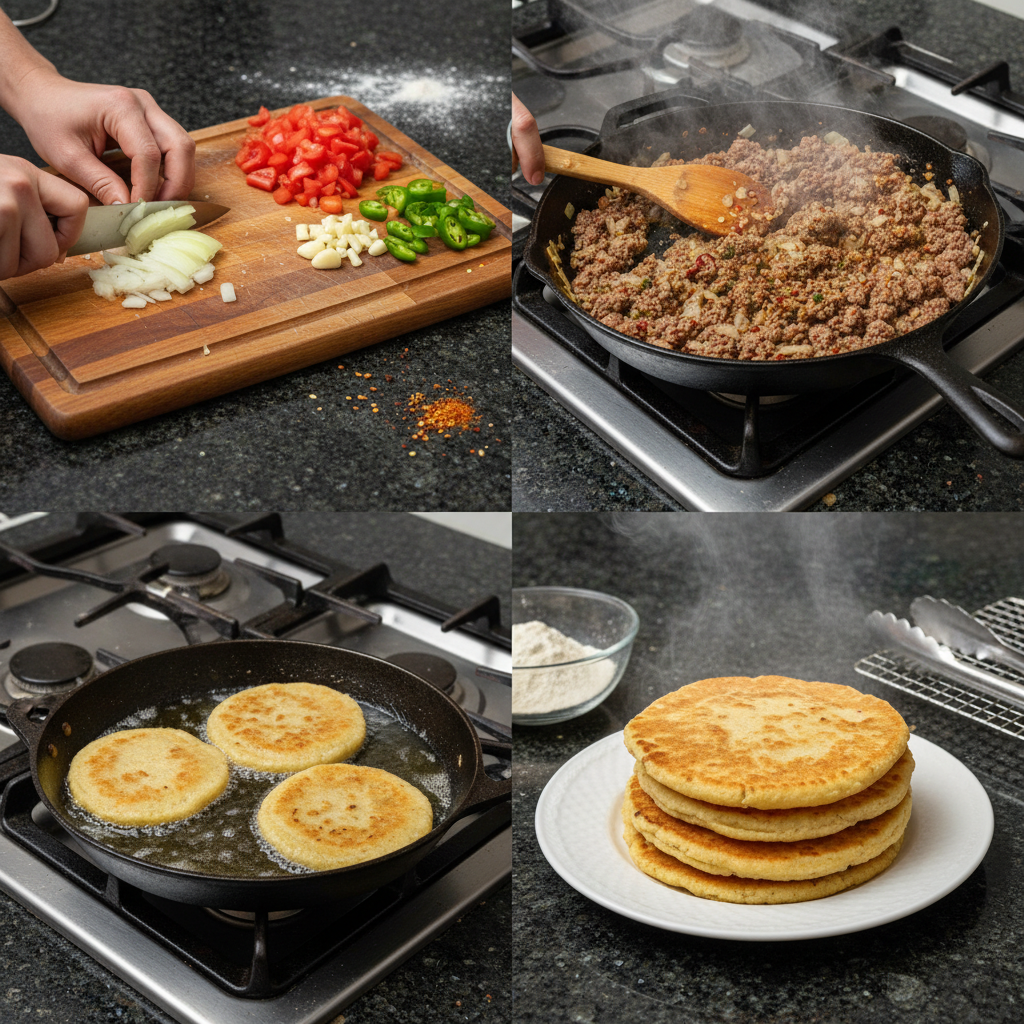
How to Make Ground Beef Gorditas
Let’s get cooking! Follow these steps to create perfectly tender gorditas with a rich, savory filling.
Making the Flavorful Ground Beef Filling
- Sauté Aromatics: In a large skillet, heat 1 tablespoon of oil over medium-high heat. Add the diced yellow onion and sauté for about 3 minutes until it becomes light, translucent, and wonderfully fragrant.
- Add Flavor Base: Stir in the diced roma tomato, minced garlic cloves, and finely minced serrano chile. Continue cooking for an additional 3 minutes, stirring occasionally, until the garlic is aromatic and the vegetables start to soften.
- Brown the Beef: Add the 1 pound of ground beef to the skillet, breaking it up with a spoon. Cook until the beef is no longer pink and is fully cooked through, ensuring a good browning for deep, rich flavor from the Maillard reaction. If using a higher fat content beef, you may drain excess fat at this point.
- Simmer with Spices & Twist: Reduce the heat to low. Add salt, pepper, chili powder, ground cumin, and oregano. Stir to combine. *Now, incorporate our unique twist:* Stir in the 1/4 cup of finely diced red bell pepper and 1/4 cup of unsalted beef broth. Stir everything together and allow the mixture to simmer for 5 minutes. This crucial step allows the spices to bloom, the broth to infuse moisture, and all the flavors to meld into a rich, juicy, and cohesive sauce.
Preparing the Perfect Masa Dough
- Combine Dry Ingredients: In a large mixing bowl, combine the 2 cups of masa harina (Maseca) and 1 teaspoon of salt.
- Form the Dough: Slowly add 1 1/2 cups of warm water to the masa harina, beginning to mix with your hands to create a dough. Remember, warm (not boiling) water makes mixing easier and aids in hydration. If the dough feels dry or crumbly, which is a common issue, gradually add more warm water, a tablespoon at a time, mixing with your hands until the dough comes together into a soft, pliable, and smooth consistency that doesn’t stick to your hands. It should feel like play-dough and hold its shape. This proper hydration of masa dough is crucial for the final texture.
- Shape Dough Balls: Divide the dough evenly into 8 balls of approximately equal size. Place them on a baking sheet and immediately cover them with a moist kitchen towel or moist paper towels. This vital step prevents the masa dough from drying out and cracking, keeping it pliable for shaping dough.
Shaping and Cooking Your Gorditas
- Heat Cooking Surface: Heat a comal or a large skillet over medium-high heat.
- Press Gorditas: Line a tortilla press or a large, flat glass/plate with plastic film (e.g., a cut-open zip-top bag). Place one masa ball in the center. Gently press down to form your gordita. The gordita should be thicker than a standard corn tortilla, about 3-4 inches in diameter, and approximately 1/4 inch thick. This pressing dough technique creates the perfect vessel for our filling.
- Prepare Remaining Gorditas: Carefully remove the shaped gordita from the press and return it to the baking sheet, covering it again with the moist towel. Continue shaping dough for the remaining gorditas.
- Cook Gorditas: Drizzle the hot comal or skillet with about 1 tablespoon of oil. Place the shaped gorditas on the hot surface a few at a time, ensuring not to overcrowd the pan. Cook for about 2 minutes, then flip and continue cooking for an additional 3 minutes, until light brown spots appear on both sides and the gordita slightly puffs up, indicating it’s cooked through and has developed a delicious light crisp outer crust from pan-frying.
- Keep Warm: Remove the cooked gorditas, place them on a plate, and cover them with a clean kitchen towel to keep them warm and pliable. Continue cooking any remaining gorditas, adding the remaining 1 tablespoon of oil if needed to prevent sticking.
Stuffing and Serving
- Create the Pocket: Carefully, using a knife (or a butter knife for safety), cut a slit down the side of each warm gordita to create a pocket. Be gentle to avoid cutting all the way through the edges.
- Fill and Serve: Generously fill each gordita pocket with the warm, juicy ground beef filling, fresh shredded lettuce, and diced tomato. Serve immediately with your favorite salsa.
Prep, Cook Time & Yield + Cooking Methods Compared
Understanding the timing and cooking options for these Ground Beef Gorditas will help you plan your meal perfectly.
Prep, Cook Time & Yield
- Prep time: Approximately 20 minutes (includes chopping vegetables and preparing the masa dough).
- Cook time: Approximately 30-35 minutes (about 15 minutes for the beef filling, 15-20 minutes for cooking the gorditas).
- Total time: Approximately 50-55 minutes.
- Yield/Serving size: This recipe yields approximately 8 gorditas, which typically serves 4 people (2 gorditas per person).
Comal vs. Deep Fry: Mastering Gordita Texture
The cooking method greatly influences the final texture of your gorditas. Here’s a comparison:
Comal or Skillet (Pan-Frying): This is the primary method used in this recipe, and my preferred way for everyday gorditas. Pan-frying creates a gordita with a lightly crisp, golden-brown exterior and a tender, slightly chewy interior. This method uses minimal oil, making it a healthier and easier option for home cooks, delivering a satisfying texture without excessive oiliness. It’s ideal for allowing the natural masa flavor to shine through.
Deep-Frying (Optional for Extra Crispness): Deep-frying gorditas yields a distinctly puffier, more hollow, and exceptionally crispy shell, a texture often associated with street food gorditas. While not used in this recipe, it’s a popular variation for those seeking a richer, more indulgent texture. If you choose this method, heat oil to 350-375°F and fry until golden brown. However, rest assured, you do not have to deep fry gorditas for delicious results; pan-frying is perfectly sufficient!
Pro Tips & Troubleshooting
Even experienced chefs encounter challenges, so I’ve compiled my best advice to ensure your Ground Beef Gorditas are a resounding success every time.
Pro Tips for Perfect Ground Beef Gorditas
- Fully Cook Your Filling First: Always ensure your ground beef filling is fully cooked and ready before you begin shaping and frying your gorditas. This prevents overcooking the masa while waiting for the filling, ensuring both components are perfect.
- Keep Masa Dough Moist: This is crucial! Always keep your uncooked masa dough balls covered with a moist kitchen towel (or moist paper towels) to prevent them from drying out and cracking. A moist dough leads to pliable, perfectly cooked gorditas that won’t fall apart.
- Safe Slicing for Pockets: When creating the pocket, especially if this is your first time, use a butter knife rather than a sharp knife on warm gorditas. They can be steamy inside, and a duller blade helps prevent accidental cuts while safely making a clean slit.
- Comal Alternatives: If you don’t own a comal, a large, heavy-bottomed skillet (cast iron is excellent) works just as effectively for cooking gorditas. If you used it for the beef, simply wipe it clean before frying the masa.
- Optimal Masa Water Temperature: For the easiest mixing and best dough consistency, use warm water (warmed in the microwave until warm to the touch, not boiling) when preparing your masa dough. This helps the masa harina hydrate properly.
- Embrace the Twist: Don’t skip the red bell pepper and beef broth in your ground beef filling! This unique twist is key to its unparalleled juiciness and depth of flavor.
Common Mistakes to Avoid & How to Fix Them
- Dry, Crumbly Masa Dough: This is a top common mistake. If your masa dough feels too dry or crumbly after mixing, it needs more hydration. Add warm water one tablespoon at a time, kneading thoroughly after each addition until the dough becomes soft, pliable, and smooth.
- Sticky Masa Dough: Conversely, if your masa dough is too sticky and difficult to handle, add a tablespoon of masa harina at a time, kneading it in until the dough reaches the right non-sticky, pliable consistency.
- Gorditas Not Puffing/Cooking Evenly: Ensure your comal or skillet is preheated to medium-high heat. Overcrowding the pan can lower the temperature, leading to uneven cooking. Proper dough consistency and thickness are also vital for a slight puff while cooking gorditas.
- Slicing Hot Gorditas Without Caution: Always be careful when slicing warm gorditas. The steam inside can be hot. Use a secure grip and a butter knife for added safety.
- Overfilling the Gordita Pocket: While tempting, resist the urge to overstuff your gorditas. A moderate amount of filling allows the gordita to hold its shape better and is easier to eat.
Serving & Storage
Once your Ground Beef Gorditas are ready, you’ll want to enjoy them at their best. Here’s how to serve them and keep any leftovers.
Delicious Serving Ideas
- Classic Accompaniments: Serve your Ground Beef Gorditas immediately with traditional fresh shredded lettuce, diced tomato, and your favorite salsa (verde or roja). These fresh elements provide a lovely counterpoint to the rich filling.
- Elevated Toppings: Take your gorditas to the next level with additional toppings like a dollop of cool Mexican crema (or sour cream), crumbled cotija cheese or queso fresco, a sprinkle of fresh cilantro, diced avocado or guacamole, or pickled red onions. A squeeze of fresh lime juice can also brighten all the flavors beautifully. These must-try toppings and accompaniments add layers of taste and texture.
- Complete the Meal: For a truly satisfying spread, serve your gorditas alongside classic Mexican side dishes such as refried beans, Mexican rice, or a simple crisp salad.
- Drink Pairings: Pair these savory antojitos with refreshing beverages like aguas frescas, Mexican sodas, or for adults, a crisp lager or a classic margarita.
Storage and Make-Ahead Tips
- Storing Cooked Gorditas (Unfilled): Allow cooked gorditas to cool completely. Store them unfilled in an airtight container at room temperature for up to 1 day, or in the refrigerator for up to 3-4 days. Storing them unfilled helps maintain their texture and prevents sogginess.
- Storing Leftover Ground Beef Filling: Transfer any leftover ground beef filling to an airtight container and refrigerate for up to 3-4 days.
- Reheating Gorditas: To reheat cooked gorditas, warm them on a dry comal or skillet over medium heat for 2-3 minutes per side until heated through and slightly crispy. You can also warm them in a preheated oven at 350°F (175°C) for 5-7 minutes, or in an air fryer at 350°F for 3-5 minutes, until hot and refreshed.
- Reheating Ground Beef Filling: Gently reheat the ground beef filling in a skillet over medium-low heat, adding a splash of water or beef broth if it appears dry, until it is thoroughly warmed through.
- Freezing Cooked Gorditas (Unfilled): Cooked and unfilled gorditas can be frozen for longer storage. Once completely cooled, wrap each gordita individually in plastic wrap, then place them in a freezer-safe bag or container. They can be stored for up to 1 month. Thaw overnight in the refrigerator before reheating as instructed above.
- Freezing Masa Dough: Freezing raw masa dough is generally not recommended as it can negatively alter the texture and consistency upon thawing. It is best to prepare the dough fresh for optimal results.
Conclusion
There’s immense satisfaction in creating something delicious from scratch, and these homemade Ground Beef Gorditas are no exception. I truly believe you’ll be delighted by the flavor and texture of these antojitos, especially with our unique twist that ensures an exceptionally juicy and deeply flavorful ground beef filling. Mastering these thick masa pockets is entirely achievable, even for beginners, thanks to the clear instructions and helpful tips I’ve shared. Don’t hesitate to experiment with different variations or explore new serving ideas to make them your own. I encourage you to print this recipe, share your culinary creations with loved ones, and perhaps explore other Mexican-inspired dishes right here on the blog! Happy cooking!
Frequently Asked Questions about Ground Beef Gorditas
What is a gordita and how is it different from a tortilla?
A gordita (Spanish for “little fat one”) is a thick, small corn cake made from masa harina, similar to a tortilla but much thicker. The key difference is its thickness, which allows it to be cut open to form a pocket, perfect for stuffing with savory fillings, unlike a thin tortilla used for wrapping.
What ingredients are essential for making ground beef gorditas?
The core ingredients are masa harina for the dough and ground beef for the filling. Key aromatics include yellow onion, roma tomato, garlic cloves, serrano chile, and Mexican spices like chili powder, ground cumin, and oregano. Our recipe also highlights the essential red bell pepper and beef broth for an exceptionally juicy filling.
Can I make gorditas without a comal or tortilla press?
Absolutely! A large skillet (like cast iron) works perfectly in place of a comal. If you don’t have a tortilla press, you can use a large, flat glass or plate to press the masa balls, or simply hand-shape them to the desired thickness.
How do you make the perfect masa dough for gorditas?
The key is proper hydration of masa dough. Use warm water (not hot) and knead the masa harina until it forms a soft, pliable, and non-sticky dough. Always keep the dough covered with a moist kitchen towel to prevent it from drying out, which can lead to crumbly gorditas.
What are the best tips for cooking and stuffing gorditas?
Cook gorditas on a medium-high comal or skillet with a little oil until golden spots appear. When warm, carefully use a knife (or butter knife for safety) to cut a slit, creating a pocket. Fill generously with the ground beef and your favorite toppings immediately.
How should I store and reheat leftover ground beef gorditas?
Store cooked, unfilled gorditas and leftover ground beef filling separately in airtight containers in the refrigerator for 3-4 days. Reheat gorditas on a dry comal or skillet until warm and slightly crisp, or in an oven/air fryer. Reheat the beef filling gently in a skillet, adding a splash of broth if needed.
What kind of meat goes in gorditas?
While ground beef is very popular, gorditas are incredibly versatile. They can be stuffed with carne guisada, carne asada, barbacoa, pastor, eggs, beans, or cheese, making them suitable for any meal from breakfast to dinner.
What is masa harina and where can I buy it?
Masa harina is a traditional corn flour made from dried corn kernels that have been cooked and steeped in a lime (calcium hydroxide) solution, then ground. This process (nixtamalization) makes it perfect for making tortillas, gorditas, and tamales. You can typically find brands like Maseca in the Hispanic foods aisle of most major grocery stores in the US.
Do gorditas have to be fried?
No, gorditas do not have to be deep-fried. While deep-frying is an option for an extra crispy texture, our recipe uses pan-frying on a comal or skillet with a small amount of oil. This traditional method still achieves a delicious, lightly crisp exterior and tender interior without excessive oil.

Homemade Ground Beef Gorditas: Juiciest Filling Ever
Ingredients
Equipment
Method
- In a large skillet, heat 1 tablespoon of oil over medium-high heat. Add the diced yellow onion and sauté for about 3 minutes until it becomes light, translucent, and wonderfully fragrant.
- Stir in the diced roma tomato, minced garlic cloves, and finely minced serrano chile. Continue cooking for an additional 3 minutes, stirring occasionally, until the garlic is aromatic and the vegetables start to soften.
- Add the 1 pound of ground beef to the skillet, breaking it up with a spoon. Cook until the beef is no longer pink and is fully cooked through, ensuring a good browning for deep, rich flavor. If using a higher fat content beef, you may drain excess fat at this point.
- Reduce the heat to low. Add salt, pepper, chili powder, ground cumin, and oregano. Stir to combine. Now, incorporate our unique twist: Stir in the 1/4 cup of finely diced red bell pepper and 1/4 cup of unsalted beef broth. Stir everything together and allow the mixture to simmer for 5 minutes. This crucial step allows the spices to bloom, the broth to infuse moisture, and all the flavors to meld into a rich, juicy, and cohesive sauce.
- In a large mixing bowl, combine the 2 cups of masa harina (Maseca) and 1 teaspoon of salt.
- Slowly add 1 1/2 cups of warm water to the masa harina, beginning to mix with your hands to create a dough. If the dough feels dry or crumbly, gradually add more warm water, a tablespoon at a time, mixing with your hands until the dough comes together into a soft, pliable, and smooth consistency that doesn't stick to your hands.
- Divide the dough evenly into 8 balls of approximately equal size. Place them on a baking sheet and immediately cover them with a moist kitchen towel or moist paper towels.
- Heat a comal or a large skillet over medium-high heat.
- Line a tortilla press or a large, flat glass/plate with plastic film (e.g., a cut-open zip-top bag). Place one masa ball in the center. Gently press down to form your gordita. The gordita should be thicker than a standard corn tortilla, about 3-4 inches in diameter, and approximately 1/4 inch thick.
- Carefully remove the shaped gordita from the press and return it to the baking sheet, covering it again with the moist towel. Continue shaping dough for the remaining gorditas.
- Drizzle the hot comal or skillet with about 1 tablespoon of oil. Place the shaped gorditas on the hot surface a few at a time, ensuring not to overcrowd the pan. Cook for about 2 minutes, then flip and continue cooking for an additional 3 minutes, until light brown spots appear on both sides and the gordita slightly puffs up.
- Remove the cooked gorditas, place them on a plate, and cover them with a clean kitchen towel to keep them warm and pliable. Continue cooking any remaining gorditas, adding the remaining 1 tablespoon of oil if needed to prevent sticking.
- Carefully, using a knife (or a butter knife for safety), cut a slit down the side of each warm gordita to create a pocket. Be gentle to avoid cutting all the way through the edges.
- Generously fill each gordita pocket with the warm, juicy ground beef filling, fresh shredded lettuce, and diced tomato. Serve immediately with your favorite salsa.
Notes

Taya Bennett is the founder of YumEasyMeals, a platform dedicated to easy, delicious, and quick-to-prepare recipes for busy families. Passionate about everyday cooking, she simplifies meals with practical, accessible, and always delicious ideas.
Discover her creations at: yumeasymeals.com